Introduction to Git and GitHub
Git is a distributed version control system that allows you to track changes in your code and collaborate with others. GitHub is a cloud-based platform that hosts Git repositories, making it easier to share and collaborate on projects. Version control using Git is the most reasonable way to keep track of changes in code, manuscripts, presentations, and data analysis projects.
Why Use GitHub in Bioinformatics?
- Version Control: Track changes in scripts, pipelines, and documentation.
- Collaboration: Work with peers and share your work with the community.
- Reproducibility: Maintain a history of your analyses for reproducibility.
- Integration: Connect with other tools and platforms used in bioinformatics.
Why Version Control?
Version control is essential in creating any project that takes longer than 5 minutes to complete. Even if your memory is longer than 5 minutes, next month you are not likely to be able to retrace your steps.
How Git Works: The Big Picture
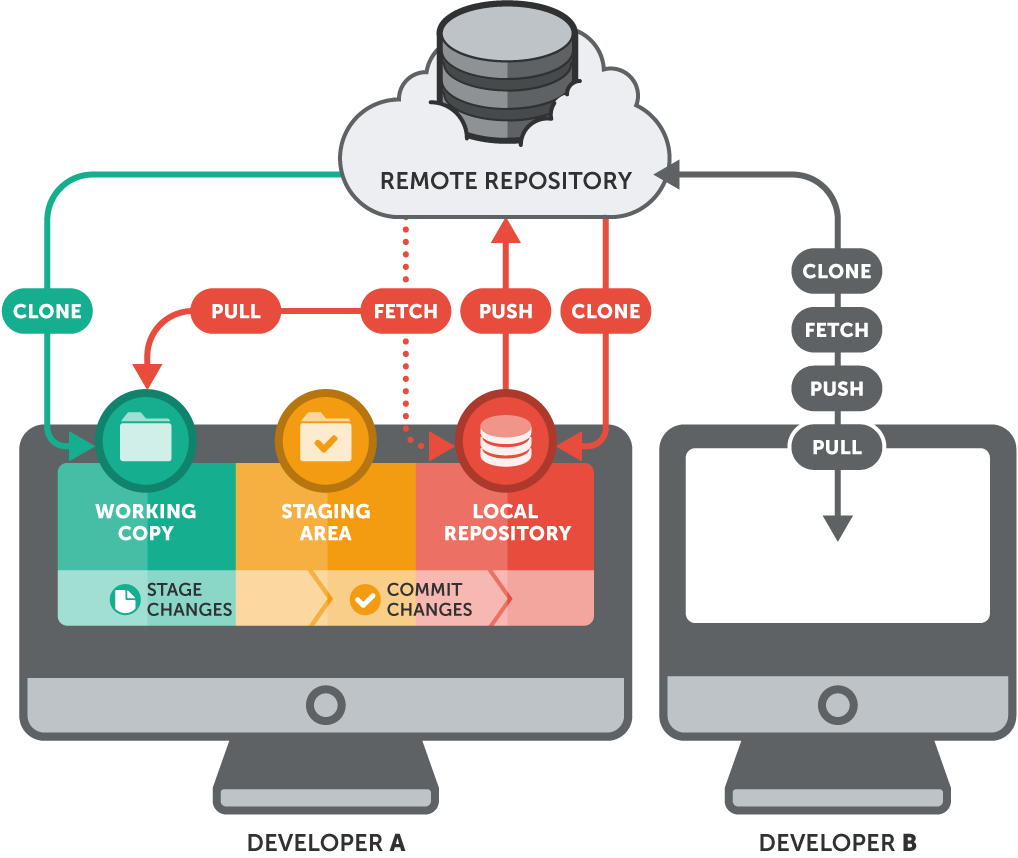
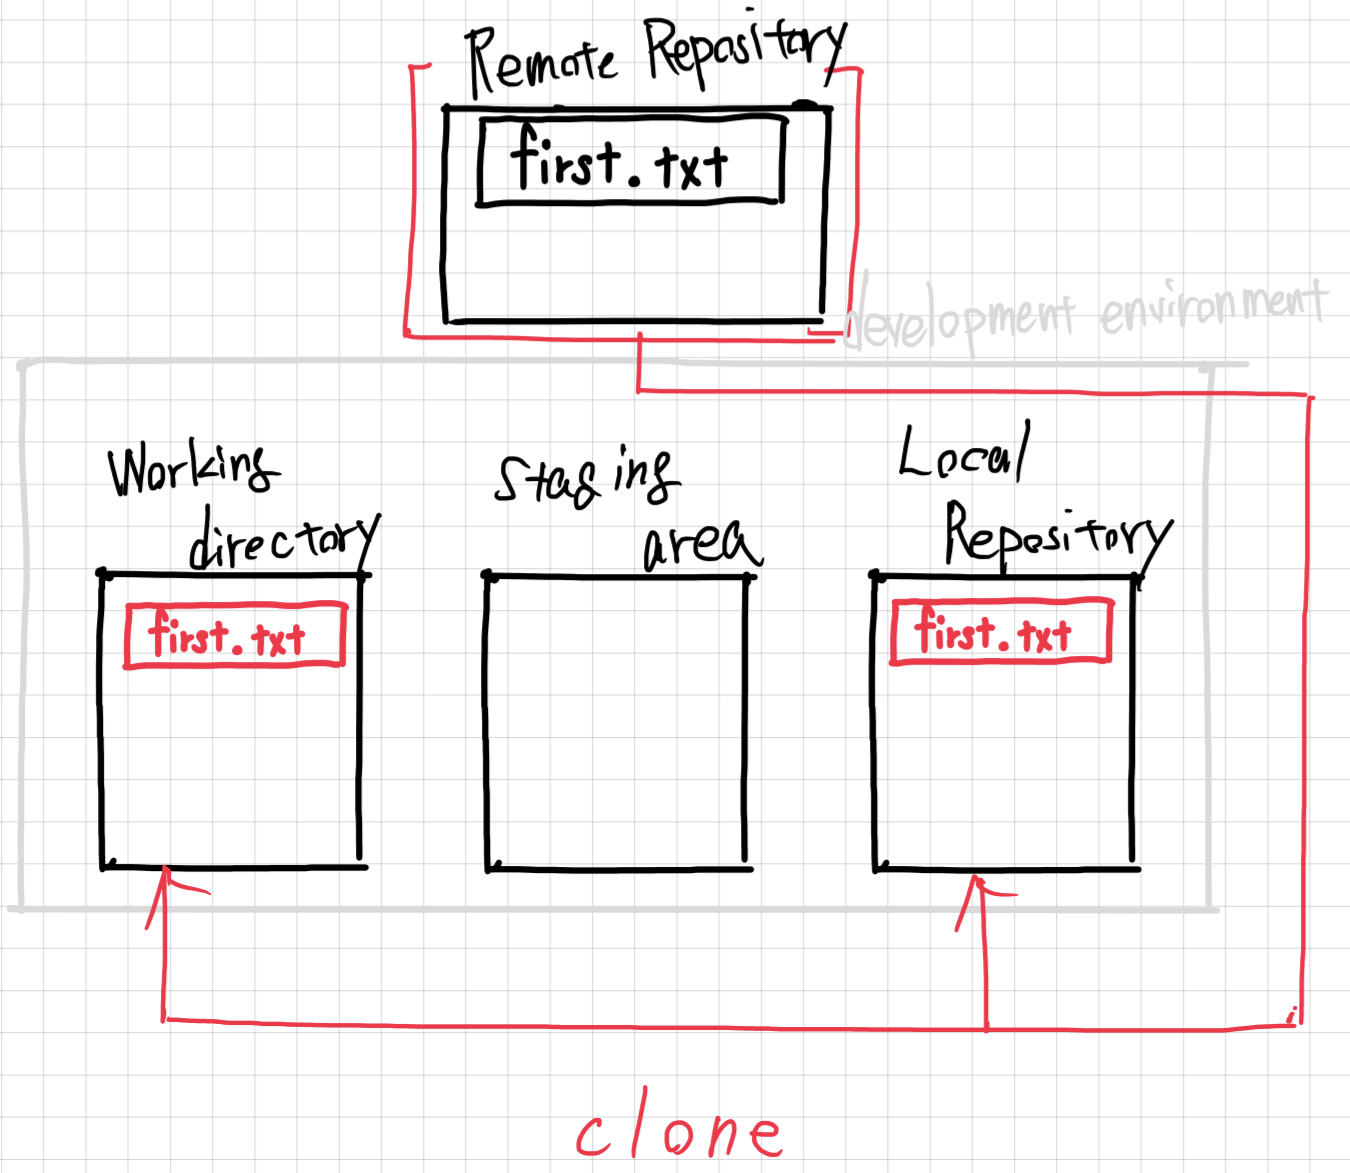
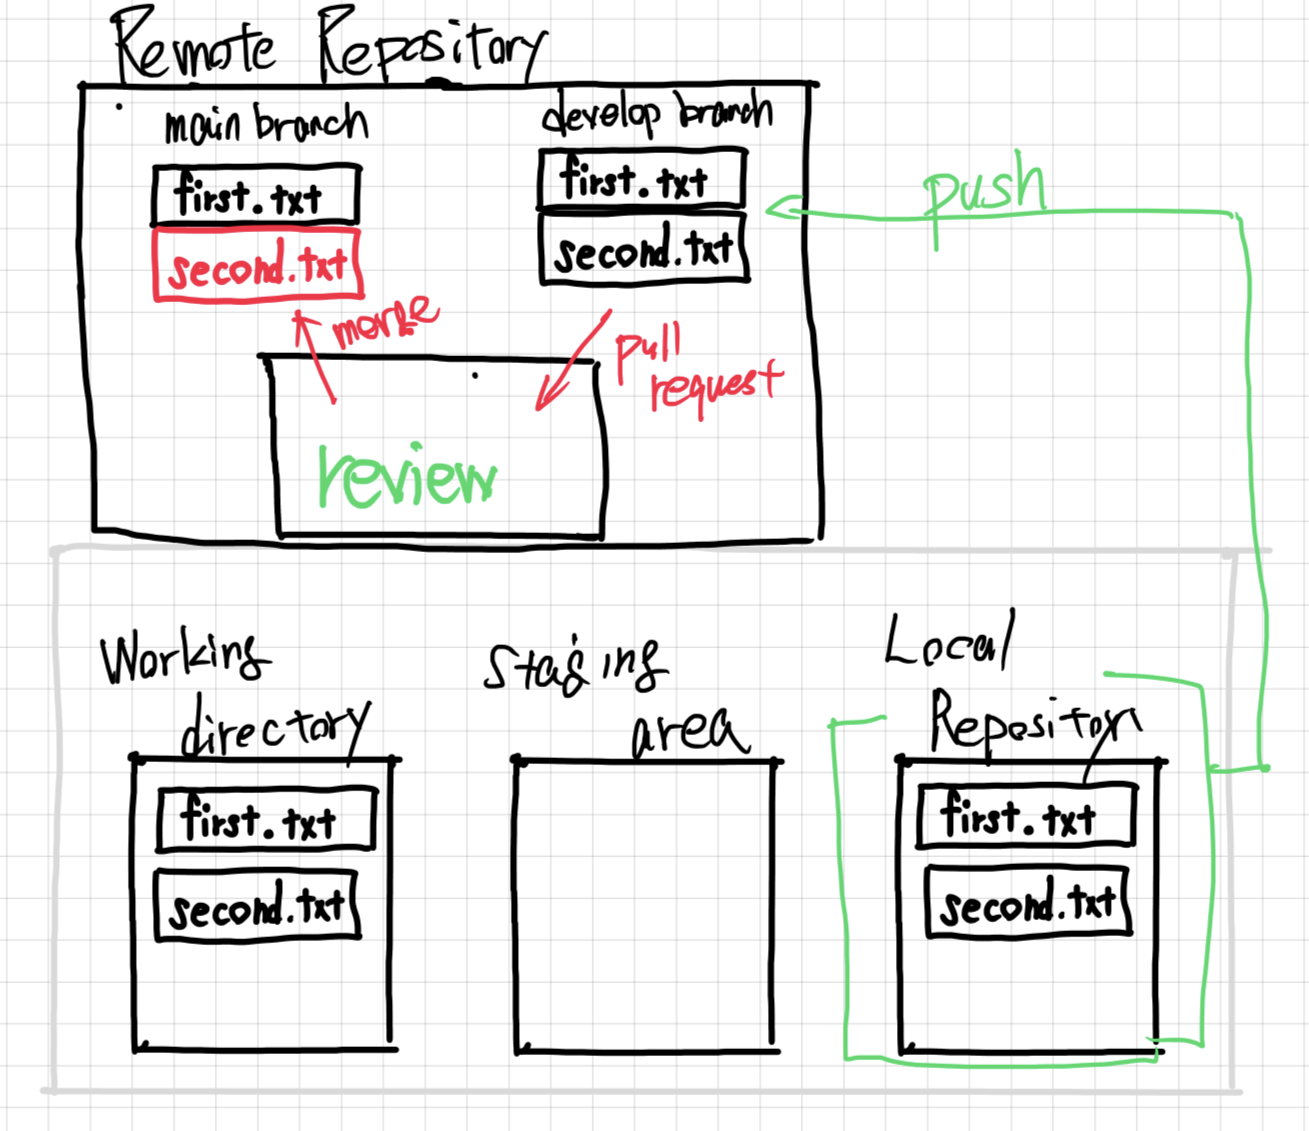
Git manages your project across four areas: your Working Directory (where you edit files), the Staging Area (where you prepare changes), the Local Repository (your committed history), and the Remote Repository (GitHub).
The basic flow is: edit → add → commit → push. Here is this workflow in action:
1. Create a GitHub Account
Step 1: Sign Up for GitHub
- Go to https://github.com
- Click Sign up
- Enter your email, create a password, and choose a username
- Verify your email address
- Complete your profile (optional)
GitHub Education (Free Pro Features for Students)
Students can get free access to GitHub Pro features:
- Go to https://education.github.com/
- Click Get benefits
- Verify your student status with your university email
- Get free GitHub Pro, Copilot, and other developer tools!
2. Setting Up Git
macOS
$ brew install git
$ git --version
git version 2.43.0
Linux (WSL)
$ sudo apt-get update
$ sudo apt-get install git
$ git --version
3. Configure Git
Set your Git username and email (used for commit history):
$ git config --global user.name "Your Name"
$ git config --global user.email "youremail@example.com"
Verify your configuration:
$ git config --list
user.name=Your Name
user.email=youremail@example.com
Additional Useful Configurations
# Set default branch name to 'main'
$ git config --global init.defaultBranch main

# Enable colored output
$ git config --global color.ui auto

# Set default editor (choose one)
$ git config --global core.editor "nano"    # or "vim" or "code --wait"
4. SSH Key Setup (Required for GitHub)
SSH keys allow secure communication with GitHub without entering your password each time.
What are SSH Keys?
- Public Key (
id_ed25519.pub): Share this with GitHub - like a lock - Private Key (
id_ed25519): Keep this secret - like a key - When you connect, GitHub checks if your private key matches the public key
Step 1: Check for Existing SSH Keys
$ ls -la ~/.ssh
If you see id_ed25519 and id_ed25519.pub, you already have keys. Skip to Step 3.
Step 2: Generate a New SSH Key
For Linux/WSL/macOS:
$ ssh-keygen -t ed25519 -C "youremail@example.com"
Generating public/private ed25519 key pair.
Enter file in which to save the key (/home/user/.ssh/id_ed25519):
Press Enter to accept the default location.
Enter passphrase (empty for no passphrase):
Enter same passphrase again:
Enter a passphrase (recommended) or press Enter for no passphrase.
Your identification has been saved in /home/user/.ssh/id_ed25519
Your public key has been saved in /home/user/.ssh/id_ed25519.pub
The key fingerprint is:
SHA256:abc123... youremail@example.com
Alternative: RSA Key (for older systems)
If ed25519 is not supported:
$ ssh-keygen -t rsa -b 4096 -C "youremail@example.com"
Step 3: Start SSH Agent and Add Key
# Start the SSH agent
$ eval "$(ssh-agent -s)"
Agent pid 12345
# Add your SSH key to the agent
$ ssh-add ~/.ssh/id_ed25519
Identity added: /home/user/.ssh/id_ed25519 (youremail@example.com)
Step 4: Copy Your Public Key
$ cat ~/.ssh/id_ed25519.pub
ssh-ed25519 AAAAC3NzaC1lZDI1NTE5AAAAIBxxxxxxxxxxxxxxxxxxxxxxxxxxxxxxxxxxxxxxxx youremail@example.com
Copy the entire output (starting with ssh-ed25519 and ending with your email).
Copy to Clipboard (Alternative Methods)
Linux/WSL:
$ cat ~/.ssh/id_ed25519.pub | clip.exe    # WSL
$ cat ~/.ssh/id_ed25519.pub | xclip -selection clipboard   # Linux with xclip
macOS:
$ pbcopy < ~/.ssh/id_ed25519.pub
Step 5: Add SSH Key to GitHub
- Go to GitHub.com and log in
- Click your profile picture (top-right) → Settings
- In the left sidebar, click SSH and GPG keys
- Click New SSH key (green button)
- Fill in the form:
- Title: Give it a descriptive name (e.g., “My Laptop WSL”, “Lab Computer”)
- Key type: Authentication Key
- Key: Paste your public key (from Step 4)
- Click Add SSH key
- Confirm with your GitHub password if prompted
Step 6: Test Your SSH Connection
$ ssh -T git@github.com
Hi username! You've successfully authenticated, but GitHub does not provide shell access.
Troubleshooting SSH Connection
If you see “Permission denied”:
# Check if SSH agent has your key
$ ssh-add -l

# If empty, add your key again
$ ssh-add ~/.ssh/id_ed25519

# Test with verbose output
$ ssh -vT git@github.com
5. Creating a Repository
Method 1: Create Repository on GitHub (Recommended)
- Go to GitHub.com and log in
- Click the + icon (top-right) → New repository
- Fill in the repository details:
- Repository name: e.g.,
my-rnaseq-project - Description: Brief description (optional)
- Public/Private: Choose visibility
- Initialize with README: Check this box
- Add .gitignore: Select a template (e.g., Python, R)
- Choose a license: MIT is common for open source
- Repository name: e.g.,
- Click Create repository
Method 2: Clone the Repository to Your Computer
After creating the repository on GitHub, you clone it to create a local copy. Cloning copies the entire repository – all files and the full commit history – to your machine.
# Using SSH (recommended)
$ git clone git@github.com:yourusername/my-rnaseq-project.git

# Or using HTTPS
$ git clone https://github.com/yourusername/my-rnaseq-project.git

$ cd my-rnaseq-project
$ ls -la
total 8
drwxr-xr-x 3 user user 4096 Jan 20 10:00 .
drwxr-xr-x 5 user user 4096 Jan 20 10:00 ..
drwxr-xr-x 8 user user 4096 Jan 20 10:00 .git
-rw-r--r-- 1 user user   50 Jan 20 10:00 README.md
Method 3: Create Local Repository First (Terminal)
# Create project directory
$ mkdir my-project
$ cd my-project

# Initialize git repository
$ git init
Initialized empty Git repository in /home/user/my-project/.git/
# Create initial files
$ echo "# My Project" > README.md
$ echo "*.log" > .gitignore

# Stage and commit
$ git add .
$ git commit -m "Initial commit"

# Create repository on GitHub, then connect:
$ git remote add origin git@github.com:yourusername/my-project.git
$ git branch -M main
$ git push -u origin main
6. Basic Git Commands
Git Workflow Overview
Git uses a three-step process to save changes. Understanding this flow is the key to using Git effectively.
Working Directory  →  Staging Area  →  Local Repository  →  Remote Repository
      (edit)           (git add)        (git commit)          (git push)
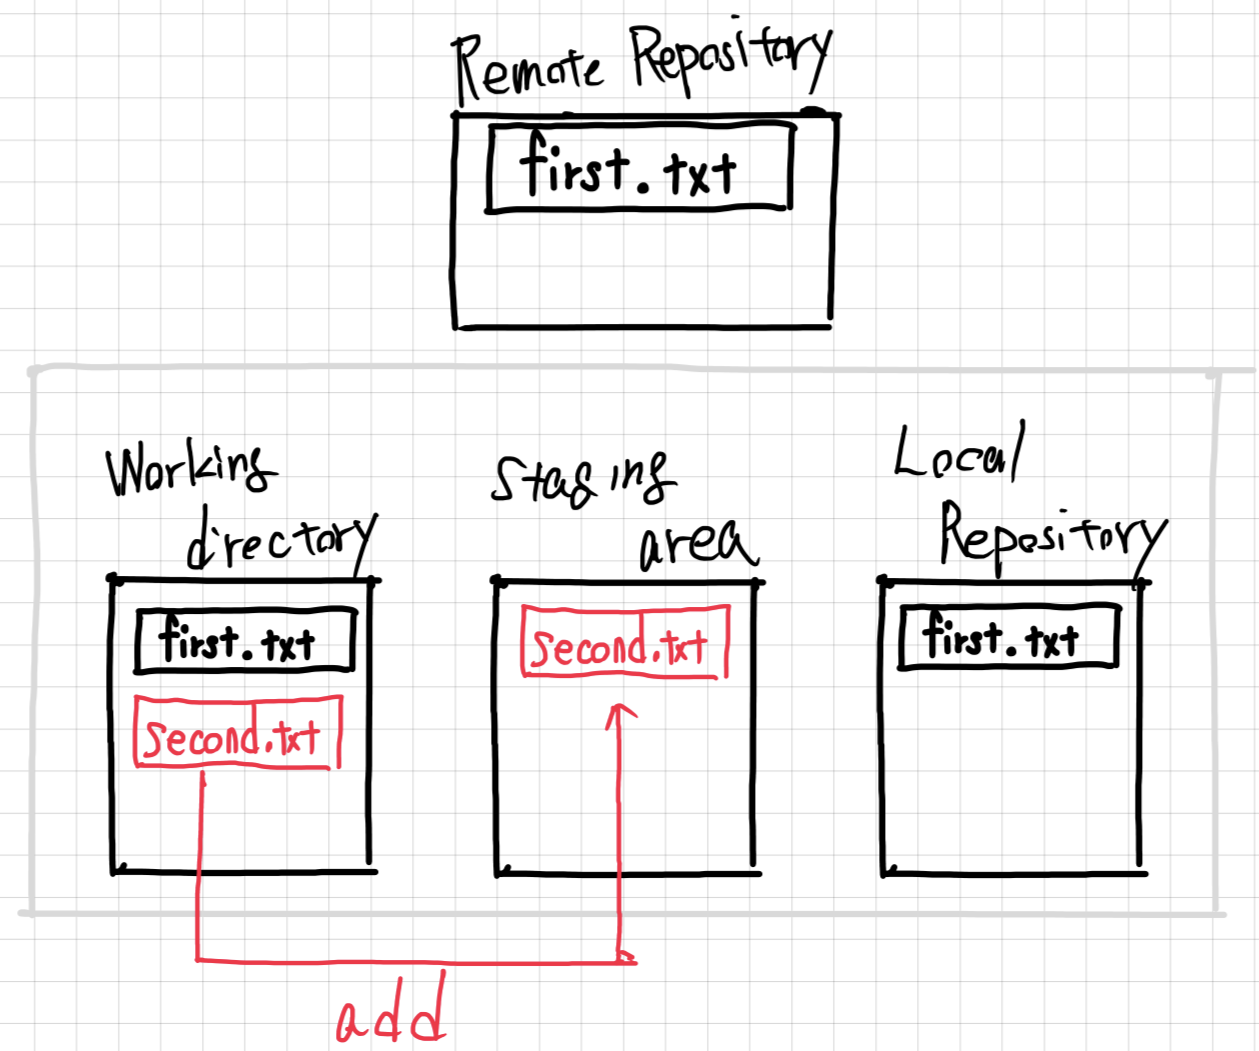
Step 1: git add – Stage Your Changes
The staging area (also called the “index”) is a holding zone where you prepare which changes to include in your next commit. This lets you selectively commit changes rather than committing everything at once.
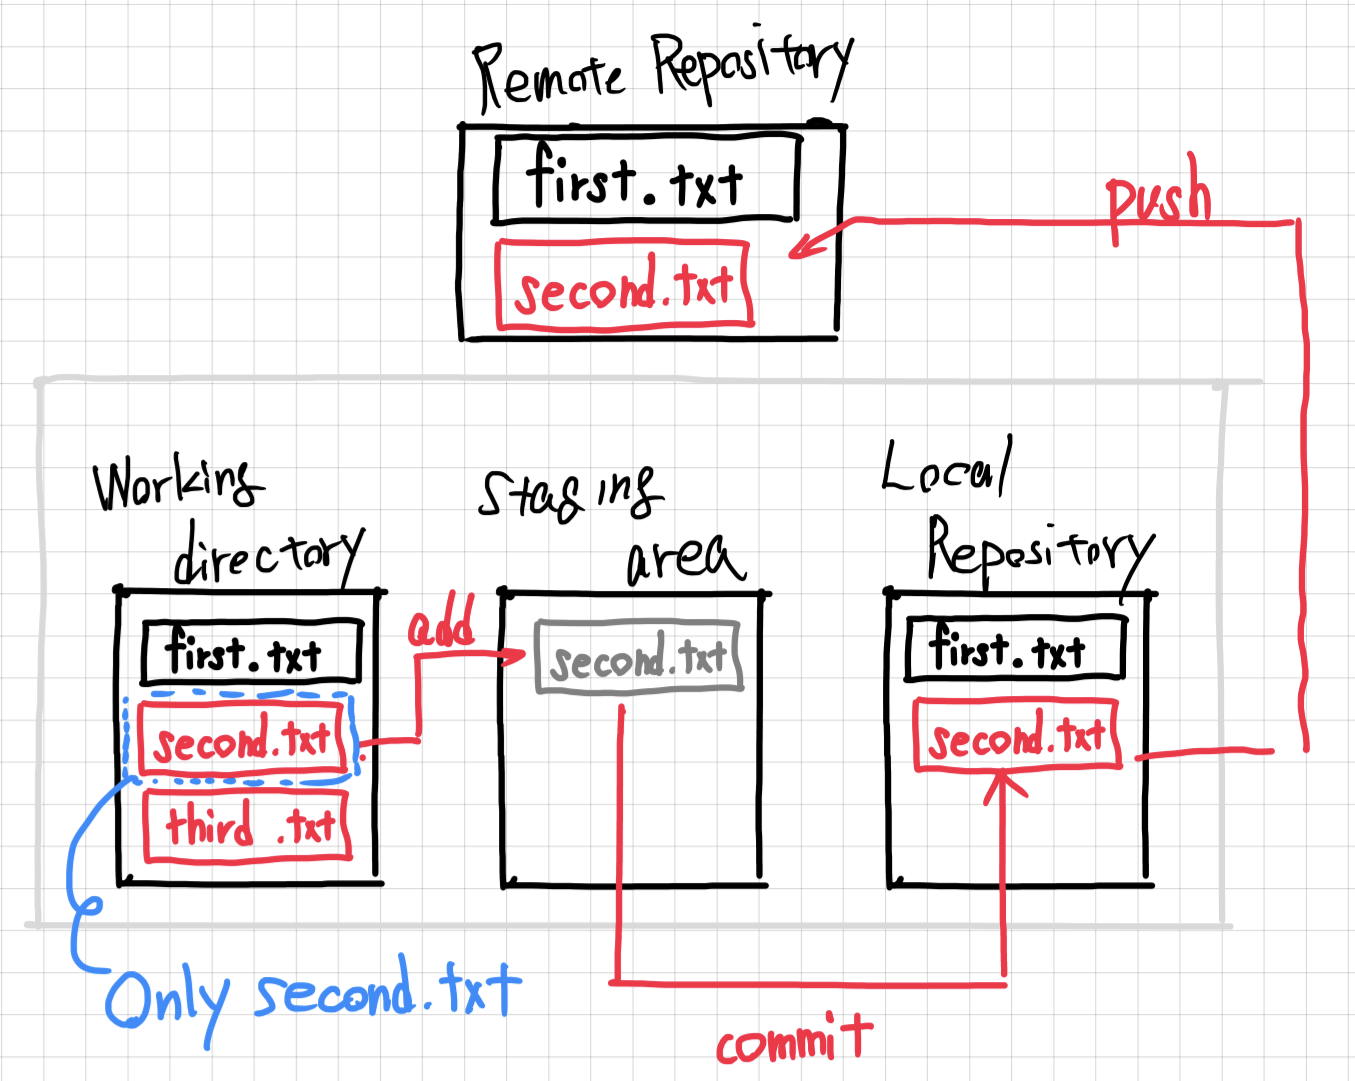
You can stage files individually, allowing you to organize your commits by feature or logical group:
# Add specific file
$ git add filename.txt

# Add all changed files
$ git add .

# Add all files matching pattern
$ git add *.py
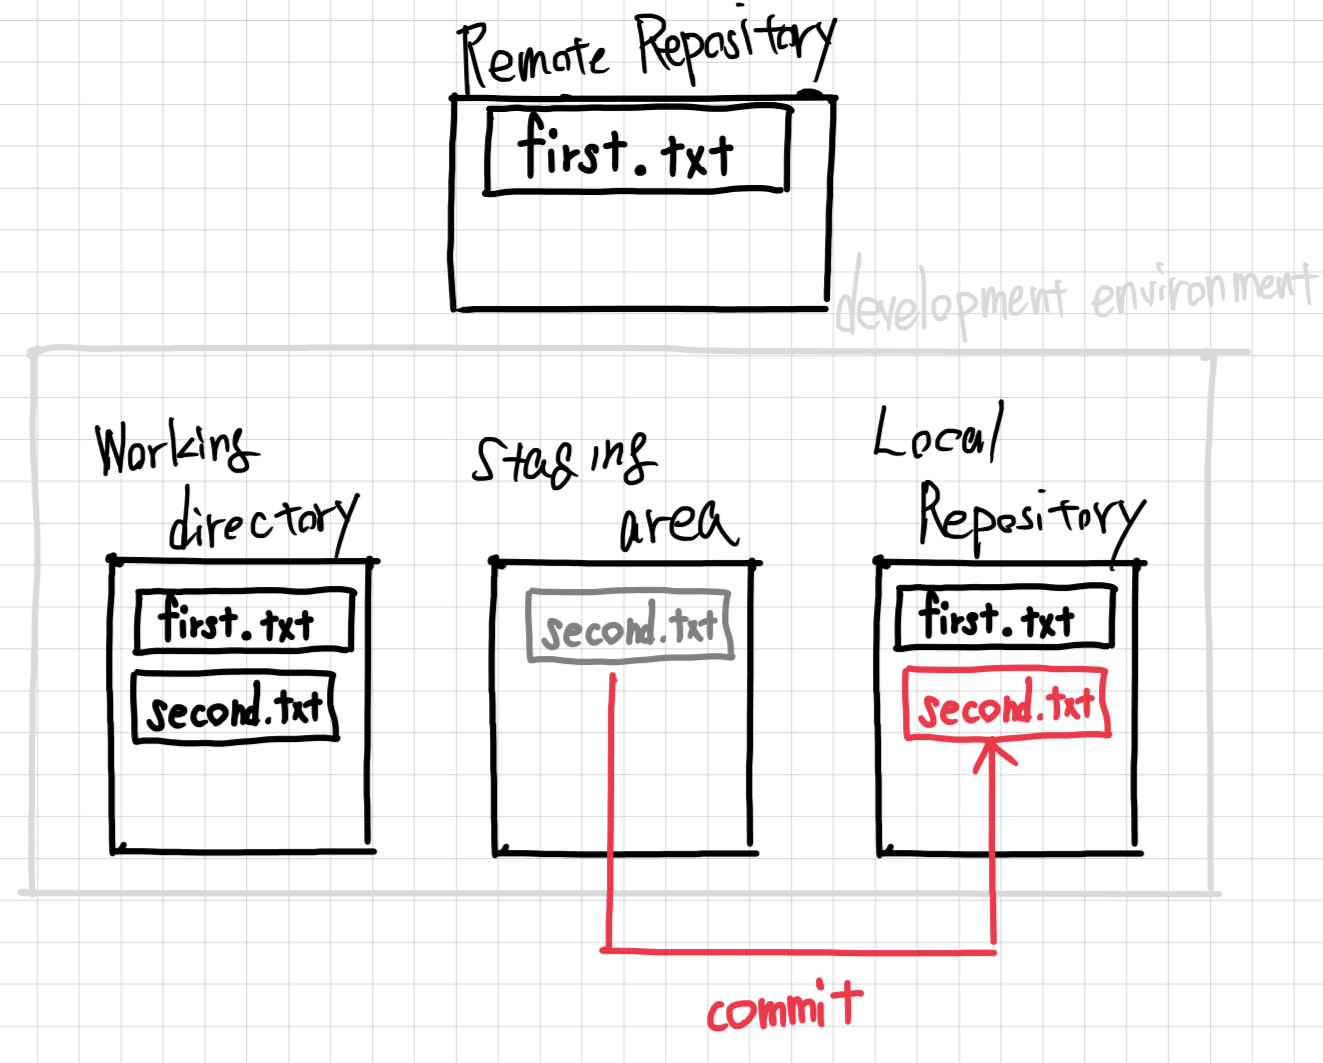
Step 2: git commit – Save a Snapshot
A commit is a snapshot of your entire repository at a specific point in time. Each commit is identified by a unique SHA hash and includes a message describing the changes. Commits form a linked list, building your project’s complete history.
$ git commit -m "Add analysis script for RNA-seq data"
[main 1a2b3c4] Add analysis script for RNA-seq data
 1 file changed, 50 insertions(+)
Step 3: git push – Upload to GitHub
Push sends your committed changes from your local repository to the remote repository on GitHub, making them available to collaborators.
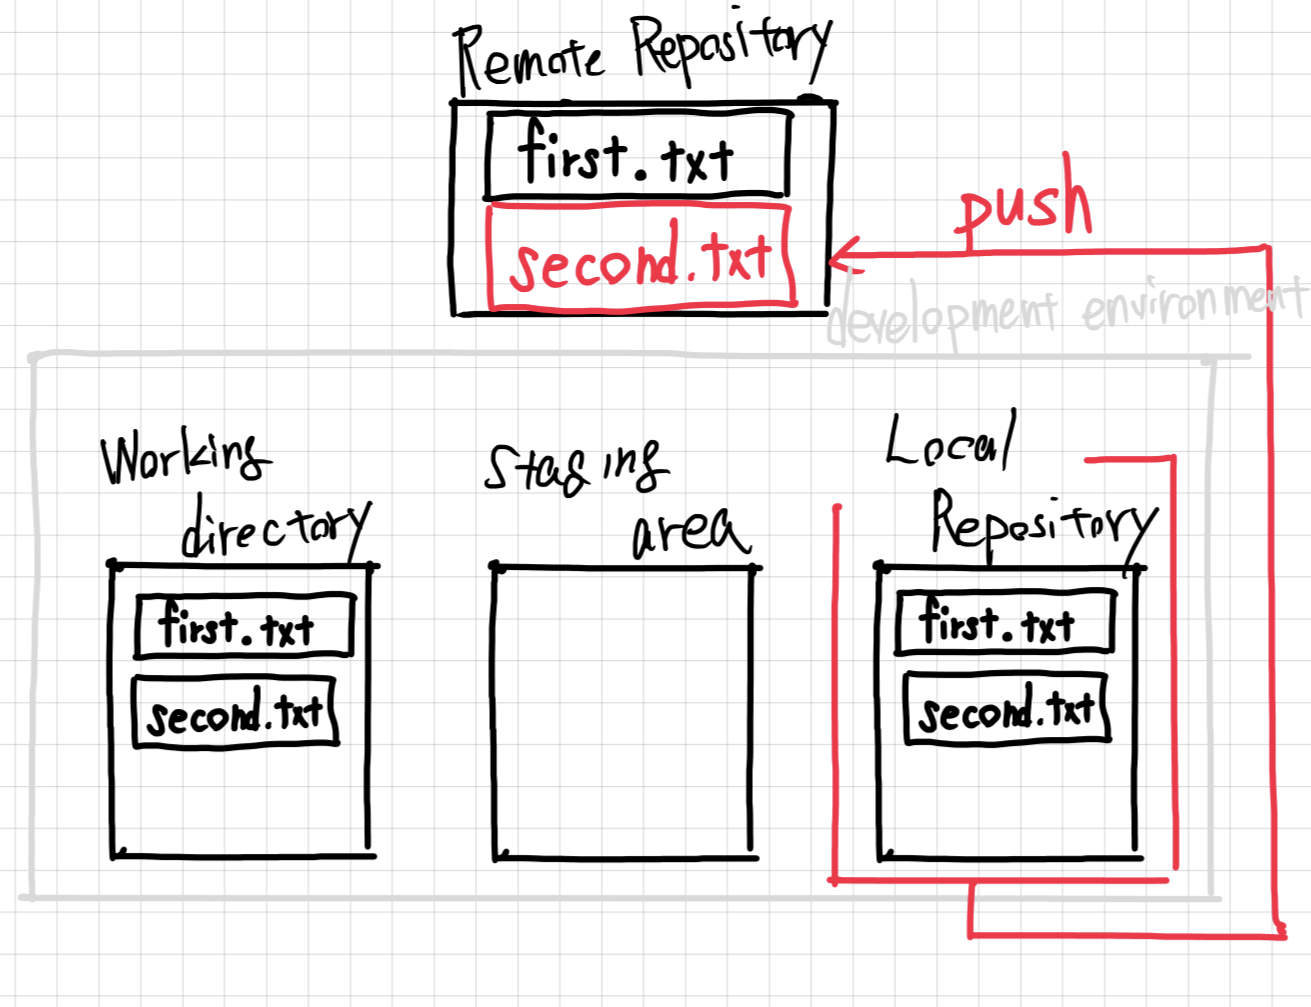
$ git push origin main
git status – Check Repository Status
$ git status
On branch main
Your branch is up to date with 'origin/main'.
nothing to commit, working tree clean
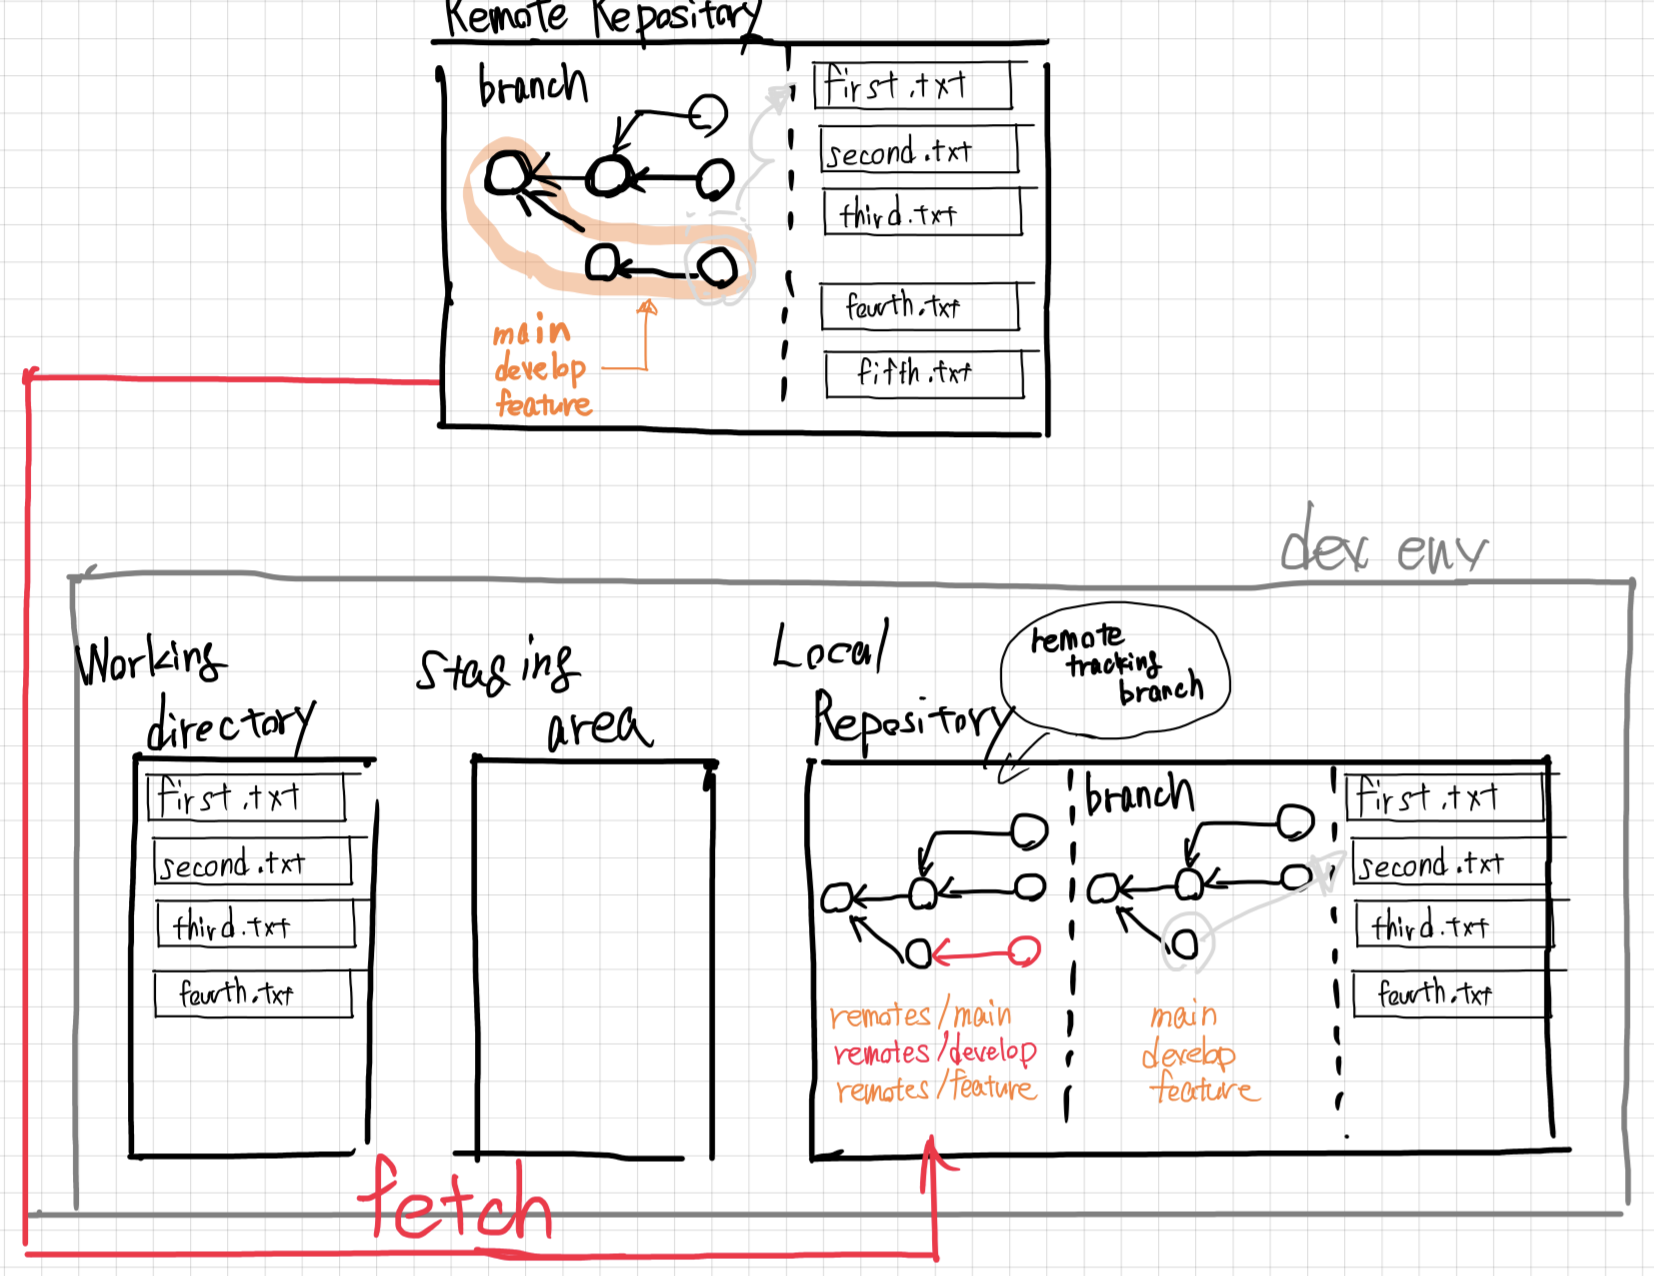
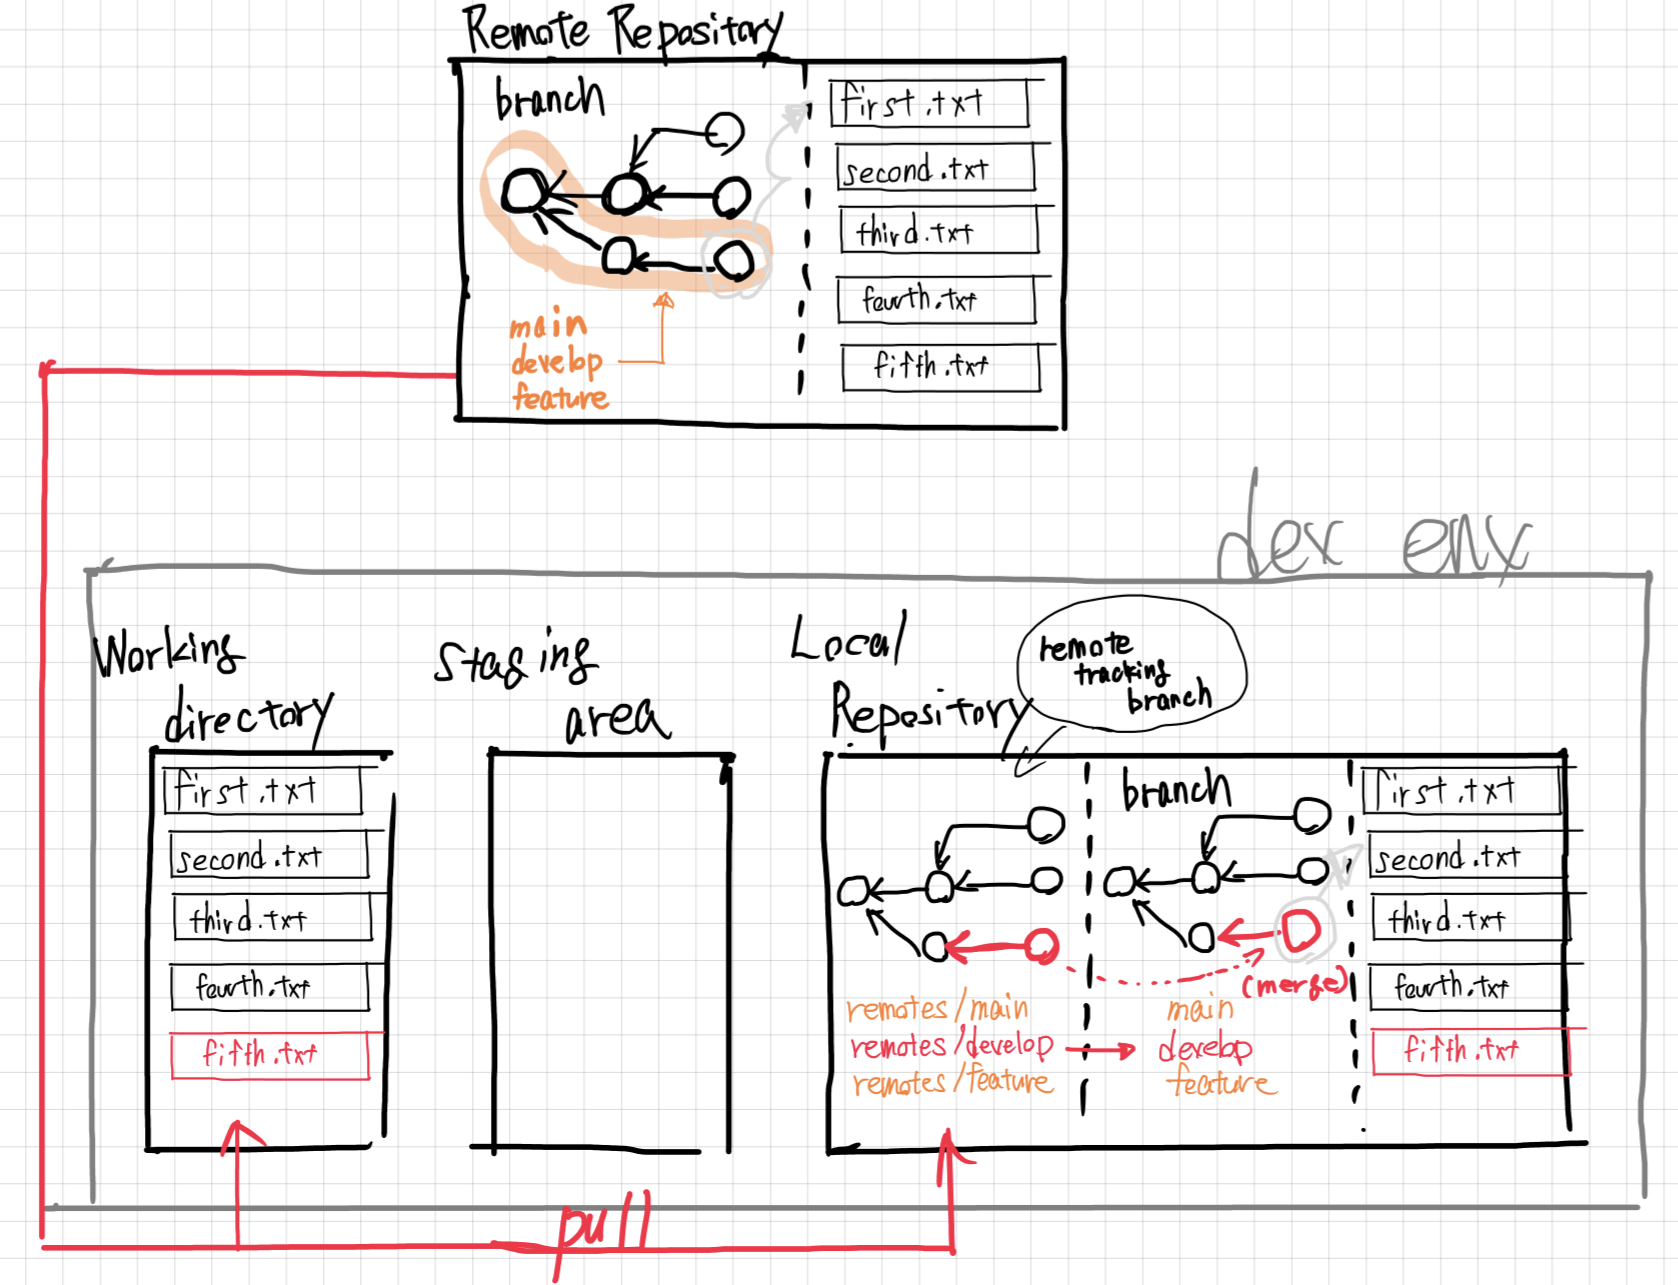
git pull – Download Updates from GitHub
Pull downloads changes from GitHub and merges them into your local branch. It combines two operations: fetch (download changes) and merge (integrate them).
$ git pull origin main
From github.com:yourusername/my-project
 * branch            main       -> FETCH_HEAD
Already up to date.
git log / git diff – Viewing History
# View commit history
$ git log --oneline
1a2b3c4 Add analysis script for RNA-seq data
5e6f7g8 Initial commit
# View changes in a file
$ git diff filename.txt

# View who changed each line
$ git blame filename.txt
7. Working with Branches
A branch is a separate version of your code within a repository. Branching allows you to work on different features or bug fixes in isolation without affecting the default codebase (often called main). Once satisfied, you can merge changes back into the main branch.
Why Branching Matters
- Protects the main branch: The
mainbranch serves as the stable version, often deployed to production - Enables parallel development: Multiple team members can work on different features simultaneously
- Supports experimentation: Try new ideas without risking the stability of the main codebase
Creating a Branch
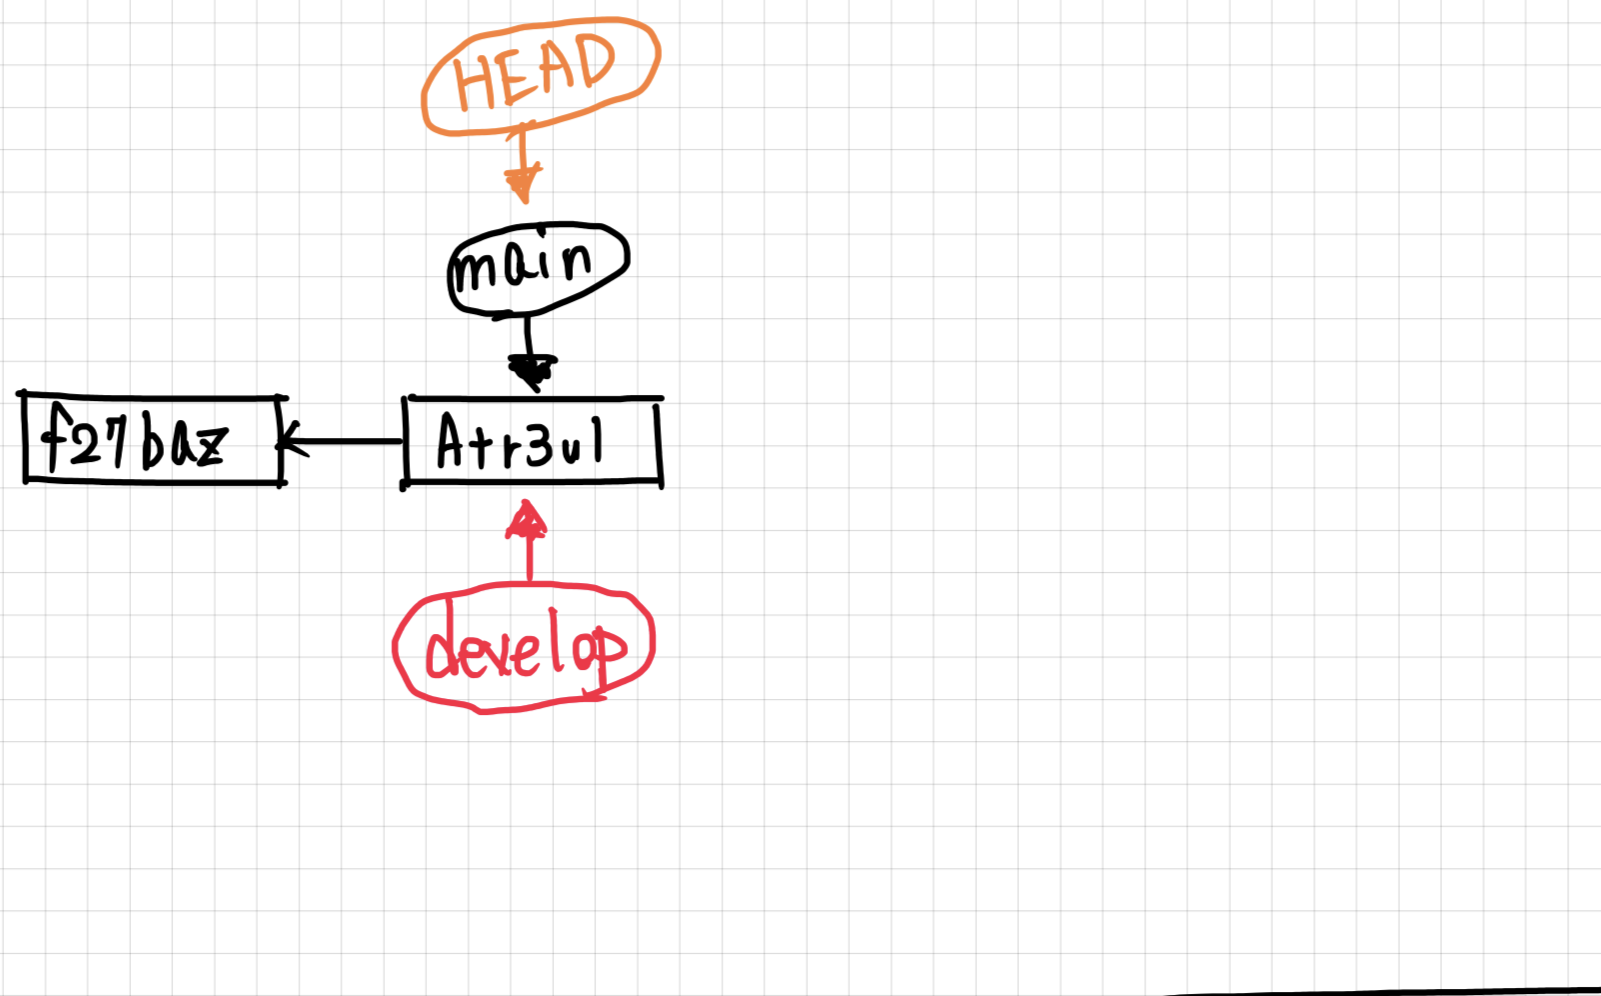
When you create a new branch, Git creates a new pointer that starts at the same commit as the branch you branched from. As you make new commits, the branch pointer advances, while the original branch stays where it was.
# Create and switch to a new branch
$ git checkout -b feature-branch
Modern Alternative:
git switchIn newer versions of Git (2.23+),
git switchreplacesgit checkoutfor branch operations:# Create and switch to a new branch $ git switch -c feature-branch # Switch to an existing branch $ git switch mainBoth
git checkoutandgit switchwork – use whichever you prefer.
Switching Between Branches
Checking out a branch moves the HEAD pointer to point at the branch you are switching to. Your working directory is updated to reflect the state of that branch.
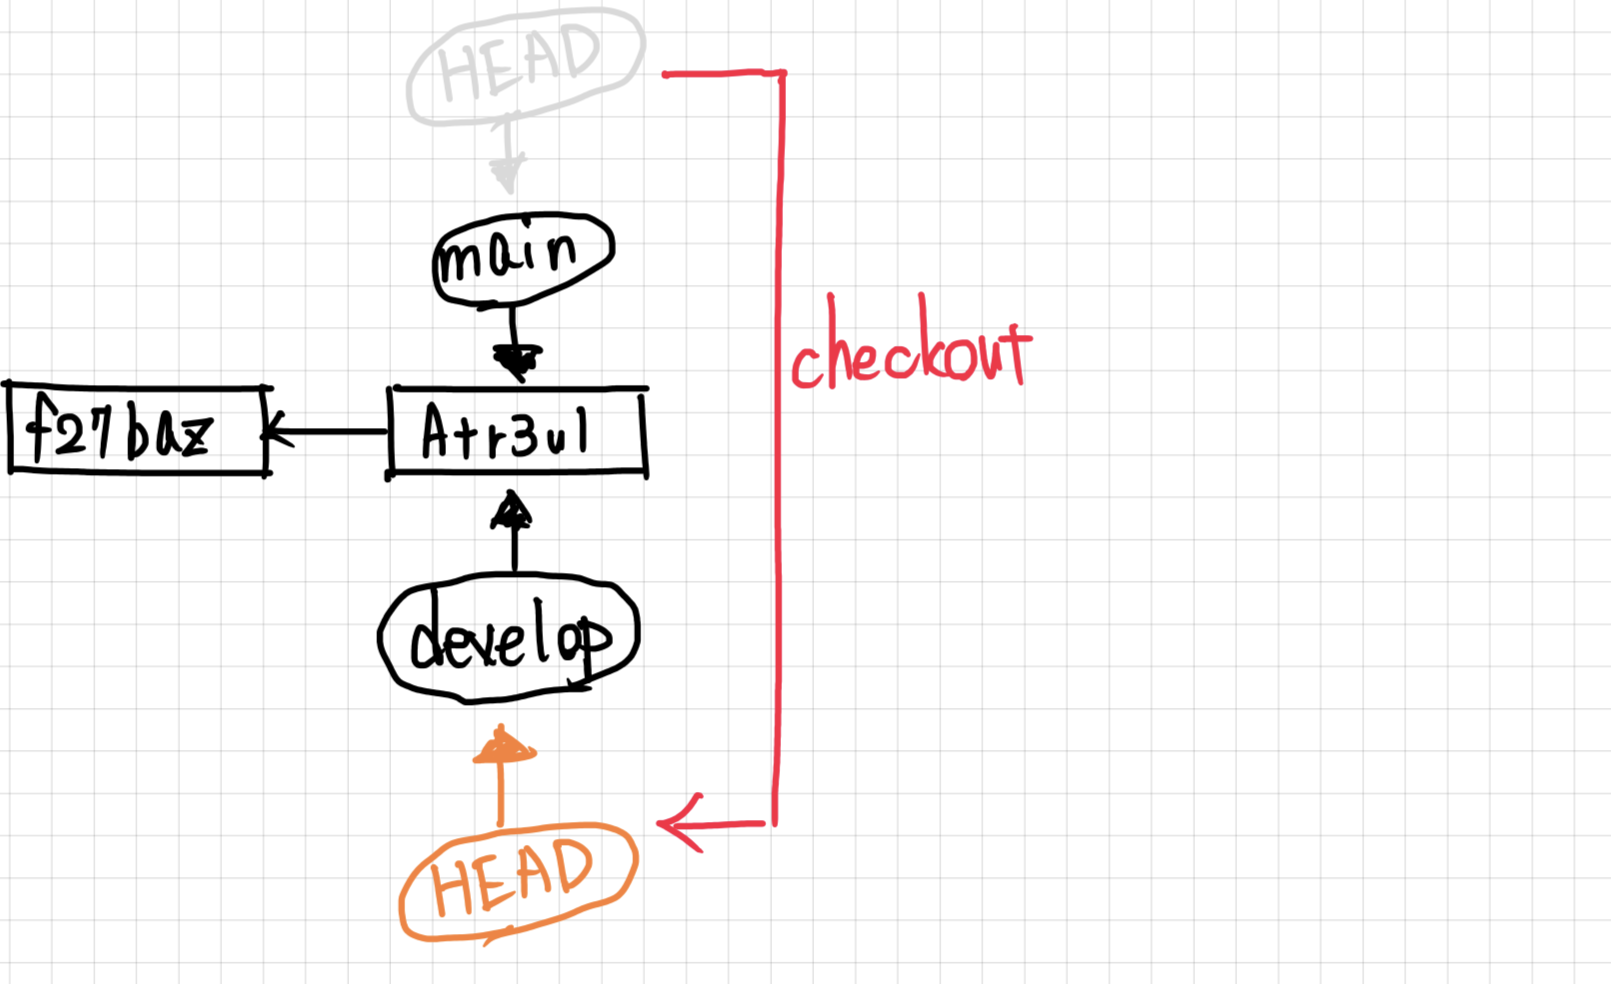
# Switch to an existing branch
$ git checkout main
Making Commits on a Branch
Each commit on a branch advances that branch’s pointer forward, creating a separate line of development.

Merging Branches
After completing work on a branch, merge it back into the main branch.
Fast-Forward Merge
When the main branch has not diverged (no new commits since the branch was created), Git can simply move the main pointer forward. This is called a fast-forward merge.
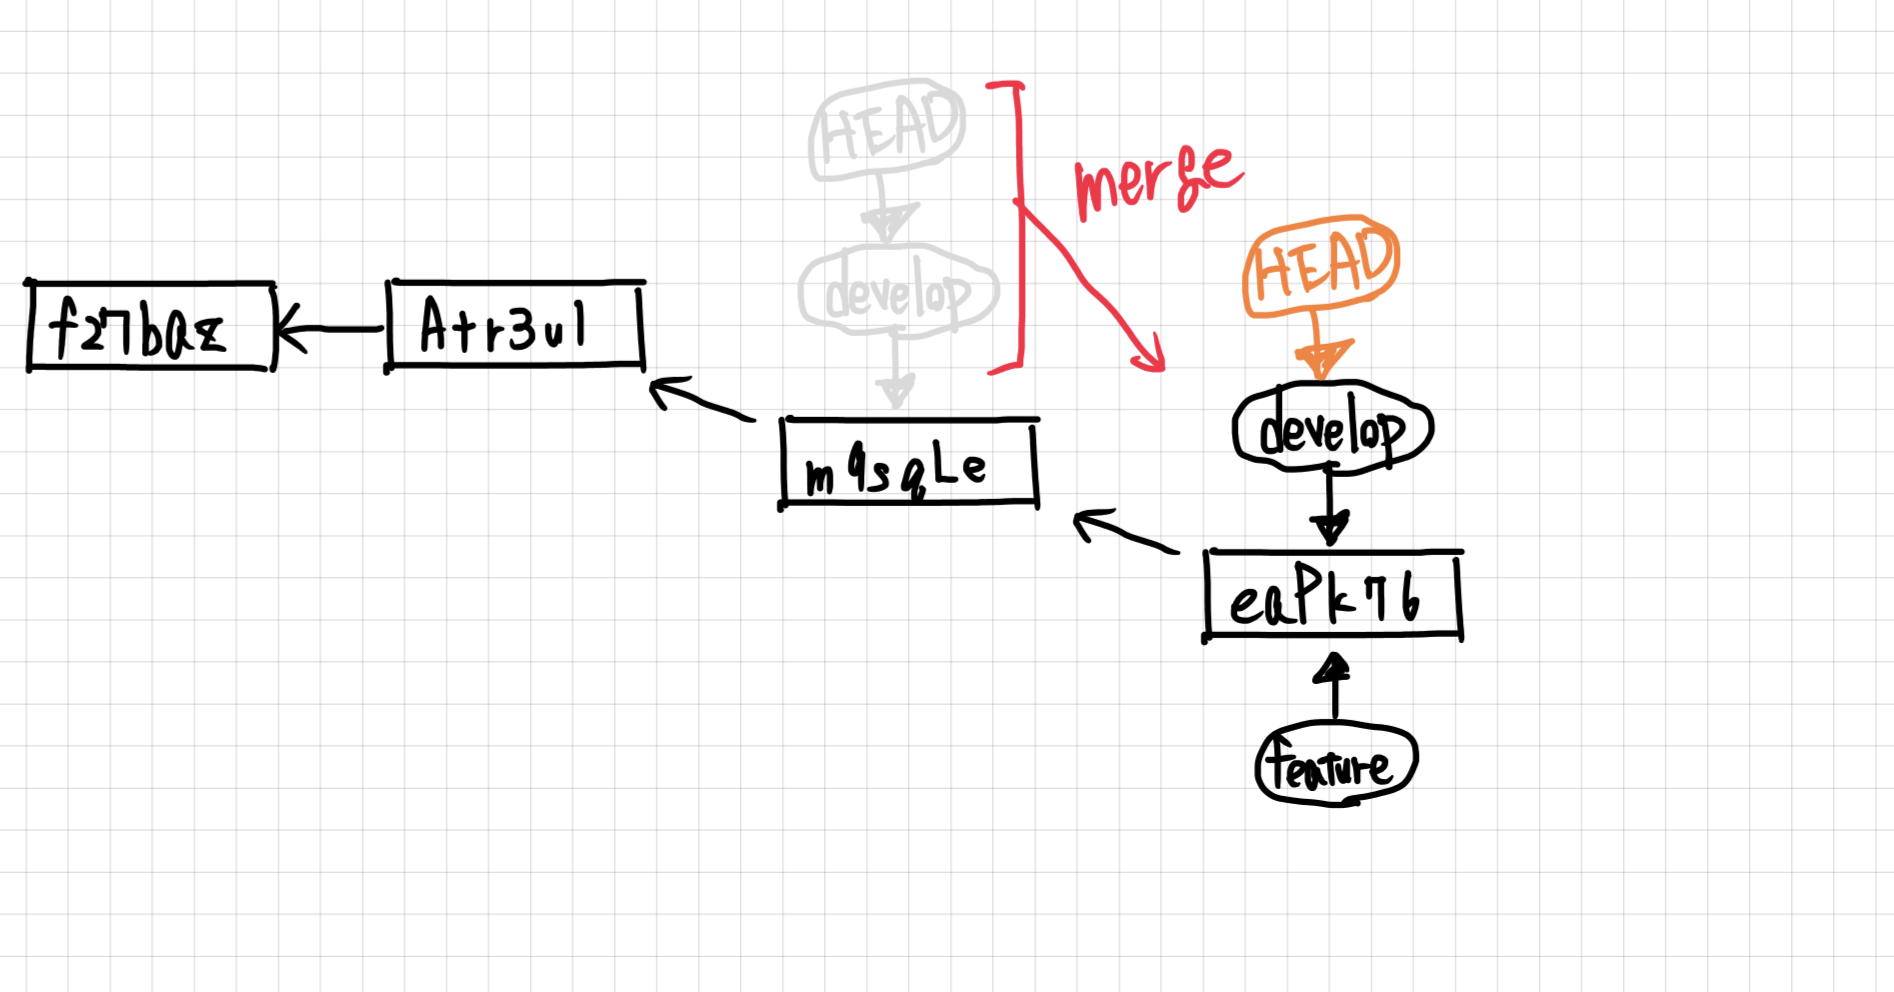

$ git checkout main
$ git merge feature-branch
No-Fast-Forward Merge
When both branches have new commits (the history has diverged), Git creates a merge commit that combines the two lines of development.
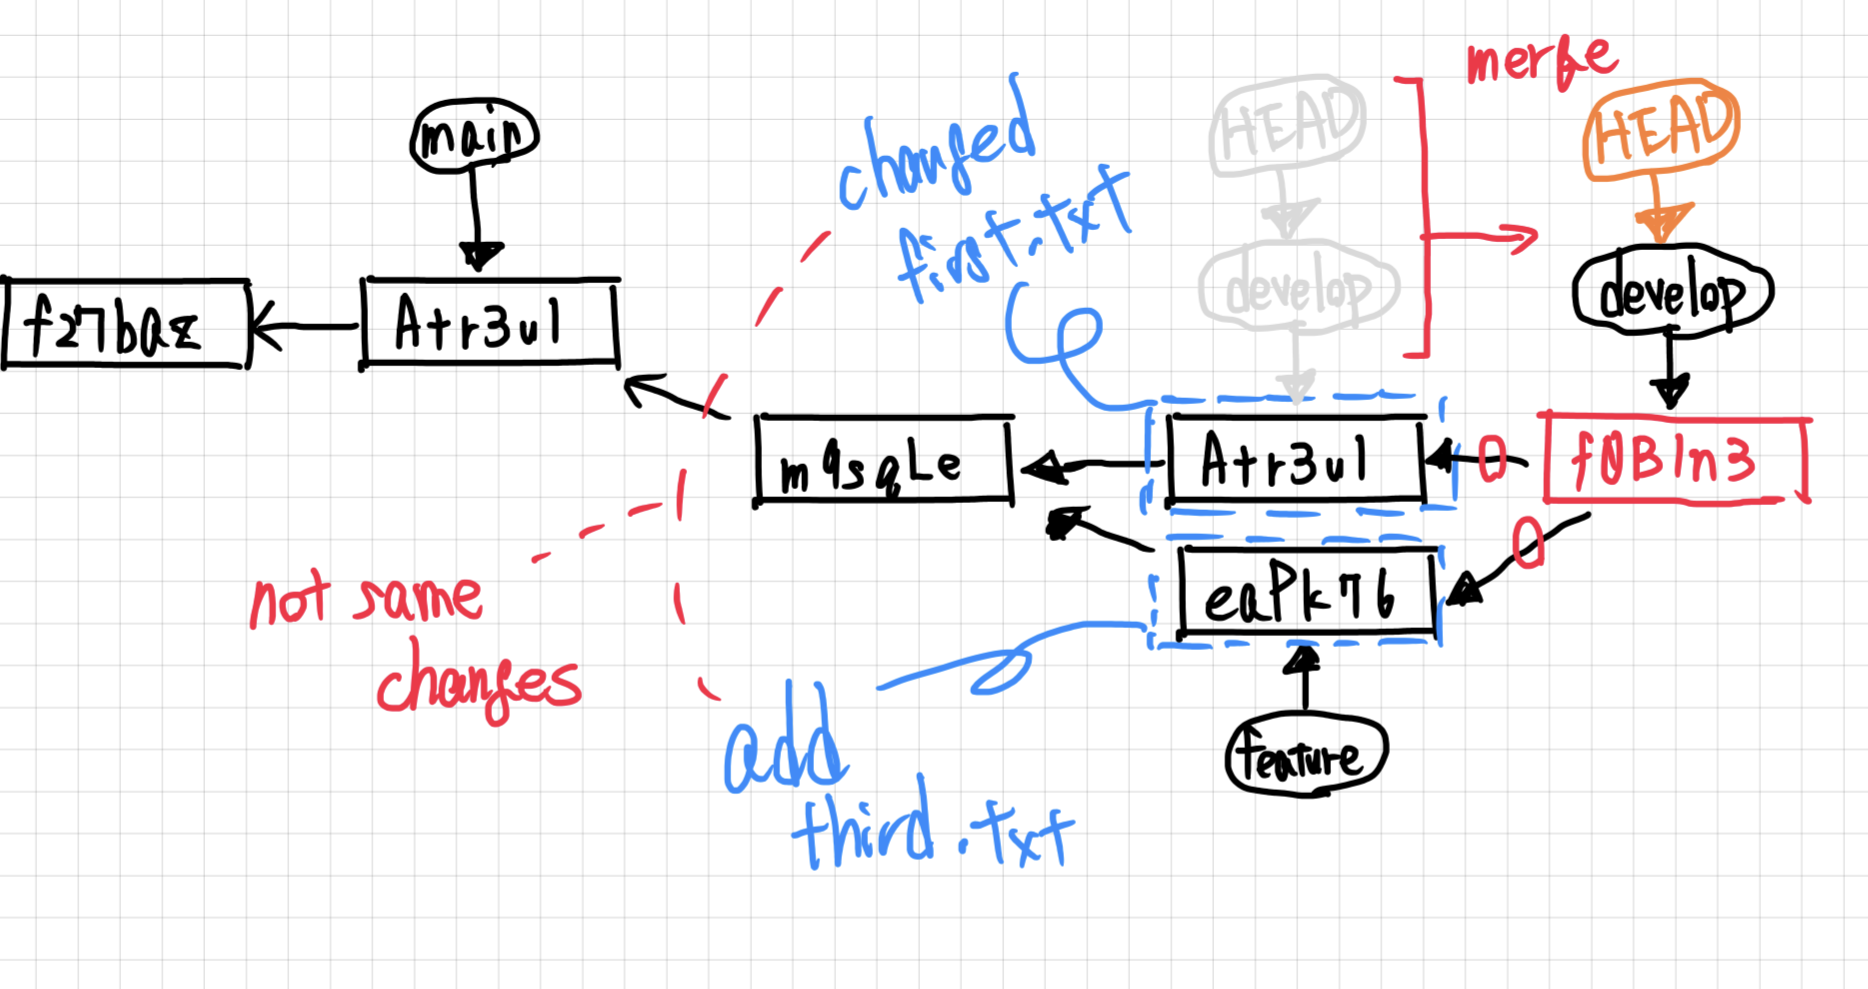

Handling Merge Conflicts
When the same lines of a file are changed differently in two branches, Git cannot automatically merge. You must resolve the conflict manually by editing the file, then staging and committing the result.
Git marks the conflicting sections in the file with special markers:
<<<<<<< HEAD
print("Hello from main branch")
=======
print("Hello from feature branch")
>>>>>>> feature-branch
To resolve the conflict:
- Open the file and find the conflict markers (
<<<<<<<,=======,>>>>>>>) - Choose which version to keep (or combine both)
- Remove all conflict markers
- Stage and commit:
$ git add resolved-file.txt
$ git commit -m "Resolve merge conflict"
Deleting Branches
After merging, you can delete the branch:
$ git branch -d feature-branch
Pushing a Branch to GitHub
$ git push -u origin feature-branch
8. Using Git with VS Code
VS Code has excellent built-in Git support with a graphical interface.
Setup VS Code for Git
- Install VS Code: https://code.visualstudio.com/
- Open your project folder: File → Open Folder
- Install Git Graph extension (optional but recommended):
- Press
Ctrl+Shift+X(Extensions) - Search “Git Graph”
- Install
- Press
VS Code Git Interface
The Source Control panel (Ctrl+Shift+G) shows:
- Changes: Modified files
- Staged Changes: Files ready to commit
- Commits: History of commits
Common Git Operations in VS Code
Clone a Repository
- Press
Ctrl+Shift+P→ Type “Git: Clone” - Paste the repository URL
- Choose a folder location
- Open the cloned repository
Stage Changes
- Click the + icon next to a file to stage it
- Or click + next to “Changes” to stage all files
Commit Changes
- Enter a commit message in the text box
- Click the checkmark (or
Ctrl+Enter)
Push/Pull
- Click … menu → Push or Pull
- Or use the sync button in the status bar
View Diff
- Click on any changed file to see the diff
- Red = removed lines, Green = added lines
Create/Switch Branches
- Click the branch name in the bottom-left corner
- Select an existing branch or create a new one
VS Code Git Keyboard Shortcuts
| Shortcut | Action |
|---|---|
Ctrl+Shift+G |
Open Source Control panel |
Ctrl+Enter |
Commit (when in commit message box) |
Ctrl+Shift+P → “Git” |
Access all Git commands |
Recommended VS Code Extensions for Git
- GitLens: Advanced Git features, blame annotations
- Git Graph: Visual commit history
- GitHub Pull Requests: Manage PRs directly in VS Code
9. Complete Git Workflow Example
Step-by-Step Terminal Workflow
# 1. Clone repository
$ git clone git@github.com:yourusername/my-project.git
$ cd my-project

# 2. Create a new branch for your work
$ git checkout -b feature/add-qc-script

# 3. Make changes (create/edit files)
$ nano qc_script.py

# 4. Check what changed
$ git status
On branch feature/add-qc-script
Untracked files:
  (use "git add <file>..." to include in what will be committed)
        qc_script.py
# 5. Stage your changes
$ git add qc_script.py

# 6. Commit with a descriptive message
$ git commit -m "Add quality control script for FASTQ files"
[feature/add-qc-script 1a2b3c4] Add quality control script for FASTQ files
 1 file changed, 50 insertions(+)
 create mode 100644 qc_script.py
# 7. Push to GitHub
$ git push -u origin feature/add-qc-script
Enumerating objects: 4, done.
Counting objects: 100% (4/4), done.
Delta compression using up to 8 threads
Compressing objects: 100% (2/2), done.
Writing objects: 100% (3/3), 1.20 KiB | 1.20 MiB/s, done.
Total 3 (delta 0), reused 0 (delta 0)
To github.com:yourusername/my-project.git
 * [new branch]      feature/add-qc-script -> feature/add-qc-script
Branch 'feature/add-qc-script' set up to track remote branch 'feature/add-qc-script' from 'origin'.
# 8. Create Pull Request on GitHub website
# 9. After merge, update local main branch
$ git checkout main
$ git pull origin main

# 10. Delete the feature branch (optional)
$ git branch -d feature/add-qc-script
Daily Git Workflow Summary
# Start of day: Get latest changes
$ git pull origin main

# Create branch for new work
$ git checkout -b feature/my-feature

# Work on your code...
# Then stage and commit frequently
$ git add .
$ git commit -m "Descriptive message"

# Push when ready for review
$ git push -u origin feature/my-feature

# Create Pull Request on GitHub
# After merge, clean up
$ git checkout main
$ git pull origin main
$ git branch -d feature/my-feature
10. Collaborating with Others
GitHub facilitates collaboration through features like pull requests, issues, and code reviews.
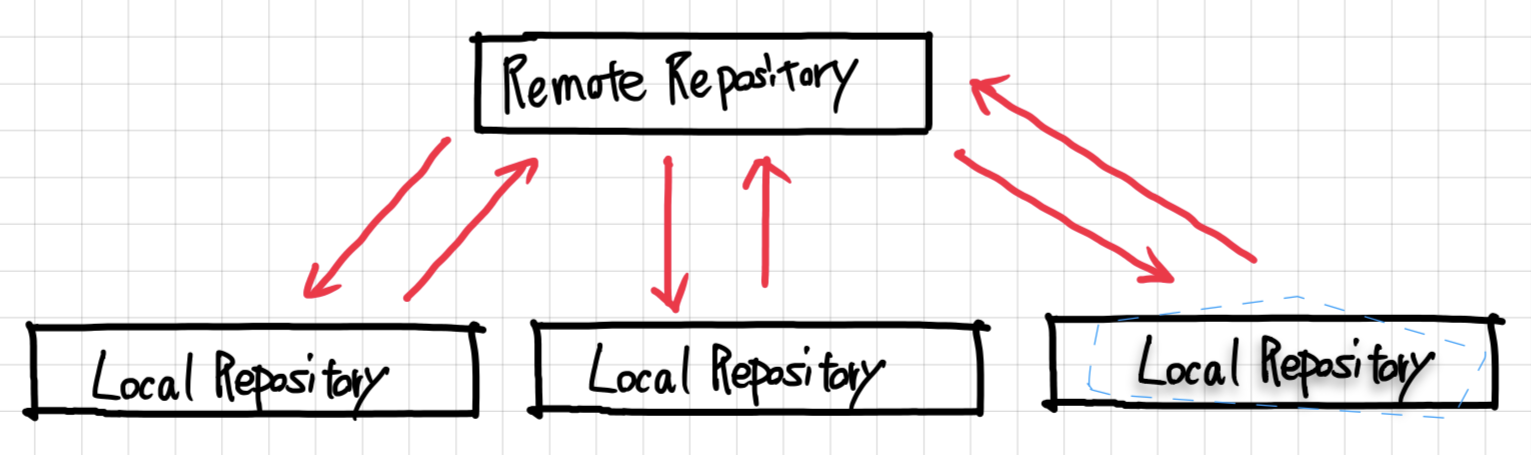
Understanding Remote and Local Repositories
When working with others, understanding the relationship between remote and local repositories is essential. Your local repository has remote tracking branches that monitor the state of the remote repository.

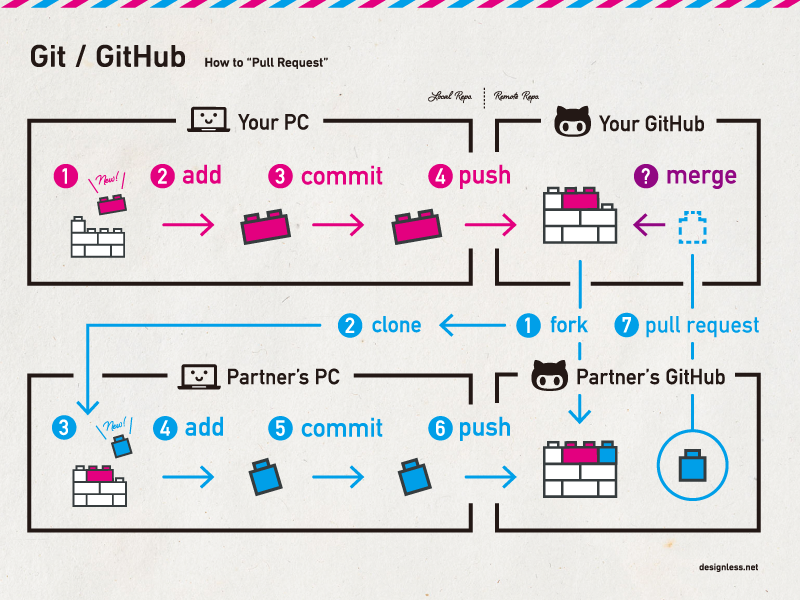
Forking a Repository
If you want to contribute to someone else’s project, you can create a fork:
- Navigate to the repository you want to fork.
- Click the Fork button in the top-right corner.
- This creates a copy of the repository under your GitHub account.
Clone your forked repository to work on it locally:
$ git clone git@github.com:your-username/repository-name.git
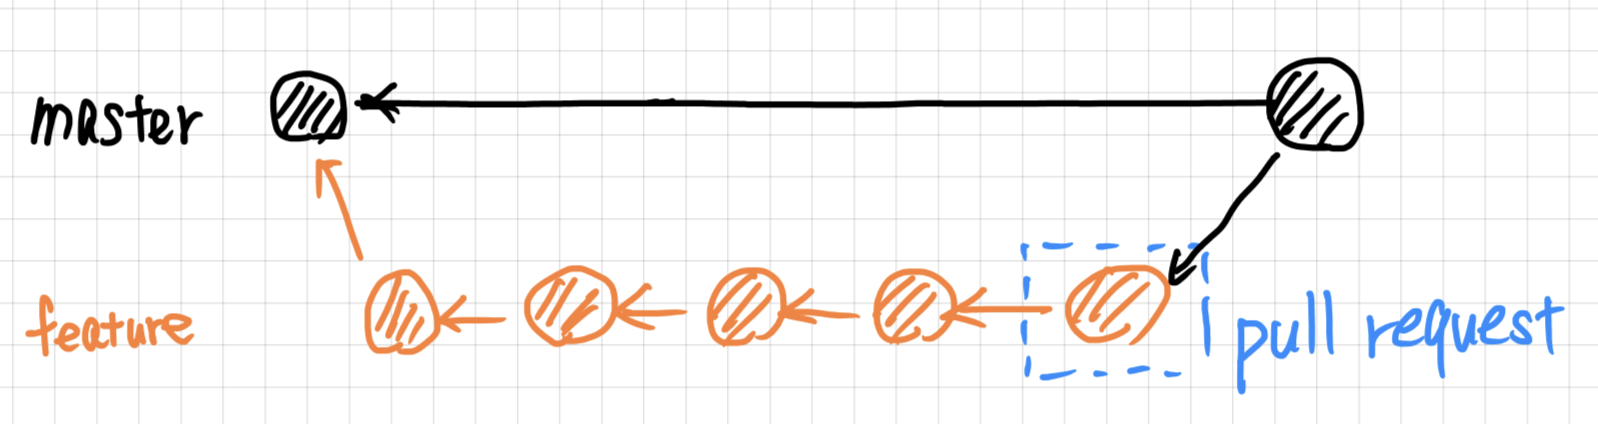
Creating a Pull Request
A pull request (PR) is a way to propose changes you’ve made on a branch to be merged back into the main branch. Other collaborators can review, discuss, and approve the changes before merging.
After making changes in your forked repository:
- Push your changes to a branch in your fork.
- Go to the original repository and click Pull requests > New pull request.
- Select your fork and branch, then submit the pull request.
Managing Issues
Issues are used to track tasks, enhancements, and bugs.
- Go to the Issues tab in your repository.
- Click New issue.
- Fill in the title and description, then submit.
Code Reviews
Collaborators can review pull requests, suggest changes, and approve merges.
- Use comments to provide feedback.
- Request changes if necessary.
- Approve and merge once the code meets standards.
GitHub Flow
GitHub Flow is a simplified branching model ideal for most projects. It uses a single main branch with short-lived feature branches.
- Create a branch from
main - Make changes and commit
- Open a Pull Request
- Review and discuss the changes
- Merge back into
main
11. Best Practices for Bioinformatics Projects
Organize Your Repository
Structure your repository to make it easy to navigate. A typical bioinformatics repo might include:
README.md: Project overview and instructions.data/: Raw and processed datasets.scripts/: Analysis scripts (e.g., Python, R).results/: Output files and visualizations.docs/: Additional documentation.
Write Clear Commit Messages
Use descriptive commit messages to explain what changes were made and why.
Good Example:
Add script for RNA-seq data normalization
Bad Example:
Update stuff
Use .gitignore Files
Exclude unnecessary files (e.g., large datasets, temporary files) from your repository by creating a .gitignore file.
Example .gitignore:
# Ignore data files
/data/raw/
/data/processed/

# Ignore temporary files
*.tmp
*.log
Document Your Work
Maintain clear documentation to help others understand and reproduce your analyses.
- Update the
README.mdwith project details. - Comment your scripts thoroughly.
- Use Markdown for well-formatted documentation.
Version Control for Data
While Git handles code effectively, managing large datasets can be challenging. Consider using Git LFS (Large File Storage) for large files.
Installing Git LFS:
$ git lfs install
Tracking Large Files:
$ git lfs track "*.csv"
$ git lfs track "*.bam"
$ git lfs track "*.fastq.gz"
12. Advanced Git Commands
Git Stash - Save Work Temporarily
When you need to switch branches but have uncommitted changes, git stash temporarily saves your work without committing it.
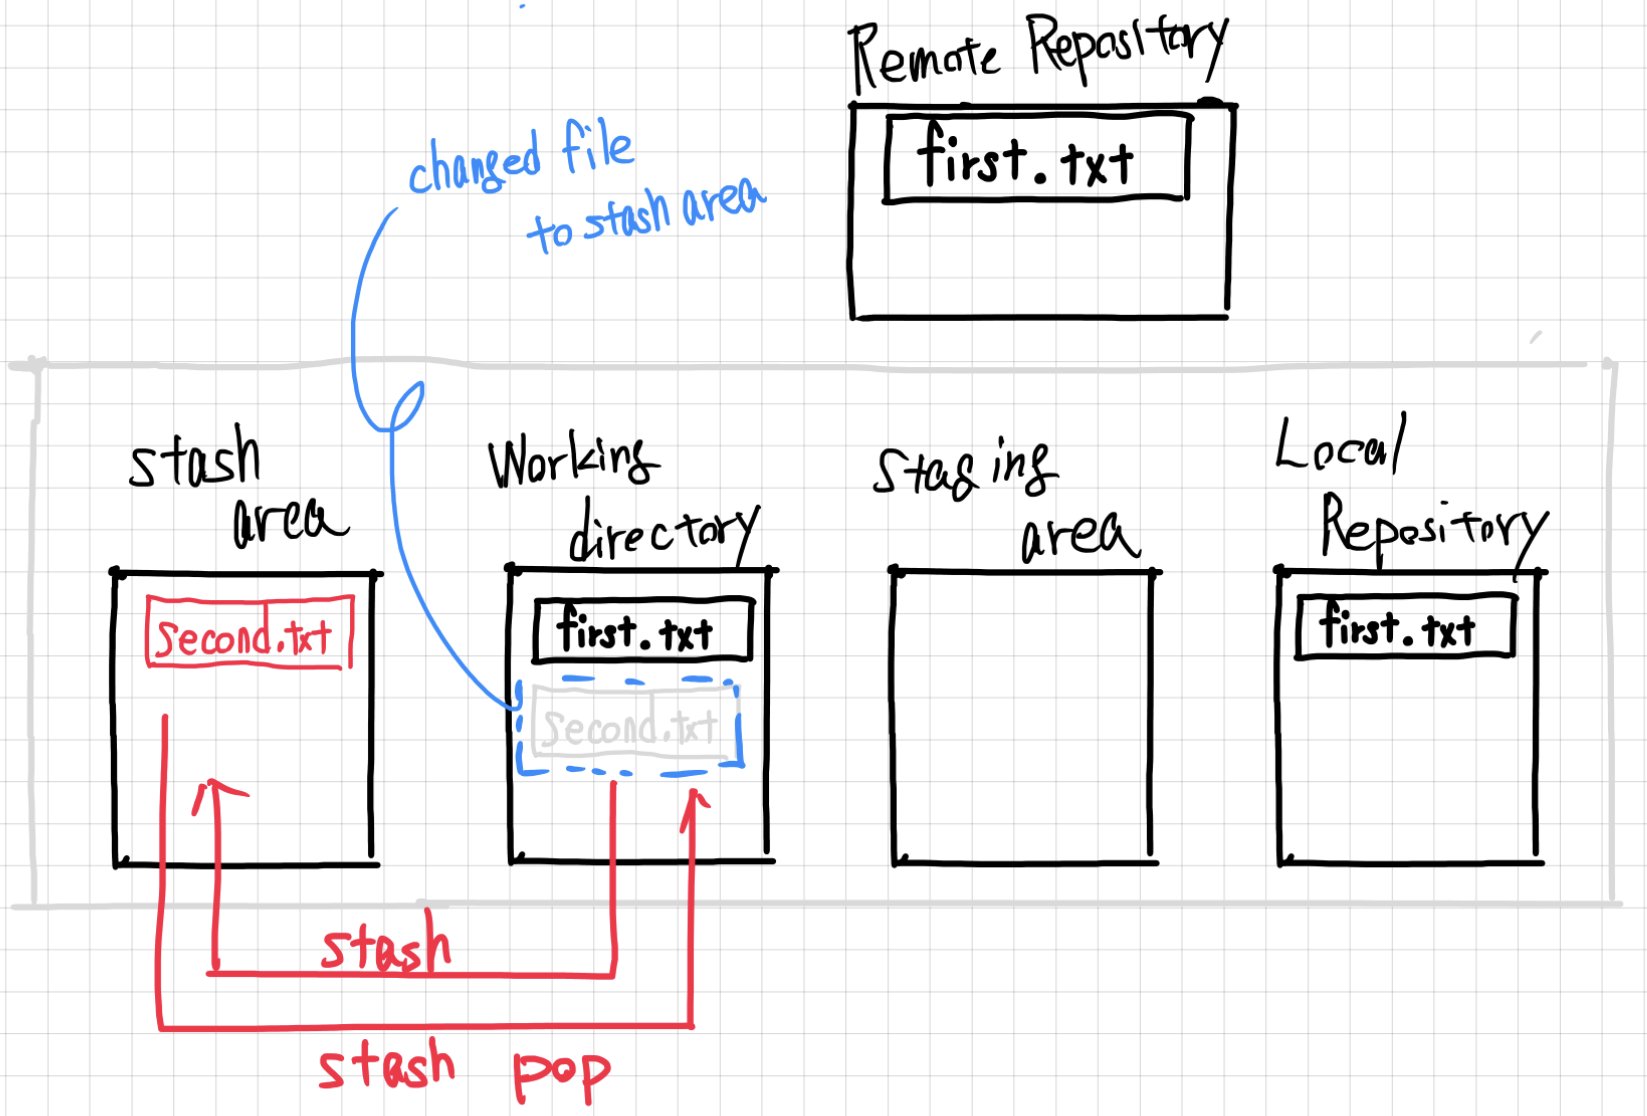
# Save current changes temporarily
$ git stash
Saved working directory and index state WIP on main: 1a2b3c4 Add analysis script
# List stashed changes
$ git stash list
stash@{0}: WIP on main: 1a2b3c4 Add analysis script
# Apply stashed changes
$ git stash pop
On branch main
Changes not staged for commit:
  (use "git add <file>..." to update what will be committed)
  (use "git restore <file>..." to discard changes in working directory)
	modified:   README.md
Dropped refs/stash@{0} (dd0559b6685e50366462c8efa17d8f92bfb0c288)
# Apply a specific stash without dropping it
$ git stash apply stash@{0}
Git Rebase - Clean History
Rebase replays your commits on top of another branch’s latest commit, creating a cleaner, linear project history.
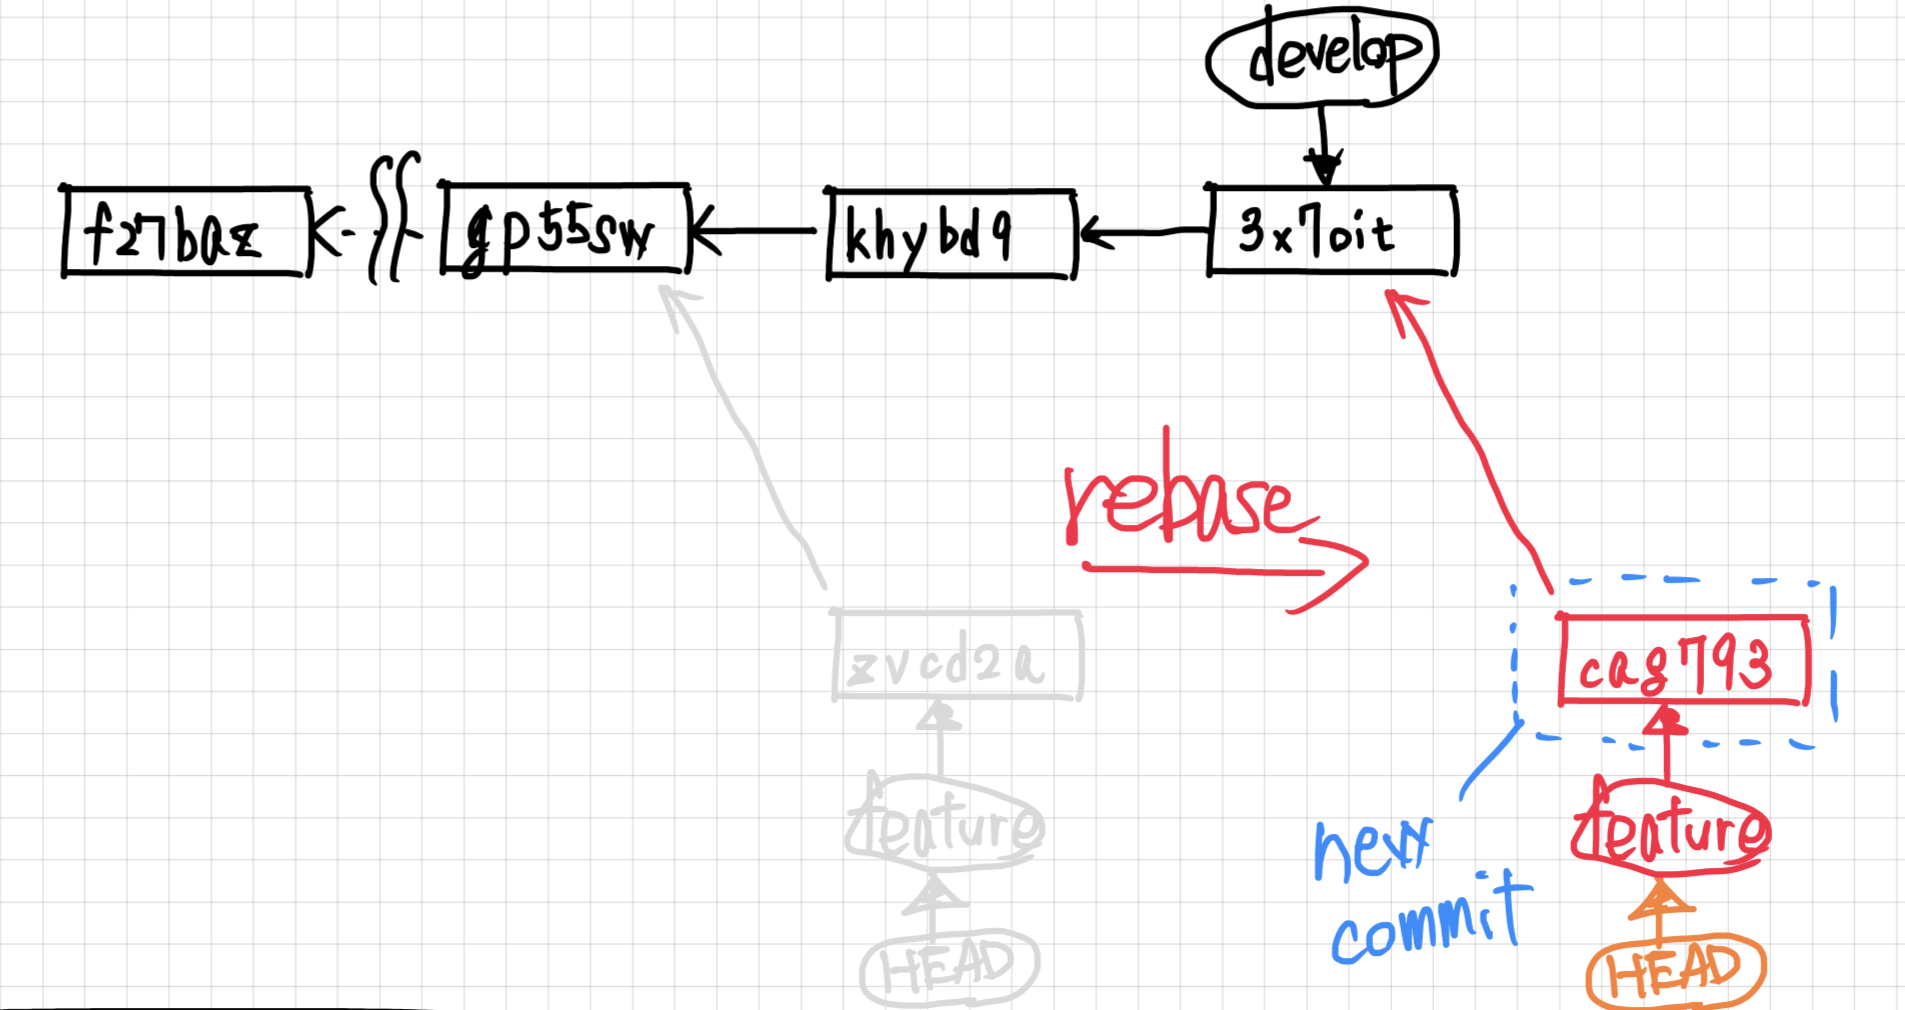
# Rebase your branch onto main
$ git checkout feature-branch
$ git rebase main
Warning: Rebase vs Merge
- Merge preserves history as it happened (safe for shared branches)
- Rebase creates linear history (use only for local/unshared branches)
Never rebase commits that have been pushed to a shared repository!
Git Cherry-pick - Select Specific Commits
Apply a specific commit from another branch:
# Get the commit hash from git log
$ git log --oneline other-branch
a1b2c3d Fix critical bug in alignment script
# Apply that commit to current branch
$ git cherry-pick a1b2c3d
Undoing Changes
Git provides several ways to undo changes depending on how far along you are in the workflow.
# Undo changes in working directory (before staging)
$ git checkout -- filename.txt
# Unstage a file (keep changes)
$ git reset HEAD filename.txt
# Undo last commit (keep changes)
$ git reset --soft HEAD~1
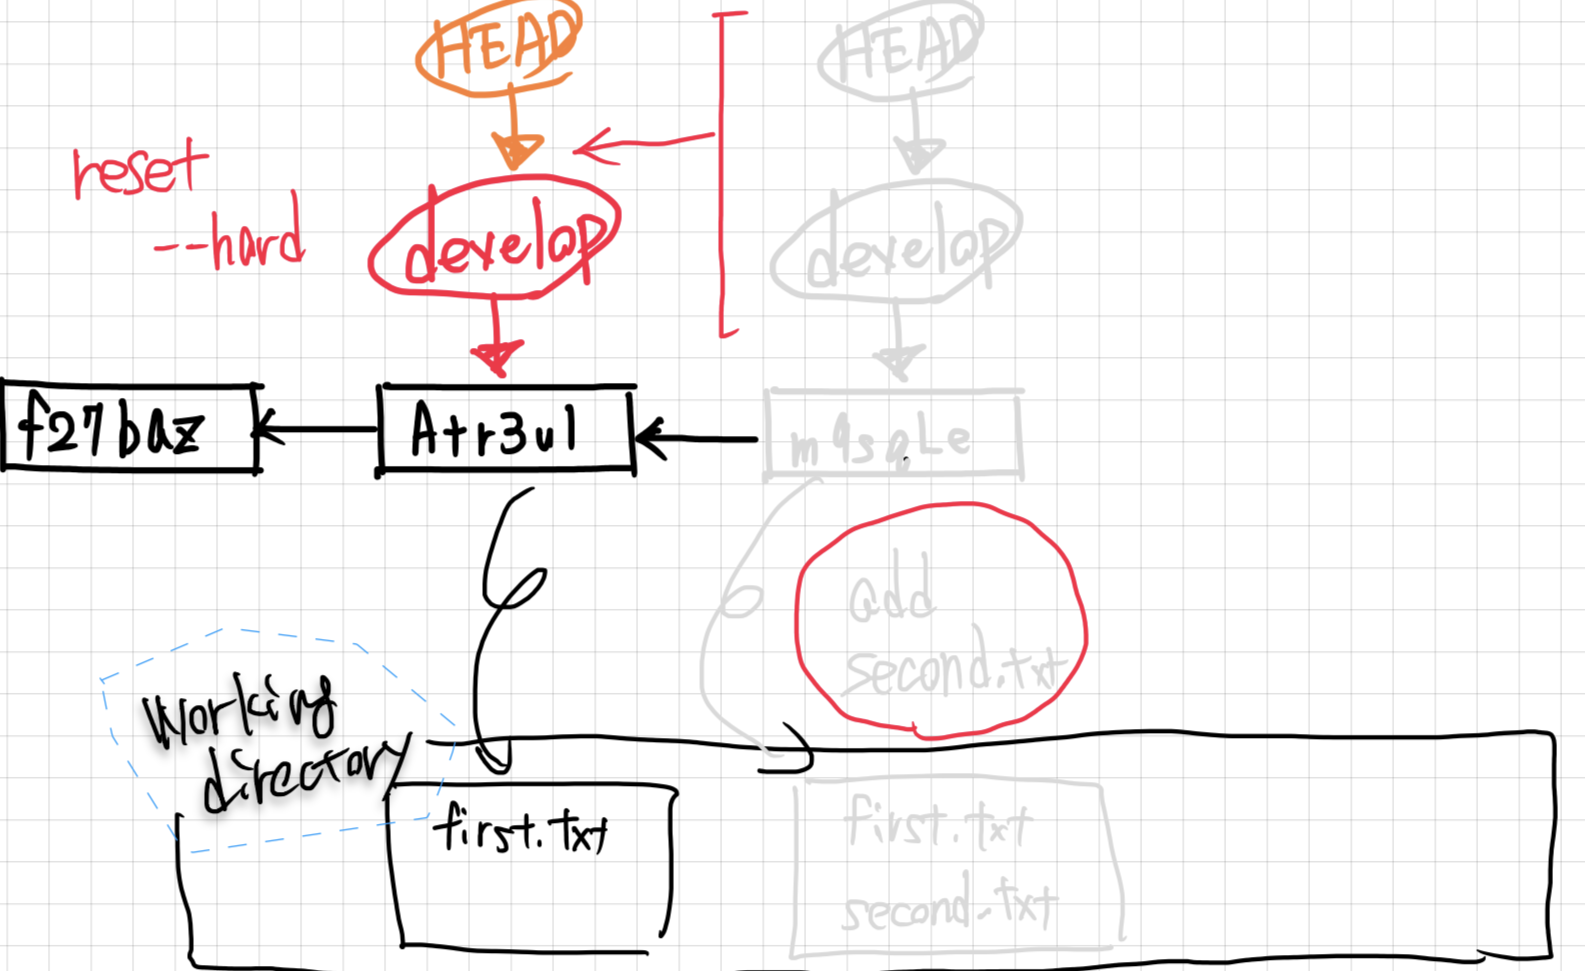
# Undo last commit (discard changes) - DANGEROUS!
$ git reset --hard HEAD~1
To safely undo a commit that has already been pushed, use git revert which creates a new commit that undoes the changes:
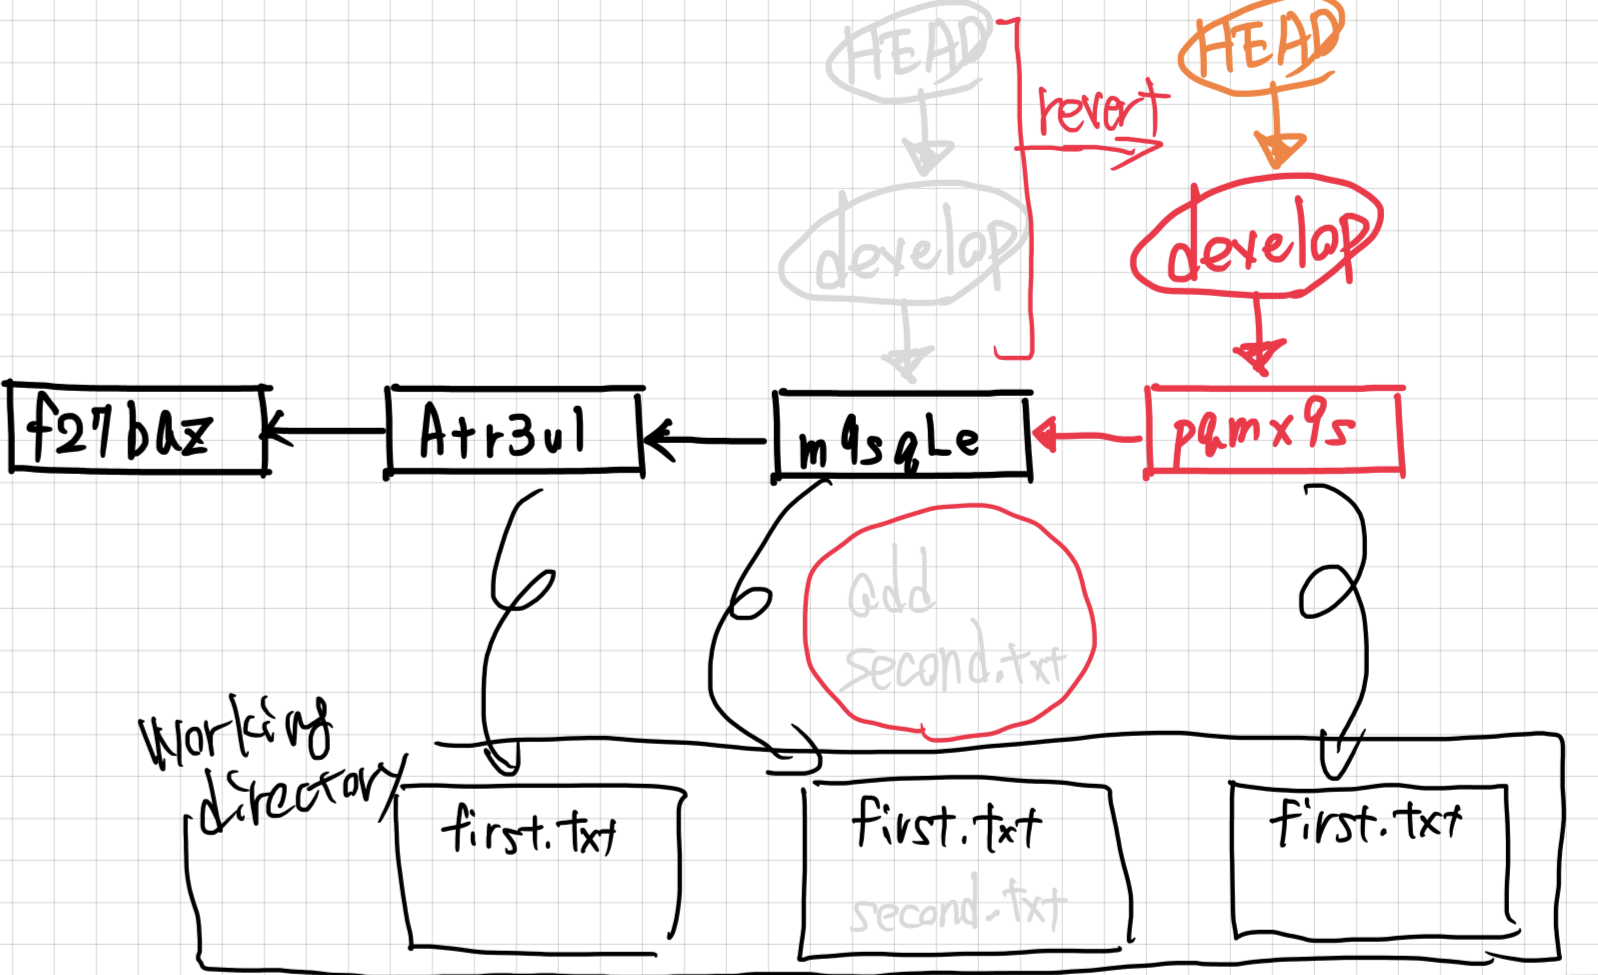
# Create a new commit that undoes a previous commit
$ git revert <commit-hash>
[main 43e91b4] Revert "junk commit"
 1 file changed, 1 deletion(-)
 delete mode 100644 junk.txt
Git Tags - Mark Important Points
Tags are useful for marking releases:
# Create a tag
$ git tag -a v1.0 -m "Version 1.0 - Initial release"

# List tags
$ git tag
v1.0
# Push tags to remote
$ git push origin --tags
To https://github.com/yourusername/my-project.git
 * [new tag]         v1.0 -> v1.0
13. Git Workflows for Bioinformatics
Feature Branch Workflow
main ─────●─────●─────●─────●─────●
           \         /
feature     ●───●───●
# Create feature branch
$ git checkout -b feature/add-qc-script

# Make changes and commit
$ git add qc_script.py
$ git commit -m "Add quality control script for FASTQ files"

# Push to GitHub
$ git push -u origin feature/add-qc-script

# Create Pull Request on GitHub, then merge
# After merge, clean up
$ git checkout main
$ git pull origin main
$ git branch -d feature/add-qc-script
Bioinformatics Project Structure
my_rnaseq_project/
├── README.md
├── .gitignore
├── environment.yml          # Conda environment
├── config/
│   └── config.yaml          # Pipeline configuration
├── data/
│   ├── raw/                  # Git LFS or .gitignore
│   └── processed/
├── scripts/
│   ├── 01_qc.sh
│   ├── 02_align.sh
│   └── 03_count.sh
├── notebooks/
│   └── analysis.ipynb
└── results/
    ├── figures/
    └── tables/
Example .gitignore for Bioinformatics
# Large data files
*.fastq
*.fastq.gz
*.bam
*.sam
*.vcf
*.bed

# Results (regeneratable)
results/

# Temporary files
*.tmp
*.log
*.swp
*~

# OS files
.DS_Store
Thumbs.db

# Python
__pycache__/
*.pyc
.ipynb_checkpoints/

# R
.Rhistory
.RData
14. Quick Reference
| Command | Description |
|---|---|
git init |
Initialize repository |
git clone <url> |
Clone repository |
git status |
Check status |
git add <file> |
Stage changes |
git commit -m "msg" |
Commit changes |
git push origin <branch> |
Push to remote |
git pull origin <branch> |
Pull from remote |
git branch <name> |
Create branch |
git checkout <branch> |
Switch branch |
git checkout -b <name> |
Create & switch branch |
git switch -c <name> |
Create & switch branch (modern) |
git merge <branch> |
Merge branch |
git log --oneline |
View history |
git diff |
View changes |
git stash |
Stash changes |
git revert <hash> |
Undo a commit safely |
git reset --hard HEAD~1 |
Undo last commit |
15. Example: Cloning a Bioinformatics Tool from GitHub
Many bioinformatics tools are available on GitHub:
$ git clone https://github.com/DaehwanKimLab/hisat2.git
$ cd hisat2
$ ls -la
$ less README.md
For compilation instructions, see the Compile and Software Installation lesson.