Overview
This lecture is designed to be run on a terminal program. With the exception of a GUI program, all of the software and data used in the terminal. Please follow the instructions below to prepare your computer for the lecture.
Please do not buy a new laptop. Your level is not that high, and our lecture will not need a new fancy computer. Please read below and think about the best way.
Required Operating System + Laptop
Windows 10 and Windows 11
1. Microsoft Office (Required)
Install MSOffice by going to the installation page or connect this site.
- The version for Windows should automatically be selected
- Once the installer is downloaded, double click on it and MSOffice should install
2. Windows Subsystem for Linux (WSL) Installation (Required)
For Windows 10 version 2004+ or Windows 11:
The easiest way to install WSL is using a single command:
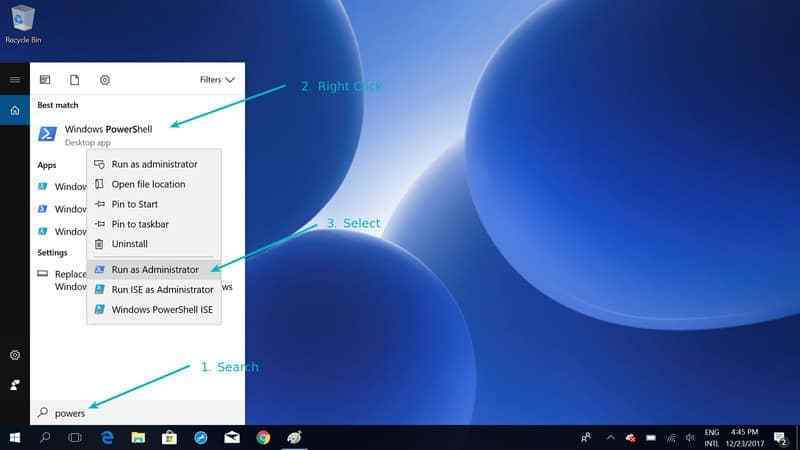
- Open PowerShell as Administrator (right click and choose “Run as administrator”)
- Run the following command:
wsl --install- Restart your computer when prompted
To install Ubuntu 24.04 LTS specifically (Recommended):
wsl --install -d Ubuntu-24.04You can also install Ubuntu 24.04 LTS from the Microsoft Store or search for “Ubuntu 24.04” in the Microsoft Store app.
After Installation:
- Launch Ubuntu from the Start menu
- The first time you launch Ubuntu, it will ask you to create a username and password
- Please be patient during the initial setup
WSL Troubleshooting:
- If you encounter issues, ensure your Windows is up to date
- For older versions of Windows 10 (before version 2004), please update Windows first
- Visit Microsoft’s official WSL documentation for detailed troubleshooting
3. Visual Studio Code (Required)
Installation Steps:
Download: Visit https://code.visualstudio.com/ and click “Download for Windows”
Run the installer (.exe file) and follow the installation wizard
- During installation, check these options:
- ✓ “Add to PATH” (recommended)
- ✓ “Create a desktop icon” (optional)
- ✓ “Add ‘Open with Code’ action to context menu” (recommended)
- Install WSL Extension (Required for WSL integration):
- Launch VS Code
- Press
Ctrl+Shift+Xto open Extensions marketplace- Search for “WSL”
- Install the official “WSL” extension by Microsoft
- This allows you to open and edit files in your WSL Ubuntu environment directly from VS Code
Why VS Code is Required for This Course:
- Built-in terminal for running bioinformatics commands
- Syntax highlighting for Python, R, Bash, and bioinformatics file formats
- Git integration for version control
- Remote development support (WSL, SSH to Pronghorn HPC, containers)
- Jupyter notebook support for data analysis
- Free and open source
AI Assistant Extensions (Optional but Recommended):
VS Code supports AI coding assistants like CODEX, Claude, and Gemini to help with coding, debugging, and understanding bioinformatics code.
General Installation Steps:
- Open Extensions view in VS Code: Press
Ctrl+Shift+X(or click Extensions icon in Activity Bar)- Search for AI extensions in the search bar
- Click “Install” on the extension you want
- Configure the extension with your API key or OAuth (in File > Preferences > Settings)
Popular AI Extensions:
- GitHub Copilot:
- Search for “GitHub Copilot”
- Requires GitHub Copilot subscription (free for students with GitHub Education)
- Best-in-class code completion and AI assistance
- Sign up for GitHub Education: https://education.github.com/
- CODEX (OpenAI):
- Search for “CODEX” or “OpenAI” extensions
- Requires OpenAI API key
- Provides AI code assistance directly in VS Code
- Claude (Anthropic):
- Search for “Claude Dev” or “Cline”
- Requires Anthropic API key or Claude Pro/Max subscription
- Provides AI assistance directly in VS Code
- Gemini (Google):
- Search for extensions supporting Gemini
- Requires Google Gemini API key or Google Cloud authentication
- Google Cloud Code extension also offers Gemini integration
How to Use:
- Select code and send it to AI for explanation or optimization
- Ask AI to generate code snippets for bioinformatics tasks
- Get help debugging errors in your scripts
- Request explanations of complex algorithms
Note: These extensions are optional. You can use web-based versions of CODEX, Claude, or Gemini instead.
4. Git Bash (Highly Recommended)
Git Bash provides a Unix-like bash terminal on Windows, which is useful for running Git commands and bash scripts directly on Windows (without WSL).
Installation Steps:
- Download: Visit https://git-scm.com/download/win
- The download should start automatically
- Or click “Click here to download manually” if it doesn’t start
Run the installer (.exe file) and follow the installation wizard
- During installation, recommended options:
- ✓ Use Visual Studio Code as Git’s default editor (if VS Code is already installed)
- ✓ Git from the command line and also from 3rd-party software
- ✓ Use bundled OpenSSH
- ✓ Use the OpenSSL library
- ✓ Checkout Windows-style, commit Unix-style line endings
- ✓ Use MinTTY (the default terminal of MSYS2)
- ✓ Enable file system caching
- After installation:
- You can launch “Git Bash” from the Start menu
- Git Bash provides a bash terminal with common Unix commands
- Useful for quick Git operations and running bash scripts on Windows
What’s included:
- Git version control system
- Bash terminal emulator
- Common Unix utilities (ls, grep, awk, sed, etc.)
- SSH client for remote connections
Windows 7 and under
1. Microsoft Office (Required)
- Install MSOffice by going to the installation page
- The version for Windows should automatically be selected
- Once the installer is downloaded, double click on it and MSOffice should install
2. PuTTY (Required for SSH)
- Install Putty by going to the installation page
- For most newer computers, click on putty-64bit-X.XX-installer.msi to download the 64-bit version
- If you have an older laptop, you may need to get the 32-bit version putty-X.XX-installer.msi
- If you aren’t sure whether you need the 64 or 32-bit version, you can check your laptop version by following the instructions here
- Once the installer is downloaded, double click on it, and PuTTY should install
3. Visual Studio Code (Required)
- Download: Visit https://code.visualstudio.com/ and click “Download for Windows”
- Run the installer (.exe file) and follow the installation wizard
- During installation, check “Add to PATH” (recommended)
AI Assistant Extensions (Optional but Recommended):
- Open Extensions in VS Code: Press
Ctrl+Shift+X- Search for “GitHub Copilot,” “CODEX,” “Claude Dev,” or “Gemini”
- Install and configure with API keys
- Popular options:
- GitHub Copilot: Search “GitHub Copilot” (free for students via GitHub Education)
- CODEX: Search “CODEX” or “OpenAI” (requires OpenAI API key)
- Claude: Search “Claude Dev” or “Cline” (requires Anthropic API key)
- Gemini: Search for Gemini extensions (requires Google API key)
- These AI tools help with coding, debugging, and understanding bioinformatics code
4. Git Bash (Highly Recommended)
- Download: Visit https://git-scm.com/download/win
- Run the installer and follow the installation wizard with default options
- After installation, launch “Git Bash” from the Start menu
- Git Bash provides a Unix-like bash terminal with Git and common Unix commands
Mac OS X
- Install MSOffice by going to the installation page. The version cannot be selected. Once the installer is downloaded, double click on it and MSOffice should install.
Terminal Application (Required):
- Mac has native Terminal (press command + space and search for “terminal”)
- Recommended: I strongly recommend using iTerm2 for a better terminal experience
- iTerm2 offers split panes, search, autocomplete, and better customization
- Download from https://iterm2.com/
- Free and widely used by developers
Code Editor / IDE (Required):
- Visual Studio Code (Required):
- Download: Visit https://code.visualstudio.com/ and download for macOS
- Open the downloaded .zip file and drag “Visual Studio Code.app” to Applications folder
- Launch VS Code from Applications or via Spotlight (
Cmd+Space, type “Visual Studio Code”)- First-time setup: VS Code may ask to install command line tools - click “Install” to enable
codecommand in Terminal- Recommended Extensions for Bioinformatics:
- Python (Microsoft)
- R (REditorSupport)
- Remote - SSH (for connecting to HPC clusters)
- Jupyter (for notebook support)
- Why VS Code?
- Free and open source
- Integrated terminal
- Excellent for Python, R, Bash scripting
- Git integration
- Remote development (SSH to Pronghorn HPC)
- Large extension ecosystem
- AI Assistant Extensions (Optional but Recommended):
- Open Extensions view: Press
Cmd+Shift+X(or click Extensions icon)- Search for AI extensions: “GitHub Copilot,” “CODEX,” “Claude Dev,” or “Gemini”
- Install and configure with API keys (in Code > Preferences > Settings)
- Popular options:
- GitHub Copilot: Search “GitHub Copilot” (free for students via GitHub Education)
- CODEX: Search “CODEX” or “OpenAI” (requires OpenAI API key)
- Claude: Search “Claude Dev” or “Cline” (requires Anthropic API key or Claude Pro/Max)
- Gemini: Search for Gemini extensions (requires Google Gemini API key)
- Use AI to help with coding, debugging, and understanding bioinformatics algorithms
- Select code and ask AI for explanations, optimizations, or bug fixes
- Optional: You can also use web-based versions instead
- Alternative - Sublime Text (Optional):
- If you prefer a lighter text editor instead of a full IDE
- Fast, lightweight, and powerful
- Download from https://www.sublimetext.com/
- Free to evaluate (unlimited trial), license available for purchase
- Note: VS Code is required for the course, but you may use Sublime Text for simple text editing
Command Line Tools (Required):
- Install Xcode Command Line Tools. Open Terminal (or iTerm2) and run:
xcode-select --install- For detailed instructions, see Command Line Tools Installation Guide
Homebrew Package Manager (Highly Recommended):
- Homebrew is the most popular package manager for macOS, essential for installing bioinformatics software
- Install Homebrew by running this command in Terminal:
/bin/bash -c "$(curl -fsSL https://raw.githubusercontent.com/Homebrew/install/HEAD/install.sh)"- After installation, follow any instructions to add Homebrew to your PATH
- Verify installation:
brew --version- For more information, visit https://brew.sh/
Why Homebrew?
- Easy installation of bioinformatics tools (samtools, bwa, BLAST, etc.)
- Automatic dependency management
- Simple updates with
brew updateandbrew upgradeEssential Tools via Homebrew (Recommended):
- After installing Homebrew, install essential development tools:
brew install git curl wget vim- git: Version control system
- curl/wget: Download tools for fetching files from the internet
- vim: Powerful text editor for terminal
- These tools may already be installed via Command Line Tools, but Homebrew versions are often more up-to-date
Linux
Office Suite:
- Install LibreOffice by going to the installation page. The version for Linux should automatically be selected. Click Download Version X.X.X (whichever is the most recent version). You will go to a page that asks about a donation, but you don’t need to make one. Your download should begin automatically.
- Once the installer is downloaded, double click on it and LibreOffice should install.
Terminal:
- Open terminal using Ctrl+Alt+T or search for “terminal”, “xterm”, or “uxterm” in your application menu
Code Editor / IDE (Required):
- Visual Studio Code (Required):
- Installation via Snap (Recommended for Ubuntu 24.04):
sudo snap install code --classic- Alternative: Installation via .deb package:
- Download from https://code.visualstudio.com/
- Or install via terminal:
sudo apt update sudo apt install wget gpg wget -qO- https://packages.microsoft.com/keys/microsoft.asc | gpg --dearmor > packages.microsoft.gpg sudo install -D -o root -g root -m 644 packages.microsoft.gpg /etc/apt/keyrings/packages.microsoft.gpg sudo sh -c 'echo "deb [arch=amd64,arm64,armhf signed-by=/etc/apt/keyrings/packages.microsoft.gpg] https://packages.microsoft.com/repos/code stable main" > /etc/apt/sources.list.d/vscode.list' rm -f packages.microsoft.gpg sudo apt update sudo apt install code- Launch VS Code by typing
codein terminal or searching for “Visual Studio Code” in your application menu- Recommended Extensions for Bioinformatics:
- Python (Microsoft)
- R (REditorSupport)
- Remote - SSH (for HPC connections)
- Jupyter (for notebook support)
- Why VS Code for Linux?
- Free and open source
- Integrated terminal
- Perfect for Python, R, and Bash scripting
- Git integration
- Remote development capabilities
- AI Assistant Extensions (Optional but Recommended):
- Open Extensions view: Press
Ctrl+Shift+X(or click Extensions icon)- Search for AI extensions: “GitHub Copilot,” “CODEX,” “Claude Dev,” or “Gemini”
- Install and configure with API keys (in File > Preferences > Settings)
- Popular options:
- GitHub Copilot: Search “GitHub Copilot” (requires subscription, free for students via GitHub Education)
- CODEX: Search “CODEX” or “OpenAI” (requires OpenAI API key)
- Claude: Search “Claude Dev” or “Cline” (requires Anthropic API key or Claude Pro/Max)
- Gemini: Search for Gemini extensions (requires Google Gemini API key)
- Use AI to help with coding, debugging, and understanding bioinformatics algorithms
- Select code and ask AI for explanations, optimizations, or bug fixes
- Optional: You can also use web-based versions instead
System Update (Required):
- Before installing any software, update your system. Open Terminal and run:
sudo apt update sudo apt upgrade -y- The first command updates package lists
- The second command upgrades installed packages
- You may be prompted for your password
Build Essential Tools (Required):
- Install build-essential package for compiling software:
sudo apt install build-essential -y- This package includes:
- GCC/G++ compilers
- Make and other build tools
- Standard C/C++ libraries
- Verify installation:
gcc --version
make --version
Additional Recommended Packages:
sudo apt install git curl wget vim -y
- git: Version control system
- curl/wget: Download tools
- vim: Text editor for terminal
Old laptop
If you’re laptop is old; We still have an option. Please choose one option in High-Performance Computing and Cloud service and connect to Google Cloud SSh
Chromebook
Of course you can do it with Secure Shell App
Phone (Android/IOS)
Of course you can do it with Termius Not recommended.
Pencil
Of course you can do it with Termius Not recommended.
Required Additional Software
This lesson requires a working web browser, terminal, spreadsheet program. If you don’t have a spreadsheet program already, you can use MSOffice for free with your affiliated email. The following guide will provide the specific information about the required software. Please select your OS system to install the software.
High-Performance Computing and Cloud service
Option A: Using the lessons on your local machine
It is possible to work through the lessons on your local machine (i.e., without using cloud or Pronghorn). However, I would recommend experiencing in High-Performance Computing and Cloud service.
Option B: Using Pronghorn (High-Performance Computing)
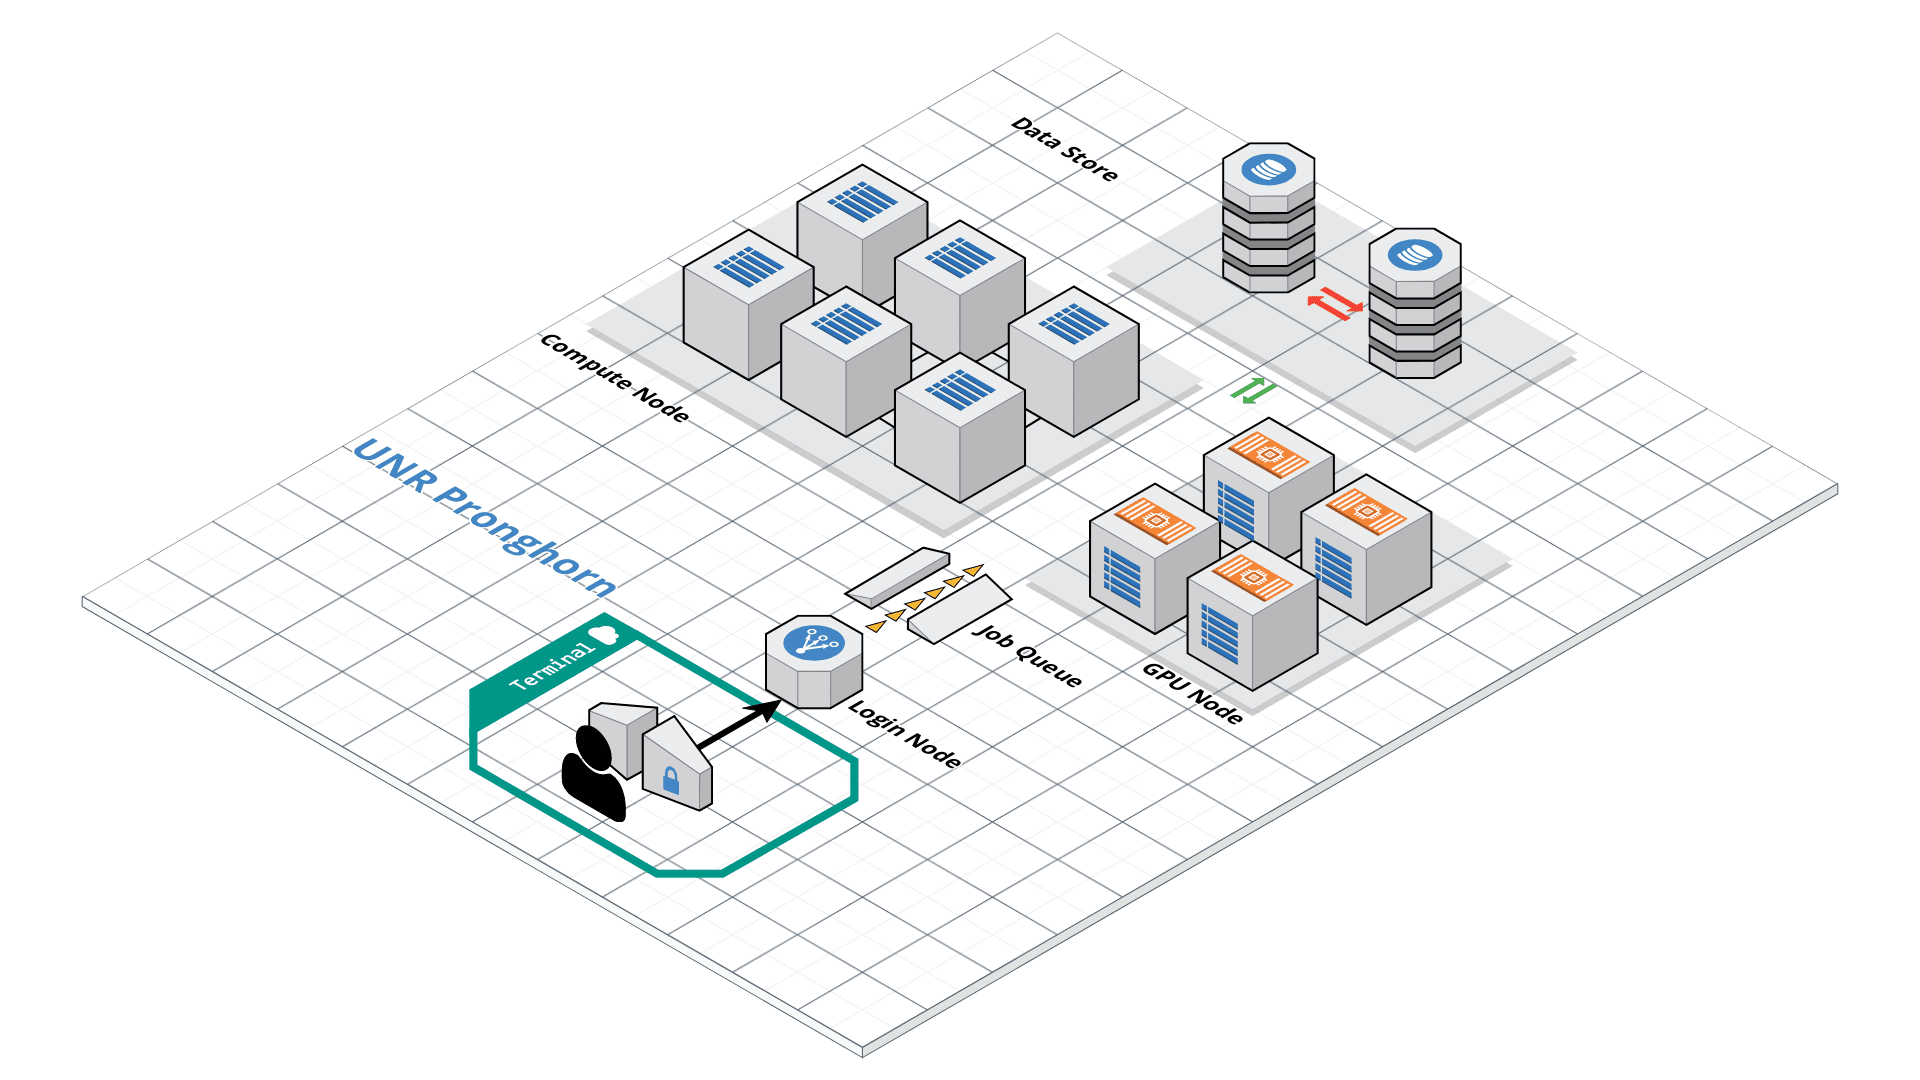
Pronghorn is the University of Nevada, Reno’s new High-Performance Computing (HPC) cluster. The GPU-accelerated system is designed, built and maintained by the Office of Information Technology’s HPC Team. Pronghorn and the HPC Team supports general research across the Nevada System of Higher Education (NSHE).
Pronghorn is composed of CPU, GPU, and Storage subsystems interconnected by a 100Gb/s non-blocking Intel Omni-Path fabric. The CPU partition features 93 nodes, 2,976 CPU cores, and 21TiB of memory. The GPU partition features 44 NVIDIA Tesla P100 GPUs, 352 CPU cores, and 2.75TiB of memory. The storage system uses the IBM SpectrumScale file system to provide 1PB of high-performance storage. The computational and storage capabilities of Pronghorn will regularly expand to meet NSHE computing demands.
Pronghorn is collocated at the Switch Citadel Campus located 25 miles East of the University of Nevada, Reno. Switch is the definitive leader of sustainable data center design and operation. The Switch Citadel is rated Tier 5 Platinum, and will be the largest, most advanced data center campus on the planet.
Pronghorn is available to all University of Nevada, Reno faculty, staff, students, and sponsored affiliates. Priority access to the system is available for purchase. Please apply your account here
Option C: Using Google Cloud Platform (GCP)
Currently, this lecture is supported by the Google Cloud Platform. If you want to try, we will provide free credit for your usage (about USD $1.50 per user, per day). If you choose this option, you need to have a Google account. We will mainly use the compute engine to run our bioinformatics project. Please check below.
 Won Yim has no control over GCP pricing structure and provides this
cost estimate with no guarantees. Please read the documentation on pricing for up-to-date information.
Won Yim has no control over GCP pricing structure and provides this
cost estimate with no guarantees. Please read the documentation on pricing for up-to-date information.
Option D: Using Amazon Web Service
If you would like to work through Amazon Web Service (AWS). I will not stop you. The cost of using this AWS for a few days, with the t2.medium instance type is very low (about USD $1.50 per user, per day). Won Yim has no control over AWS pricing structure and provides this cost estimate with no guarantees. Please read GCP documentation on pricing for up-to-date information.
Data
The data used in this lecture will be available by direct link.