BASH customization
When you work with the command line and the bash shell frequently, you will want to customize the environment. This can mean changing environment variables, such as where the shell looks for commands or how the prompt looks, or adding customized commands.
For example, macOS sets the PATH environment variable to /usr/local/bin:/usr/bin:/bin:/usr/sbin:/sbin by default. This is a list of directories (separated by a colon ‘:’) that the system searches through in order for commands. I like to add a folder in my home directory ~/bin to that list, so that I can execute certain tools without needing to type out the full path. (e.g. munkipkg, quickpkg and ssh-installer).
In bash you append to existing PATH do this with:
export PATH="$PATH:~/bin"
You could type this command every time you open a new Terminal window (i.e. shell), or you can configure your shell to do this automatically. Depending on which shell you use and how you start the shell, then certain script files will be executed which allow you to set up these customizations. This article will talk about customizing bash on macOS. Other shells and other operating systems may have other files or rules.
Which file?
There are (mainly) two user level files which bash may run when a bash shell starts. ~/.bash_profile or ~/.bashrc.
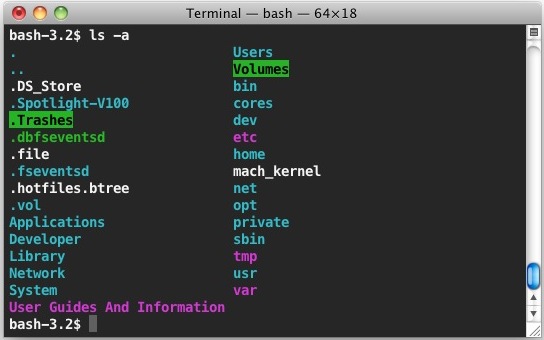
Both these files are on the first level of your home directory ~/. Since the file names start with a . Finder and normal ls will not show them. You need to use ls -a to see if they are present.
The usual convention is that .bash_profile will be executed at login shells, i.e. interactive shells where you login with your user name and password at the beginning. When you ssh into a remote host, it will ask you for user name and password (or some other authentication) to log in, so it is a login shell.
When you open a terminal application, it does not ask for login. You will just get a command prompt. In other versions of Unix or Linux, this will not run the .bash_profile but a different file .bashrc. The underlying idea is that the .bash_profile should be run only once when you login, and the .bashrc for every new interactive shell.
However, macOS does not follow this convention. When Terminal.app opens a new window, it will run .bash_profile. Not, as users familiar with other Unix systems would expect, .bashrc.
This is all very confusing.
There are two main approaches:
When you are living mostly or exclusively on macOS and the Terminal.app, you can create a .bash_profile, ignore all the special cases and be happy. If you want to have an approach that is more resilient to other terminal applications and might work (at least partly) across Unix/Linux platforms, put your configuration code in .bashrc and source .bashrc from .bash_profile with the following code in .bash_profile:
if [ -r ~/.bashrc ]; then
   source ~/.bashrc
fi
The if [ -r … ] tests wether a file exists and is readable and the source command reads and evaluates a file in place. Sometimes you see
[ -r ~/.bashrc ] && . ~/.bashrc
(mind the spaces) Which is a shorter way to do the same thing.
Since either file can drastically change your environment, you want to restrict access to just you:
$ chmod 700 ~/.bash_profile
$ chmod 700 ~/.bashrc
That was confusing. Is that all?
No. There are more files which may be executed when a shell is created.
When bash cannot find .bash_profile it will look for .bash_login and if that does not exist either .profile. If .bash_profile is present the succeeding files will be ignored. (though you can source them in your .bash_profile)
There is also a file /etc/profile that is run for interactive login shells (and Terminal.app). This provides a central location to configure the shells for all users on a system. On macOS /etc/profilesets the default PATH with the path_helper tool and then sources /etc/bashrc which (you guessed) would be the central file for all users that is executed for non-login interactive shells. For macOS Terminal.app /etc/bashrc sets the default prompt and then itself sources /etc/bashrc_Apple_Terminal which sets up the session persistence across logins.
So in macOS Terminal.app, before you even see a prompt, these scripts will be run:
/etc/profile /etc/bashrc /etc/bashrc_Apple_Terminal if it exists: ~/.bash_profile when ~/.bash_profile does not exists, ~/.bash_login when neither ~/.bash_profile nor ~/.bash_login exist, ~/.profile ~/bash_profile can optionally source ~/.bashrc There is also a file ~/.inputrc, where you can setup certain command line input options. One common example for this is to enable case-insensitive tab-completion. You can find a list of more options here.
Ok, so I have the file, now what?
Whichever file you choose, (I went with option one and have everything in .bash_profile) now you want to put stuff in it.
Technically this is a script, so you can do anything you can code in bash. However, usually the contents of a .bash_profile or .bashrc fall into one of three categories:
- setting environment variables, usually ones that affect shell behavior (PATH) or look and feel (PS1) or set configuration for other commands or programs (CLICOLOR)
- aliases
- functions
bash aliases
Note: bash aliases are something completely different from Finder aliases. The closest shell equivalent for Finder alias files are symbolic links.
bash aliases are basically text substitutions. For example a common alias is to define:
alias ll="ls -l"
-
You can type this alias definition directly into bash but then the definition will only exist for that particular shell. When you open a new terminal window it will know nothing of this alias. If you want an alias to exist in all your shells (and usually you do), you need to add the above line to your .bash_profile or .bashrc.
-
Whenever you modify the .bash_profile or .bashrc it will not automatically be loaded into any shell that is already open, you either have to close the Terminal window and open a new one or write
$ source ~/.bash_profile(or ~/.bashrc) to load the new settings.
Once you have set the alias, anytime you type ll at the start of a command, bash will replace it with ls -l before executing. Since subsequent arguments are left alone they will just be picked up by the substituted ls command, so if you type ll -a bash will substitute that to ls -l -a and it will work just your would expect.
You can make the alias more complex if you want:
alias lll="ls -alhTOe@"
If you always want to use the long format of ls, you can alias the ls command itself:
alias ls="ls -l"
Then, when ever you type ls it will be replaced with ls -l. Note the lack of spaces around the ‘=’, as usual when assigning values in bash.
Uncovering the alias
You can unset or delete an alias with the unalias command:
$ unalias ls
This will return to the default ls command (for this bash instance only).
Since alias substitution only happens at the beginning of the command, you can also bypass it once by starting the command line with a different character:
$ "ls" -S
$ \ls -S
Either way of typing this will use the original ls command, avoiding substitution, just this once.
If you are unsure if a command has an alias or want to know what gets substituted, then you can have the alias definition printed with
$ alias ls
alias ls='ls -l'
$ alias lll
alias lll='ls -alhTOe@'
You can also list all defined aliases by running alias without any arguments:
$ alias
alias ll=’ls -l’
alias lll=’ls -alhTOe@’
alias ls=’ls -l’
Some Alias examples
Some users like to alias the potentially dangerous commands rm, mv and cp with the -i option, which forces the user to confirm when a file is going to be deleted or overwritten:
alias rm="rm -i"
alias mv="mv -i"
alias cp="cp -i"
Then if you do something that could destroy an existing file you will be prompted to confirm:
$ rm my_important_file
remove my_important_file? You can still use \rm to bypass the alias, if you believe you know what you are doing and want to avoid being prompted several times.
You can add short cuts to cd to parent folders:
alias ..="cd .."
alias ...="cd ../.."
alias cd..="cd .."
Since alias substitution only takes place at the beginning of the command, you can still use .. normally as an argument.
Note that the last alias cd.. is a substitution of a common typo. Since the output of the alias is not checked for further alias substitutions you cannot use alias cd..=.. to define it using the previous alias. Each alias must stand for itself.
Choose your own PATH
The PATH environment variable contains a list of directories that bash will search through for commands. You can show your current path by echoing the PATH variable:
$ echo $PATH
/usr/local/bin:/usr/bin:/bin:/usr/sbin:/sbin:
This is the default PATH for a ‘clean’ macOS. Depending on what you have installed, there may be more elements in your PATH. The individual directories are separated by a colon :. When you enter a command, like for example systemsetup at the prompt, bash will search through the directories in PATH in the order until it finds a match.
Note: if there is ever any question on which command is actually executed, you can use the which command to get the effective path to a given command from the shell:
$ which python
/usr/bin/python
$ which systemsetup
/usr/sbin/systemsetup
$ which bash
/bin/bash
You might have installed other (newer versions) of certain tools (such as python or bash itself). Depending on how you install them they may be installed in a way that overrides the tool that is part of macOS. This may lead to problems when scripts assume the system version of a tool.
You can add your own directories by either appending (safe) or prepending (risky) your own directories to the PATH variable:
PATH=$PATH:~/bin
export PATH
This will add the ~/bin directory (which does not exist by default, you have to create and fill your own) to your PATH. The export command tells bash it should export this variable to child processes.
You can add more than one directory to the PATH, either at once, or one per line:
export PATH=$PATH:~/bin:~/Projects/scripts
or
PATH=$PATH:~/bin
PATH=$PATH:~/Projects/scripts
export PATH
Since bash stops looking when it finds a match, the order of the directories in the PATH is important. When you place your directories before the default directories you can override some of the system commands. This can be powerful, but also very dangerous. There are safer methods for overriding system commands. You should add your directory to the end of the PATH to be safe.
Note: the PATH (and other environment variables) are exported to child-shells and scripts executed from the shell. However, not every tool executes directly from a shell, or from a shell with your configuration file. So you should never assume PATH (or any other environment variable) is set to anything specific (or even set) when you write a script. You can either set the PATH at the beginning of a script, or use absolute paths for commands in scripts such as /usr/bin/defaults or /usr/bin/pkgbuild. You can determine the path to a command with the which command.
List in Color
You can also tell bash to color for some other commands, such as ls. To do that you just have to set the CLICOLOR variable:
export CLICOLOR=1
LSCOLORS changes the colors when you run ls
As you may have guessed, this has to do with the ls command in terminal. That is to say when we list the contents of a folder we can make it pretty with colors!!!. The MAC dev site explains what all those letters mean after LSCOLORS here. However, I’m going to summarize it for you. The first letter “E” is the color of the directory folders (bold blue), the second letter “x” is the default background color of the folder. The second half of the list below explains the sequence. You can play around with it but we really only care about the first 2 letters.
The color designators are as follows:
a black b red c green d brown e blue f magenta g cyan h light grey A bold black, usually shows up as dark grey B bold red C bold green D bold brown, usually shows up as yellow E bold blue F bold magenta G bold cyan H bold light grey; looks like bright white x default foreground or background
Note that the above are standard ANSI colors. The actual display may differ depending on the color capabilities of the terminal in use.
The order of the attributes are as follows:
- directory
- symbolic link
- socket
- pipe
- executable
- block special
- character special
- executable with setuid bit set
- executable with setgid bit set
- directory writable to others, with sticky bit
- directory writable to others, without sticky bit
Here is exampl folders set to a red background (b) with a bold cyan text (G).
export CLICOLOR=1
export LSCOLORS=Gbfxcxdxbxegedabagacad

Here is example for dark.
export CLICOLOR=1
export LSCOLORS=GxFxCxDxBxegedabagaced
In linux, I always use below.
alias ls='ls --color=auto'
Prompt Me!
You can also configure the command prompt, i.e. the text that bash displays before you enter a command. By default the macOS prompt looks like this:
hostname:currentDir user$
 The configuration for the prompt is stored in the PS1 environment variable. You can see the default value by echoing it:
$ echo $PS1
\h:\W \u$
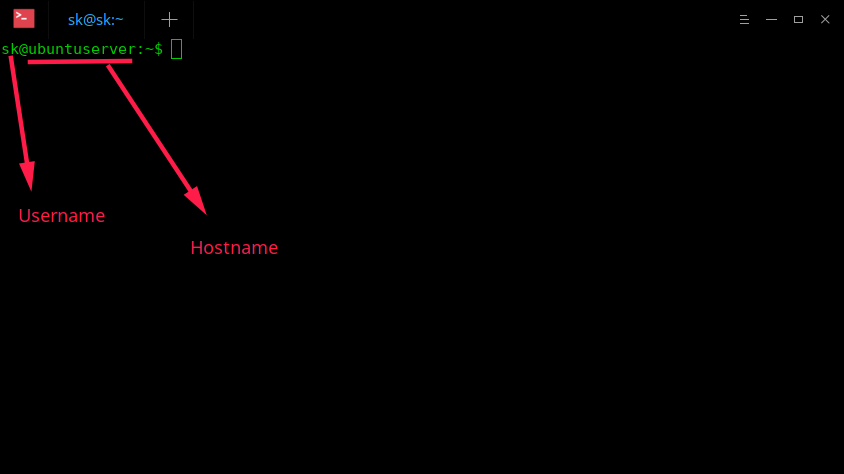
The letters with the backslash \ in the prompt variable are placeholders that will be replaced with a specific value when the prompt is printed out.
\h will be replaced with the hostname of the computer up to the first . (\H would be the complete hostname) \W will be the basename of the current working directory \u is the current user $ will be $ unless the current user is root or effectively elevated to root privileges, in which case it will be #. This is very useful as a warning when working with elevated privileges. Since I am the only user on my Mac, and I also know which Mac I am sitting at, I have changed my prompt to something simpler:
export PS1="\W \$ "
Note the space after the $. If you forget that the cursor will stick right on the $.
(When I log in to a different Mac with ssh the different prompt also reminds me that this shell is on a different Mac.)
You can find a list of escape sequences here.
You can also add color to the prompt data, but the escape sequences will look very messy very quickly. To have the directory name in gray, you use:
export PS1="\[\e[1;30m\]\W\[\e[m\] \\$ "
Is there any easy way?
Of course there are. You can use this website to make your OWN PS1.
What does Won Yim use?
###setting history length see HISTSIZE and HISTFILESIZE in bash(1)
HISTSIZE=1000
HISTFILESIZE=3000

###Alias
alias vi='vim'
alias grep='grep --color=auto'
alias egrep='egrep --color=auto'
alias ls='ls --color=auto'
alias ll='ls -alhg'
alias la='ls -A'
alias l='ls -CF'

###PS1
tty -s && export PS1="\[\033[38;5;2m\]\u\[$(tput sgr0)\]\[\033[38;5;15m\] \[$(tput sgr0)\]\[\033[38;5;33m\]@\[$(tput sgr0)\]\[\033[38;5;15m\] \[$(tput sgr0)\]\[\033[38;5;2m\]\h\[$(tput sgr0)\]\[\033[38;5;15m\] \[$(tput sgr0)\]\[\033[38;5;166m\]\t\[$(tput sgr0)\]\[\033[38;5;15m\] \[$(tput sgr0)\]\[\033[38;5;2m\]\w\[$(tput sgr0)\]\[\033[38;5;15m\] \[$(tput sgr0)\]\[\033[38;5;4m\]\\$\[$(tput sgr0)\]\[\033[38;5;15m\]\n \[$(tput sgr0)\]"

# macOS only Add homebrew sbin to PATH variable
export PATH=$PATH:/usr/local/sbin