Reading and Watching
- Reading 1: Luscombe et al., 2001
- Reading 2: Attwood 2000
- Reading 3: Smith 2018
- Nano Text Editor Basics
- Edit files on command line
Before you start
- Access to a Unix-like terminal (Linux, macOS, or WSL) with internet connectivity.
- Permission to install software (either
sudoon Linux or Homebrew on macOS); on managed systems, check with your admin first.- Run install commands on your own machine or assigned training server—not on shared clusters unless instructed.
- Comfort with copy/paste in your terminal and a basic text editor (nano/vim/emacs) available.
Assignments
Please complete the following assignments before the due date:

History of UNIX
Unix was conceived and implemented in 1969 at AT&T’s Bell Laboratories by Ken Thompson, Dennis Ritchie, Douglas McIlroy, and Joe Ossanna. Initially released in 1971 and written in assembly language, Unix was re-written in C in 1973 by Dennis Ritchie, making it more portable across platforms. A legal issue forced AT&T to license the source code, which led to its widespread adoption in academia and industry. In 1984, AT&T began selling Unix as a proprietary product after divesting Bell Labs.
Why UNIX
- Unix is historically significant in computing.
- Two dominant OS families: Unix-based and Windows-based.
- Widely used in back-end systems and personal computing.
- Unix derivatives like Linux are open source and community-developed.
- Skills learned in Unix transfer easily to other platforms.

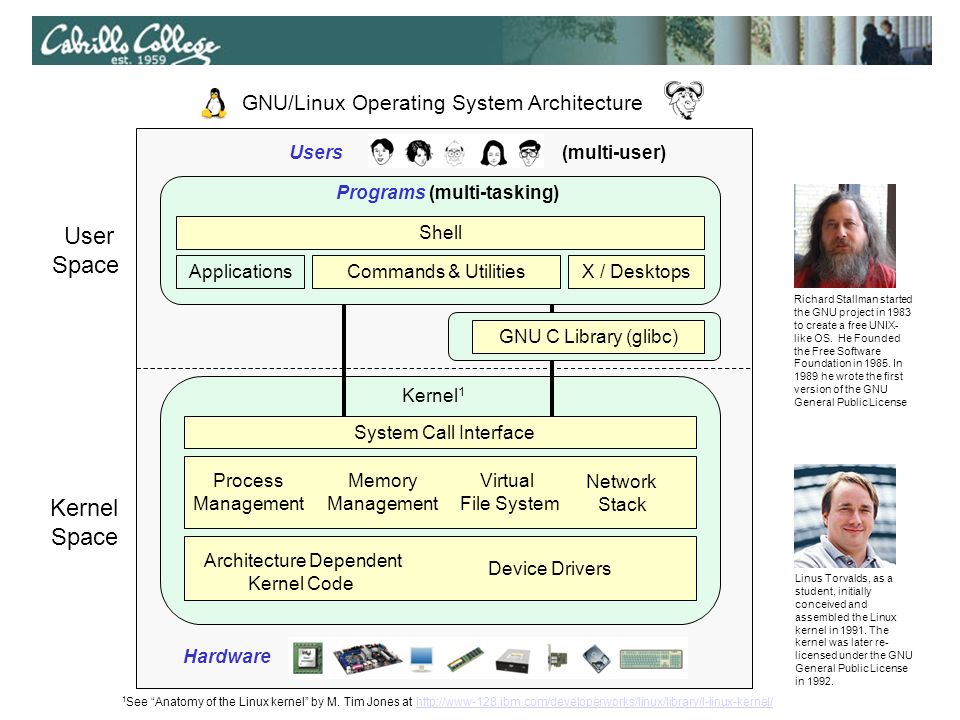
The Kernel
The kernel is the core of the operating system, managing memory, time, file storage, and communications in response to system calls.
BSD
BSD (Berkeley Software Distribution) is a Unix variant developed at UC Berkeley. Derivatives like FreeBSD, OpenBSD, and NetBSD have emerged from BSD. OS X (macOS) and PS4 also have roots in BSD.
LINUX
Linux, released by Linus Torvalds in 1991, is a Unix-like, open-source operating system. Initially built for Intel x86 PCs, Linux has since been ported to more platforms than any other OS. It is now widely used on servers, supercomputers, mobile phones (Android), and gaming consoles like the Nintendo Switch.
Every Linux Concept Explained in 8 Minutes

- Linux means Linus’s MINIX. Linus Torvalds is known for his frank communication style.
- Famous quotes from Linus:
- “Talk is cheap. Show me the code.”
- “What am I going to do without my coffee maker? I’m going to sit here in a corner, crying, that’s what.”

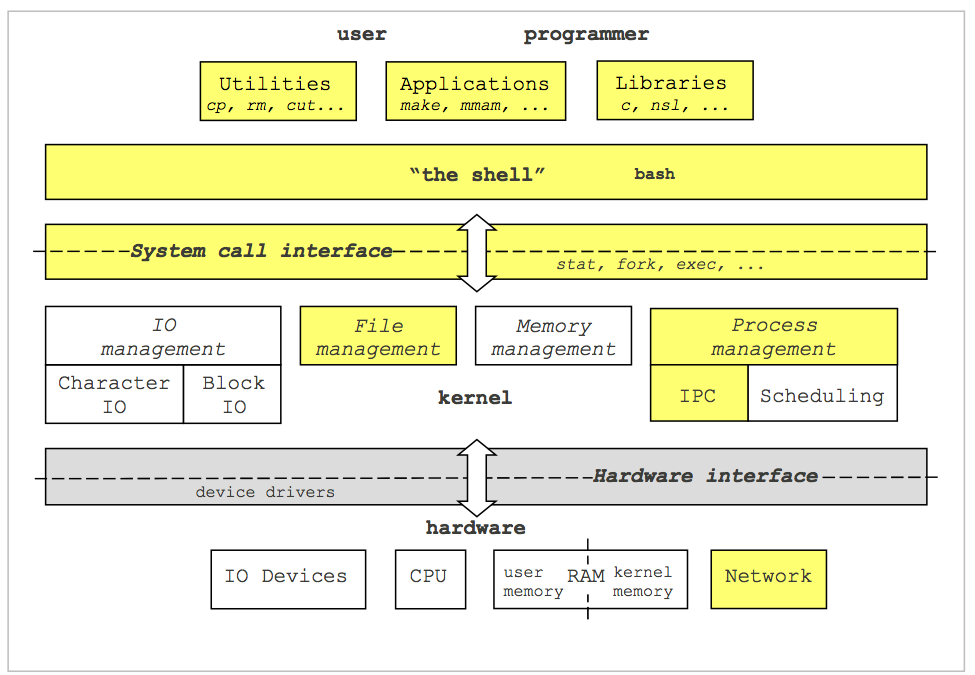
Unix/Linux Main Components
Unix/Linux systems consist of three main parts:
- User Space: User-accessible programs, libraries, and utilities.
- Kernel Space: Manages interactions between user actions and hardware.
- Hardware: Physical components like CPU, memory, and I/O devices.
What is GNU?
GNU is a free operating system that respects users’ freedom. It is Unix-like but contains no Unix code. The GNU project was started by Richard Stallman, and the GNU General Public License ensures software freedom to use, modify, and share.
How about macOS (XNU)?
macOS’s kernel is XNU (XNU is Not Unix), a hybrid of the Mach kernel and BSD components. While macOS and Linux may seem similar, they have distinct histories and features.
 GNU and Tux

Operating Systems Tasks
OS tasks include managing file systems, device I/O, processes, memory management, and more.
I/O
I/O (Input/Output) refers to the communication between a system and the outside world, such as with a human or another processing system.
The Shell
The shell is an interface between the user and the kernel, interpreting commands and arranging their execution.
Shell Types
Bash in 100 Seconds

Different shells have unique features:
- Bourne Shell (sh)
- Korn Shell (ksh)
- Bourne Again Shell (bash) - Default in most Linux distributions.
- C Shell (csh)
- TENEX/TOPS C Shell (tcsh)

Bourne Shell was created in the mid-1970s by Stephen R. Bourne.
BASH
Bash (Bourne Again Shell) offers command-line editing, job control, and more, making it a powerful interactive shell.

Text Editor Options
Common text editors in Unix/Linux:
- nano
- emacs
- vim

Using nano
Nano, created in 1999, is a free replacement for Pico and includes features like colored text and multiple buffers.
Using emacs
GNU Emacs is a highly customizable text editor with an extensive feature set, including syntax highlighting and a built-in tutorial.
Using vim
Vi is the standard Unix text editor and a powerful tool for text manipulation. Vim (Vi Improved) adds more features.
Text Editor Cheat Sheets
go to nano
#!/bin/bash
echo "hello world"
Save it “first.sh”
####
sh first.sh
Shebang line
A shebang line (e.g., #!/bin/bash) at the top of a script tells the OS which interpreter to use for executing the file.
In order to make it possible to execute scripts as though they were first class executables, UNIX systems will looks for what we refer to as a shebang line at the top of the file. The origin of the name is murky. Some think it came from sharp-bang or hash-bang – contractions of # (“sharp”) and ! (“bang”). Others think the “SH” is in reference to the first UNIX shell, named “sh”.
In any case, if a UNIX system sees that the first line of an executable begins with #!, then it will execute the file using whatever command is specified in the rest of the line. For example, if there’s a file named /path/to/bar that looks like:
#!/bin/bash
#!/bin/python
#!/bin/perl
Advanced shebang line
For perl
#!/usr/bin/env perl
For python
#!/usr/bin/env python
Explainshell
Your first Unix command.
echo "Hello World!"
Basic commands
| Category | command |
|---|---|
| Navigation | cd, ls, pwd |
| File creation | touch,nano,mkdir,cp,mv,rm,rmdir |
| Reading | more,less,head,tail,cat |
| Compression | zip,gzip,bzip2,tar,compress |
| Uncompression | unzip,gunzip,bunzip2,uncompress |
| Permissions | chmod |
| Help | man |
Open Current Folder in File Manager
You can open your current terminal directory in a graphical file manager:
Mac (iTerm2/Terminal):
open .This opens the current directory in Finder.
Windows WSL:
explorer.exe .This opens the current directory in Windows Explorer.
Accessing WSL Files from Windows Explorer:
- Open Windows Explorer
- Type in the address bar:
\\wsl$- You’ll see your Linux distributions listed (e.g.,
Ubuntu)- Navigate to your home directory:
\\wsl$\Ubuntu\home\{username}Tip: Pin
\\wsl$\Ubuntu\home\{username}to Quick Access for easy access!You can also type this directly in Explorer’s address bar:
\\wsl.localhost\Ubuntu\home\{username}
pwd
Returns the
presentworkingdirectory (print working directory).$ pwd/home/{username}This means you are now working in the home directory, located under your username. You can also avoid writing the full path by using
~in front of your username, or simply~.
mkdir
To create a directory, the
mkdir(make directory) command can be used.$ mkdir <DIRECTORY>Example:
$ cd ~
$ mkdir bch709_test
Like most Unix commands,
mkdirsupports command-line options. For example, the-poption allows you to create parent directories in one step:$ mkdir -p bch709_test/helpNote: Unix allows spaces in directory names using
\(e.g.,mkdir bch709\ test), but this is not recommended.
cd
The
cdcommand stands forchangedirectory.$ cd <DIRECTORY>Example:
$ cd bch709_testTo check your current directory, use:
$ pwd/home/{username}/bch709_testTo move up one level to the parent directory:
$ cd ..To move up two levels to the grandparent directory:
$ cd ../../To navigate to the root directory:
$ cd /To return to your home directory:
$ cd ~To navigate to a specific directory:
$ cd ~/bch709_test/helpTo move up one level again:
$ cd ../
Absolute and relative paths
The
cdcommand allows you to change directories relative to your current location. However, you can also specify an absolute path to navigate directly to a folder.
- Absolute path:
$ cd /home/<username>/bch709_test/help- Relative path:
$ cd ../
The way back home
Your home directory is
/home/<username>. To quickly return to your home directory from any location, you can use:$ cd ~Or simply:
$ cd
Pressing
<TAB>keyThe
<TAB>key helps auto-complete file or directory names when typing in the terminal. If multiple matches exist, pressing<TAB>twice will show all possible options. This feature saves time and keystrokes.
Pressing
<Arrow up/down>keyYou can recall previously used commands by pressing the
up/downarrow keys, or view your command history using thehistorycommand in the terminal.
Copy & Paste
In most terminal environments, dragging text automatically copies it, and right-clicking pastes it. On macOS, you can use
Command + CandCommand + Vdepending on your settings.
ls
The
lscommand lists the contents of a directory.The
lscommand has various useful options:
- List files in long format:
$ ls -l- List files sorted by creation time:
$ ls -t- List files sorted by size:
$ ls -S- List all files, including hidden files:
$ ls -aYou can also try combining options:
$ ls -ltrTo list files in another directory:
$ ls -l /usr/bin/
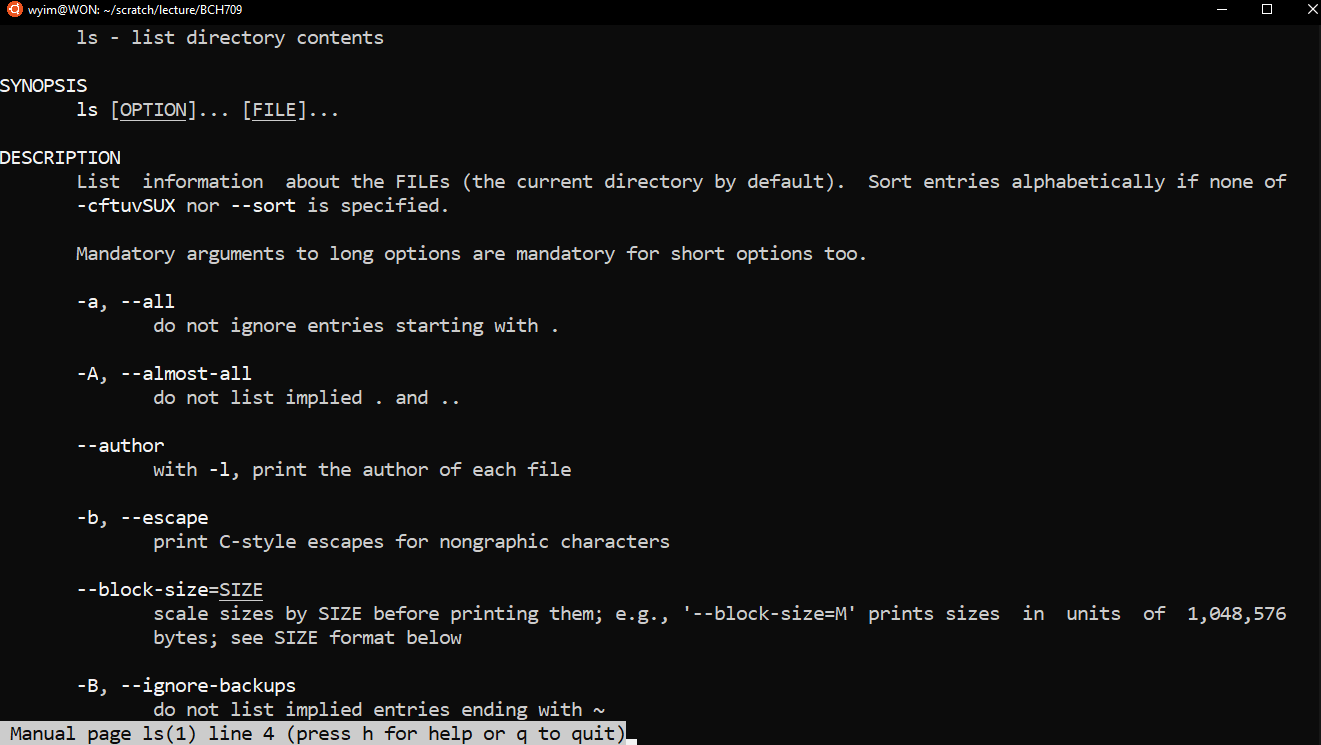
man & help
Every Unix command comes with a manual, accessible via the
mancommand. To view the manual forls:$ man lsAlternatively, many commands also support a
--helpoption:$ ls --help
rmdir
The
rmdir(remove directory) command deletes empty directories.$ rmdir <DIRECTORY>Example (assuming you’re in
bch709_testdirectory):$ cd ~/bch709_test $ rmdir help
Note: The directory must be empty, and you must be outside the directory to remove it.
touch
The
touchcommand creates an empty file. Make sure you’re inbch709_test:$ cd ~/bch709_test $ touch test.txt $ touch exam.txt $ touch ETA.txtTo list files, use:
$ lsETA.txt exam.txt test.txt
mv
The
mv(move) command moves files or directories from one location to another.$ mkdir Hello $ mv test.txt Hello $ ls Hellotest.txtYou can also use wildcards like
*to move multiple files:$ mv *.txt Hello $ ls HelloETA.txt exam.txt test.txtThe
*wildcard matches any sequence of characters. This allows you to move files that follow a particular pattern.
Renaming files with mv
The
mvcommand can also be used to rename files:$ mv Hello/test.txt Hello/renamed.txt $ ls HelloETA.txt exam.txt renamed.txt
Moving files back
You can move files back to the current directory using
.:$ mv Hello/renamed.txt . $ lsHere,
.represents the current directory.
rm
The
rm(remove) command deletes files. Be cautious when using it, as deleted files cannot be recovered. To makermsafer, use the-ioption for interactive deletion:$ rm -i renamed.txtrm: remove regular empty file 'renamed.txt'? yThis will ask for confirmation before deleting each file.
To remove multiple files:
$ rm Hello/ETA.txt Hello/exam.txt
cp
The
cp(copy) command copies files. Unlikemv, the original file remains at the source.$ touch file1 $ cp file1 file2 $ lsfile1 file2 HelloCopy a file into a directory:
$ cp file1 Hello/ $ ls Hellofile1Copy an entire directory using
-r(recursive):$ cp -r Hello Hello_backup $ lsfile1 file2 Hello Hello_backupUse
cp --helporman cpfor more options.
using . < Dot> ?
In Unix, the current directory can be represented by a . (dot) character. You will often use for copying files to the directory that you are in. Compare the following:
ls
ls .
ls ./
In this case, using the dot is somewhat pointless because ls will already list the contents of the current directory by default. Also note how the trailing slash is optional.
Clean up and start new
Before we start the next session, let’s clean up the files and folders we created.
$ cd ~/bch709_test
$ ls
You should see:
Hello,Hello_backup,file1,file2
Clean the folder with contents
To remove folders and their contents, use
rm -r(recursive):$ cd ~ $ rm -r bch709_test $ lsThis removes
bch709_testand everything inside it (Hello, Hello_backup, file1, file2).Warning:
rm -rpermanently deletes folders and all contents. Use with caution!
Downloading a file
Let’s download a file from a website. There are several commands to download files, such as
wget,curl, andrsync. In this case, we will usecurl.First, create a working directory:
$ cd ~
$ mkdir -p bch709_data
$ cd bch709_data
File location:
https://raw.githubusercontent.com/plantgenomicslab/BCH709/gh-pages/bch709_student.txtHow to use
curl:To download the file using
curl, use the following syntax:curl -L -o <output_name> <link>Example:
$ curl -L -o bch709_student.txt https://raw.githubusercontent.com/plantgenomicslab/BCH709/gh-pages/bch709_student.txt
$ ls
bch709_student.txt

Viewing file contents
There are various commands to print the contents of a file in bash. Each command is often used in specific contexts, and when executed with filenames, they display the contents on the screen. Common commands include
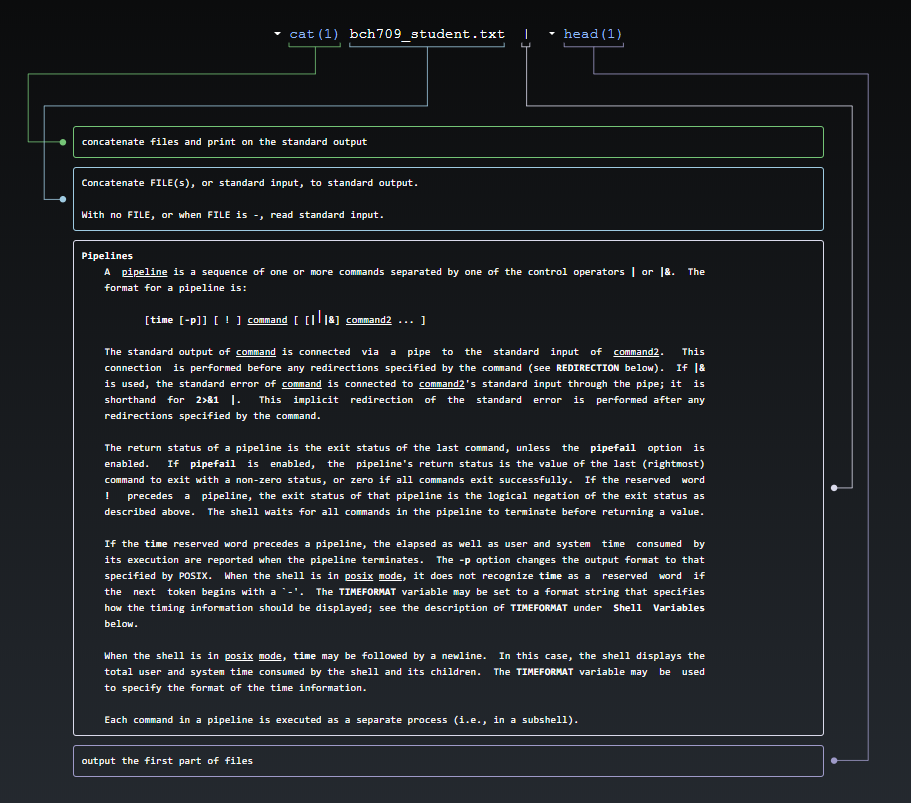
less,more,cat,head, andtail.
lessFILENAME: Try this:less bch709_student.txt. It displays the file contents with line scrolling (use arrow keys, PgUp/PgDn, space bar, or Enter to scroll). Pressqto exit.moreFILENAME: Try this:more bch709_student.txt. Similar toless, but you scroll using only the space bar or Enter. Pressqto exit.catFILENAME: Try this:cat bch709_student.txt. This command displays the entire file content at once, which may result in the file scrolling off the screen for large files.headFILENAME: Try this:head bch709_student.txt. It shows only the first 10 lines by default, but you can specify a different number using the-noption (e.g.,head -n 20).tailFILENAME: Try this:tail bch709_student.txt. It displays the last 10 lines by default, and similar tohead, you can modify the number of lines with-n.
How many lines does the file have?
You can pipe the output of your stream into another program rather than displaying it on the screen. Use the
|(Vertical Bar) character to connect the programs. For example, thewc(word count) program:cat bch709_student.txt | wcprints the number of lines, words, and characters in the stream:
106 140 956To count just the lines:
cat bch709_student.txt | wc -l106Of course, we can use
wcdirectly:wc -l bch709_student.txtThis is equivalent to:
cat bch709_student.txt | wc -lIn general, it is better to open a stream with
catand then pipe it into the next program. This method simplifies building and understanding more complex pipelines.Let’s also check the first few lines of the file using
head:cat bch709_student.txt | head
Is this equivalent to running?
head bch709_student.txt
grep
grep(Global Regular Expression Print) is one of the most useful commands in Unix. It is commonly used to filter a file/input, line by line, against a pattern. It prints each line of the file containing a match for the pattern. Check available options with:grep --helpSyntax:
grep [OPTIONS] PATTERN FILENAMELet’s find how many people use Mac. First, check the file:
wc -l bch709_student.txtless bch709_student.txtTo find the Mac users:
cat bch709_student.txt | grep MacTo count the number of Mac users:
cat bch709_student.txt | grep Mac | wc -lAlternatively:
grep Mac bch709_student.txt | wc -lOr simply:
grep -c Mac bch709_student.txtUsing flags to filter lines that don’t contain “Windows”:
grep -v Windows bch709_student.txtCombining multiple flags:
grep -c -v Windows bch709_student.txtWith case-insensitive search and colored output:
grep --color -i mac bch709_student.txt
How do I store the results in a new file?
Use the
>character for redirection:grep -i mac bch709_student.txt > mac_studentcat bch709_student.txt | grep -i windows > windows_studentYou can check the new files with
catorless.
Do you want to check the differences between two files?
diff mac_student windows_studentdiff -y mac_student windows_student
How can I select the name only? (cut)
To extract specific columns, use
cut:cat bch709_student.txt | cut -f 1Or:
cut -f 1 bch709_student.txt
How can I sort it? (sort)
Sorting names:
cut -f 1 bch709_student.txt | sortSorting by the second field:
sort -k 2 bch709_student.txtSorting by the first field:
sort -k 1 bch709_student.txtSorting and extracting names:
sort -k 1 bch709_student.txt | cut -f 1Save the sorted names:
sort -k 1 bch709_student.txt | cut -f 1 > name_sort
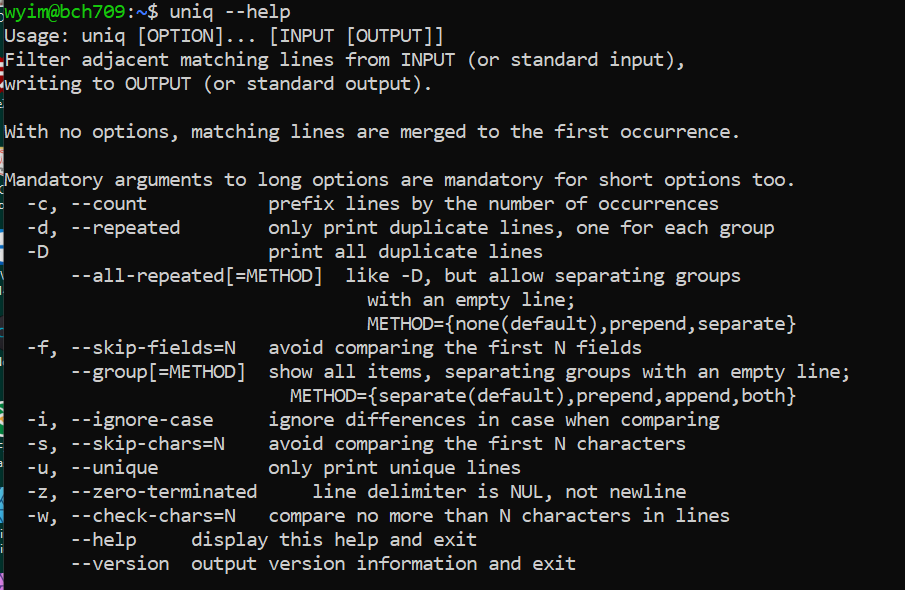
uniq
The
uniqcommand removes duplicate lines from a sorted file, retaining only one instance of matching lines. Optionally, it can show lines that appear exactly once or more than once. Note thatuniqrequires sorted input.cut -f 2 bch709_student.txt > os.txtTo count duplicates:
uniq -c os.txt
To sort and then count:
sort os.txt | uniq -c
Of course, you can sort independently:
sort os.txt > os_sort.txt
uniq -c os_sort.txt
To learn more about
uniq:uniq --help
diff
The
diffcommand compares the differences between two files. Example usage:diff FILEA FILEBWhen trying new commands, always check with
--help:Compare the contents of
os.txtandos_sort.txt:diff os.txt os_sort.txtSide-by-side comparison:
diff -y os.txt os_sort.txtYou can also pipe sorted data into
diff:sort os.txt | diff -y - os_sort.txt
There are still a lot of command that you can use. Such as paste, comm, join, split etc.
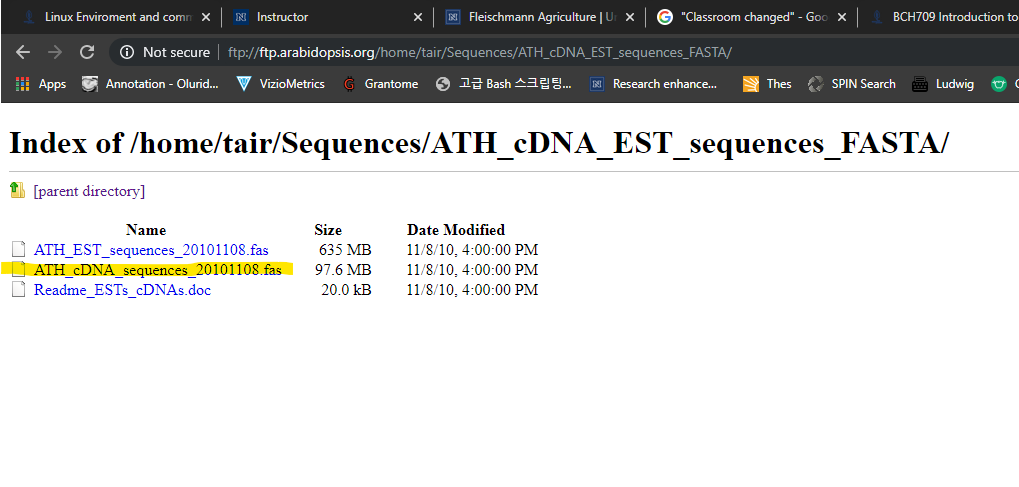
Let’s Download Bigger Data
Please visit the following website to download larger data:
https://hgdownload.soe.ucsc.edu/goldenPath/hg38/bigZips/Download the file marked in yellow.
How to Download
Make sure you’re in the working directory, then download:
$ cd ~/bch709_data
$ curl -L -O https://hgdownload.soe.ucsc.edu/goldenPath/hg38/bigZips/mrna.fa.gz
$ gunzip mrna.fa.gz
$ ls -lh mrna.fa
-rw-r--r-- 1 user group 416M Jan 20 10:00 mrna.fa
Viewing File Contents
What is the difference between
less,tail,more, andhead?
What Are Flags (Parameters/Options)?
A “flag” in Unix terminology is a parameter that is added to a command to modify its behavior. For example:
$ lsversus
$ ls -lThe
-lflag changes the output oflsto display detailed information about each file. Flags help commands behave differently or report information in various formats.
How to Find Available Flags
You can use the manual (man) to learn more about a command and its available flags:
$ man lsThis will display the manual page for
ls, detailing all available flags and their purposes.
What if the Tool Doesn’t Have a Manual Page?
Not all tools include a manual page, especially third-party software. In those cases, use the
-h,-help, or--helpoptions:$ curl --helpIf these flags do not work, you may need to refer to external documentation or online resources.
What Are Flag Formats?
Unix tools typically follow two flag formats:
- Short form: A single minus
-followed by a single letter, like-o,-L.- Long form: Double minus
--followed by a word, like--output,--Location.Flags may act as toggles (on/off) or accept additional values (e.g.,
-o <filename>or--output <filename>). Some bioinformatics tools diverge from this format and use a single-for both short and long options (e.g.,-g,-genome).Using flags is essential in Unix, especially in bioinformatics, where tools rely on a large number of parameters. Proper flag usage ensures the accuracy of results.
Oneliners
Oneliner, textual input to the command-line of an operating system shell that performs some function in just one line of input. This need to be done with “|”. For advanced usage, please check this
FASTA format
The original FASTA/Pearson format is described in the documentation for the FASTA suite of programs. It can be downloaded with any free distribution of FASTA (see fasta20.doc, fastaVN.doc or fastaVN.me—where VN is the Version Number).
The first line in a FASTA file started either with a “>” (greater-than; Right angle braket) symbol or, less frequently, a “;” (semicolon) was taken as a comment. Subsequent lines starting with a semicolon would be ignored by software. Since the only comment used was the first, it quickly became used to hold a summary description of the sequence, often starting with a unique library accession number, and with time it has become commonplace to always use “>” for the first line and to not use “;” comments (which would otherwise be ignored).
Following the initial line (used for a unique description of the sequence) is the actual sequence itself in standard one-letter character string. Anything other than a valid character would be ignored (including spaces, tabulators, asterisks, etc…). Originally it was also common to end the sequence with an “*” (asterisk) character (in analogy with use in PIR formatted sequences) and, for the same reason, to leave a blank line between the description and the sequence.
Description line
The description line (defline) or header/identifier line, which begins with ‘>’, gives a name and/or a unique identifier for the sequence, and may also contain additional information. In a deprecated practice, the header line sometimes contained more than one header, separated by a ^A (Control-A) character. In the original Pearson FASTA format, one or more comments, distinguished by a semi-colon at the beginning of the line, may occur after the header. Some databases and bioinformatics applications do not recognize these comments and follow the NCBI FASTA specification.
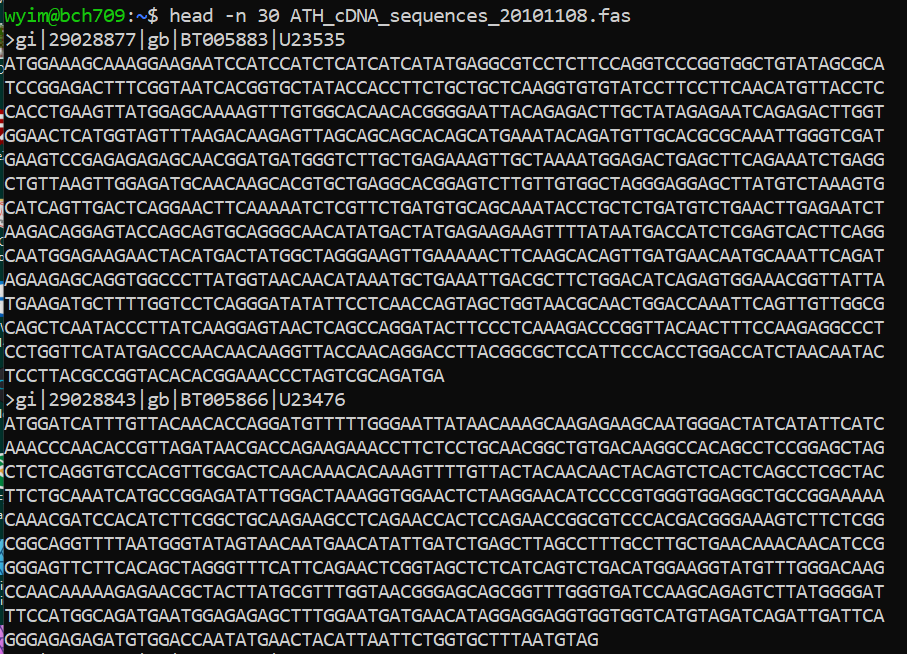
FASTA file handling with command line.
Make sure you’re in the data directory:
$ cd ~/bch709_data
Please check one fasta file
$ ls mrna.fa
mrna.fa
count cDNA
How many cDNA in this fasta file?
Please use grep wc to find number.
fasta count

count DNA letter
How many sequences (DNA letter) in this fasta file? Please use
grepwcto find number.
what is GI and GB?
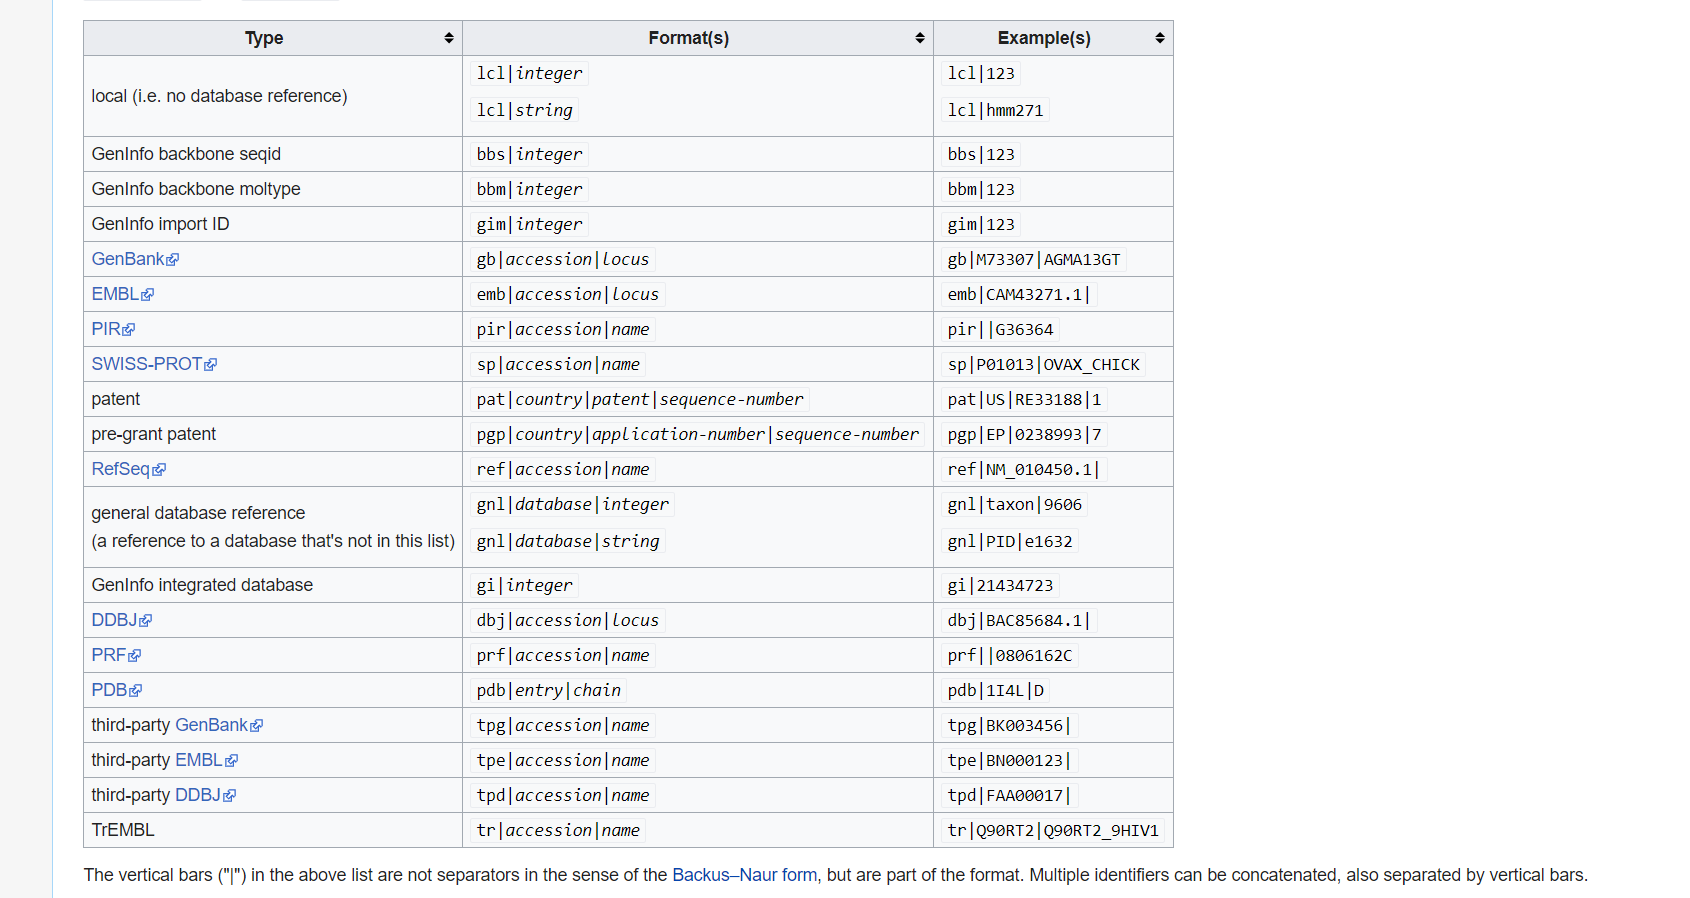
Collect GI
How can I collect GI from FASTA description line?
Please use grep cut to find number.
Sequence redundancy
Does GI have any redundancy? Please use
grepwcdiffto solve.
Split fasta
Split a multi-sequence FASTA file into individual files (one sequence per file):
# Using mrna.fa downloaded earlier
awk '/^>/{f=++d".fasta"} {print > f}' mrna.fa
ls *.fasta | head
Merge fasta
Combine multiple FASTA files into one:
cat 1.fasta 2.fasta 3.fasta >> myfasta.fasta
# Or use wildcards:
cat ?.fasta > single_digit.fasta   # matches 1.fasta, 2.fasta, etc.
cat ??.fasta > double_digit.fasta  # matches 10.fasta, 11.fasta, etc.
Search fasta
Search for specific sequences or patterns. The UCSC mrna.fa sequences are stored in lowercase, so use -i for case-insensitive matching so the same command works regardless of input case or locale:
# Find exact sequence (case-insensitive)
grep -n -i --color "GAATTC" mrna.fa | head
# Find pattern with regex (? = 0 or 1 of preceding char)
grep -n -i --color -E 'GAA?TTC' mrna.fa | head
Regular Expression
A regular expression is a pattern that the regular expression engine attempts to match in input text. A pattern consists of one or more character literals, operators, or constructs. Please play this
GFF file
The GFF (General Feature Format) format consists of one line per feature, each containing 9 columns of data, plus optional track definition lines. The following documentation is based on the Version 3 (http://gmod.org/wiki/GFF3) specifications.
Download the GFF file:
$ cd ~/bch709_data
$ curl -L -o MGI.gff3.gz http://www.informatics.jax.org/downloads/mgigff3/MGI.gff3.gz
$ ls MGI.gff3.gz
MGI.gff3.gz
What is .gz ?
$ file MGI.gff3.gz
MGI.gff3.gz: gzip compressed data
Compression
There are several options for archiving and compressing groups of files or directories. Compressed files are not only easier to handle (copy/move) but also occupy less size on the disk (less than 1/3 of the original size). In Linux systems you can use zip, tar or gz for archiving and compressing files/directories.
ZIP compression/extraction
zip OUTFILE.zip INFILE.txt # Compress INFILE.txt
zip -r OUTDIR.zip DIRECTORY # Compress all files in a DIRECTORY into one archive file (OUTDIR.zip)
zip -r OUTFILE.zip . -i \*.txt # Compress all txt files in a DIRECTORY into one archive file (OUTFILE.zip)
unzip SOMEFILE.zip
TAR Compression and Extraction
The tar (tape archive) utility is used to bundle multiple files into a single archive file and to extract individual files from that archive. It offers options for automatic compression and decompression, along with special features for incremental and full backups.
Common Commands
- To extract the contents of a gzipped TAR file:
tar -xzvf SOMEFILE.tar.gz - To create a gzipped TAR archive from a directory:
tar -czvf OUTFILE.tar.gz DIRECTORY - To archive and compress all
.txtfiles in the current directory:tar -czvf OUTFILE.tar.gz *.txt - To create a backup archive of a specific directory:
tar -czvf backup.tar.gz BACKUP_WORKSHOP
Gzip Compression and Extraction
The gzip (GNU zip) compression utility is designed as a replacement for the compress program, offering much better compression without using patented algorithms. It is the standard compression system for all GNU software.
Commands
- To compress a file:
gzip SOMEFILE # This also removes the uncompressed file - To uncompress a file:
gunzip SOMEFILE.gz # This also removes the compressed file
Example
Uncompress the file, examine the size difference, then keep it uncompressed for later exercises:
$ cd ~/bch709_data
$ ls -lh MGI.gff3.gz
-rw-r--r-- 1 user group 12M Jan 20 10:00 MGI.gff3.gz
$ gunzip MGI.gff3.gz
$ ls -lh MGI.gff3
-rw-r--r-- 1 user group 95M Jan 20 10:00 MGI.gff3
Notice the uncompressed file is ~8x larger! You can recompress with gzip MGI.gff3 if needed.
GFF3 Annotations
Note on file sizes and counts
The exact gene counts and chromosome lists below depend on when MGI.gff3 was downloaded — the database is updated regularly. Expect numbers similar in magnitude to the examples (tens of thousands of genes, mouse chromosomes 1-19, X, Y, MT).
Print all sequences annotated in a GFF3 file.
cut -s -f 1,9 MGI.gff3 | grep $'\t' | cut -f 1 | sort | uniq
1
2
...
19
MT
X
Y
Determine all feature types annotated in a GFF3 file.
grep -v '^#' MGI.gff3 | cut -s -f 3 | sort | uniq
CDS
exon
gene
lncRNA
mRNA
miRNA
ncRNA
pseudogene
tRNA
...
Determine the number of genes annotated in a GFF3 file.
grep -c $'\tgene\t' MGI.gff3
71481
Extract all gene IDs from a GFF3 file.
grep $'\tgene\t' MGI.gff3 | perl -ne '/ID=([^;]+)/ and printf("%s\n", $1)' | head
MGI_C57BL6J_1918292
MGI_C57BL6J_5455983
MGI_C57BL6J_3528744
MGI_C57BL6J_6722034
MGI_C57BL6J_5610408
...
Print all CDS lines:
$ cat MGI.gff3 | cut -f 3 | grep CDS | head
CDS
CDS
CDS
CDS
CDS
CDS
CDS
CDS
CDS
CDS
Print CDS and ID (step by step):
# Step 1: Select relevant columns
$ cat MGI.gff3 | cut -f 1,3,4,5,7,9 | head

# Step 2: Filter for CDS only
$ cat MGI.gff3 | cut -f 1,3,4,5,7,9 | grep CDS | head

# Step 3: Remove everything after semicolon
$ cat MGI.gff3 | cut -f 1,3,4,5,7,9 | grep CDS | sed 's/;.*//g' | head

# Step 4: Remove ID= prefix
$ cat MGI.gff3 | cut -f 1,3,4,5,7,9 | grep $'\tCDS\t' | sed 's/;.*//g' | sed 's/ID=//g' | head
Print length of each gene in a GFF3 file.
grep $'\tgene\t' MGI.gff3 | cut -s -f 4,5 | perl -ne '@v = split(/\t/); printf("%d\n", $v[1] - $v[0] + 1)' | head
1070
110
471778
84140
2819
2233
2309
46983
2057
3012
Extract all gene IDs from a GFF3 file.
grep $'\tgene\t' MGI.gff3 | perl -ne '/ID=([^;]+)/ and printf("%s\n", $1)'
GFF3 file format
- Fields must be tab-separated. Also, all but the final field in each feature line must contain a value; “empty” columns should be denoted with a ‘.’
- seqid - name of the chromosome or scaffold; chromosome names can be given with or without the ‘chr’ prefix. Important note: the seq ID must be one used within Ensembl, i.e. a standard chromosome name or an
- source - name of the program that generated this feature, or the data source (database or project name)
- type - type of feature. Must be a term or accession from the SOFA sequence ontology
- start - Start position of the feature, with sequence numbering starting at 1.
- end - End position of the feature, with sequence numbering starting at 1.
- score - A floating point value.
- strand - defined as + (forward) or - (reverse).
- phase - One of ‘0’, ‘1’ or ‘2’. ‘0’ indicates that the first base of the feature is the first base of a codon, ‘1’ that the second base is the first base of a codon, and so on.. attributes - A semicolon-separated list of tag-value pairs, providing additional information about each feature. Some of these tags are predefined, e.g. ID, Name, Alias, Parent - see the GFF documentation for more details.
Returns all lines on Chr 10 between 5.2MB and 5.45MB in MGI.gff3. (assumes) chromosome in column 1 and position in column 4:
cat MGI.gff3 | awk '$1=="10"' | awk '$4>=5200000' | awk '$4<=5450000'

cat MGI.gff3 | awk '$1=="10"' | awk '$4>=5200000' | awk '$4<=5450000' |  grep mRNA

cat MGI.gff3 | awk '$1=="10"' | awk '$4>=5200000' | awk '$4<=5450000' |  grep mRNA | awk '{print $0,$5-$4}'
Returns specific lines
sed -n '1,10p' MGI.gff3
##gff-version 3
#
# MGI.gff3
# Date: Mon Apr 27 09:00:11 AM EDT 2026
# Taxonid: 10090
# Genome build: GRCm39
#
# The MGI gff3 file is generated by merging information from multiple sources.
# Gene nomenclature, identifiers, and cross references come from MGI.
# Gene models come from NCBI, ENSEMBL, and miRBase. Others may be added.
sed -n '52p' MGI.gff3
1 NCBI snRNA 3172239 3172348 . + . ID=MGI_C57BL6J_5455983_transcript_2;Name=XR_004936710.1;Parent=MGI_C57BL6J_5455983;...
Time and again we are surprised by just how many applications it has, and how frequently problems can be solved by sorting, collapsing identical values, then resorting by the collapsed counts. The skill of using Unix is not just that of understanding the commands themselves. It is more about recognizing when a pattern, such as the one that we show above, is the solution to the problem that you wish to solve. The easiest way to learn to apply these patterns is by looking at how others solve problems, then adapting it to your needs.
Quick reminder
-
Learn basic Bash. Actually, type
man bashand at least skim the whole thing; it’s pretty easy to follow and not that long. Alternate shells can be nice, but Bash is powerful and always available (learning only zsh, fish, etc., while tempting on your own laptop, restricts you in many situations, such as using existing servers). -
Learn at least one text-based editor well. The
nanoeditor is one of the simplest for basic editing (opening, editing, saving, searching). However, for the power user in a text terminal, there is no substitute for Vim (vi), the hard-to-learn but venerable, fast, and full-featured editor. Many people also use the classic Emacs, particularly for larger editing tasks. (Of course, any modern software developer working on an extensive project is unlikely to use only a pure text-based editor and should also be familiar with modern graphical IDEs and tools.) - Finding documentation:
- Know how to read official documentation with
man(for the inquisitive,man manlists the section numbers, e.g. 1 is “regular” commands, 5 is files/conventions, and 8 are for administration). Find man pages withapropos. - Know that some commands are not executables, but Bash builtins, and that you can get help on them with
helpandhelp -d. You can find out whether a command is an executable, shell builtin or an alias by usingtype command. curl cheat.sh/commandwill give a brief “cheat sheet” with common examples of how to use a shell command.
- Know how to read official documentation with
-
Learn about redirection of output and input using
>and<and pipes using|. Know>overwrites the output file and>>appends. Learn about stdout and stderr. -
Basic file management:
lsandls -l(in particular, learn what every column inls -lmeans),less,head,tailandtail -f(or even better,less +F),lnandln -s(learn the differences and advantages of hard versus soft links),chown,chmod,du(for a quick summary of disk usage:du -hs *). For filesystem management,df,mount,fdisk,mkfs,lsblk. Learn what an inode is (ls -iordf -i). - Know regular expressions well, and the various flags to
grep/egrep. The-i,-o,-v,-A,-B, and-Coptions are worth knowing.
Everyday use
-
In Bash, use Tab to complete arguments or list all available commands and ctrl-r to search through command history (after pressing, type to search, press ctrl-r repeatedly to cycle through more matches, press Enter to execute the found command, or hit the right arrow to put the result in the current line to allow editing).
-
Use
aliasto create shortcuts for commonly used commands. For example,alias ll='ls -latr'creates a new aliasll. -
Save aliases, shell settings, and functions you commonly use in
~/.bashrc, and arrange for login shells to source it. This will make your setup available in all your shell sessions. -
To see recent commands, use
history. Follow with!n(wherenis the command number) to execute again. There are also many abbreviations you can use, the most useful probably being!$for last argument and!!for last command (see “HISTORY EXPANSION” in the man page). However, these are often easily replaced with ctrl-r and alt-..
Obscure but useful
-
expr: perform arithmetic or boolean operations or evaluate regular expressions -
m4: simple macro processor -
yes: print a string a lot -
cal: nice calendar -
env: run a command (useful in scripts) -
printenv: print out environment variables (useful in debugging and scripts) -
look: find English words (or lines in a file) beginning with a string -
cut,pasteandjoin: data manipulation -
fmt: format text paragraphs -
pr: format text into pages/columns -
fold: wrap lines of text -
column: format text fields into aligned, fixed-width columns or tables -
expandandunexpand: convert between tabs and spaces -
nl: add line numbers -
seq: print numbers -
bc: calculator -
factor: factor integers -
gpg: encrypt and sign files -
toe: table of terminfo entries -
nc: network debugging and data transfer -
socat: socket relay and tcp port forwarder (similar tonetcat) -
dd: moving data between files or devices -
file: identify type of a file -
tree: display directories and subdirectories as a nesting tree; likelsbut recursive -
stat: file info -
time: execute and time a command -
timeout: execute a command for specified amount of time and stop the process when the specified amount of time completes. -
lockfile: create semaphore file that can only be removed byrm -f -
logrotate: rotate, compress and mail logs. -
watch: run a command repeatedly, showing results and/or highlighting changes -
when-changed: runs any command you specify whenever it sees file changed. Seeinotifywaitandentras well. -
tac: print files in reverse -
comm: compare sorted files line by line -
strings: extract text from binary files -
tr: character translation or manipulation -
iconvoruconv: conversion for text encodings -
splitandcsplit: splitting files -
sponge: read all input before writing it, useful for reading from then writing to the same file, e.g.,grep -v something some-file | sponge some-file -
units: unit conversions and calculations; converts furlongs per fortnight to twips per blink (see also/usr/share/units/definitions.units) -
apg: generates random passwords -
xz: high-ratio file compression -
ldd: dynamic library info -
nm: symbols from object files -
aborwrk: benchmarking web servers -
strace: system call debugging -
mtr: better traceroute for network debugging -
cssh: visual concurrent shell -
rsync: sync files and folders over SSH or in local file system -
ngrep: grep for the network layer -
hostanddig: DNS lookups -
lsof: process file descriptor and socket info -
dstat: useful system stats -
glances: high level, multi-subsystem overview -
iostat: Disk usage stats -
mpstat: CPU usage stats -
vmstat: Memory usage stats -
htop: improved version of top -
last: login history -
w: who’s logged on -
id: user/group identity info -
sar: historic system stats -
ss: socket statistics -
dmesg: boot and system error messages -
sysctl: view and configure Linux kernel parameters at run time -
hdparm: SATA/ATA disk manipulation/performance -
lsblk: list block devices: a tree view of your disks and disk partitions -
lshw,lscpu,lspci,lsusb,dmidecode: hardware information, including CPU, BIOS, RAID, graphics, devices, etc. -
lsmodandmodinfo: List and show details of kernel modules. -
fortune,ddate, andsl: um, well, it depends on whether you consider steam locomotives and Zippy quotations “useful”
Recent unix command
Modern Unix
bat
A cat clone with syntax highlighting and Git integration.

exa
A modern replacement for ls.

lsd
The next gen file listing command. Backwards compatible with ls.

delta
A viewer for git and diff output

dust
A more intuitive version of du written in rust.

duf
A better df alternative

broot
A new way to see and navigate directory trees

fd
A simple, fast and user-friendly alternative to find.

ripgrep
An extremely fast alternative to grep that respects your gitignore

ag
A code searching tool similar to ack, but faster.

fzf
A general purpose command-line fuzzy finder.

mcfly
Fly through your shell history. Great Scott!

choose
A human-friendly and fast alternative to cut and (sometimes) awk

jq
sed for JSON data.

sd
An intuitive find & replace CLI (sed alternative).

cheat
Create and view interactive cheatsheets on the command-line.

tldr
A community effort to simplify man pages with practical examples.

bottom
Yet another cross-platform graphical process/system monitor.

glances
Glances an Eye on your system. A top/htop alternative for GNU/Linux, BSD, Mac OS and Windows operating systems.

gtop
System monitoring dashboard for terminal.

hyperfine
A command-line benchmarking tool.

gping
ping, but with a graph.

procs
A modern replacement for ps written in Rust.

httpie
A modern, user-friendly command-line HTTP client for the API era.

curlie
The power of curl, the ease of use of httpie.

xh
A friendly and fast tool for sending HTTP requests. It reimplements as much as possible of HTTPie's excellent design, with a focus on improved performance.

zoxide
A smarter cd command inspired by z.

dog
A user-friendly command-line DNS client. dig on steroids

Advanced Linux Topics
The following topics are covered in separate pages for more detailed learning:
| Topic | Description |
|---|---|
| File Permissions | Understanding and managing file permissions with chmod |
| Environment Variables | Working with system and user environment variables |
| Process Management | Managing processes, background jobs, and signals |
| Symbolic Links | Creating and understanding symbolic and hard links |
| Find Command | Searching for files by name, type, size, and more |
| sed - Stream Editor | Text transformations and find-and-replace operations |
| awk - Pattern Processing | Processing structured text data and columns |
| Shell Scripting Basics | Automating tasks with bash scripts |
| Standard Streams and Redirection | Working with stdin, stdout, stderr, and pipes |
| Bioinformatics File Formats | SAM/BAM, BED, VCF formats and tools |
Screen and tmux - Terminal Multiplexers
Run long jobs that continue after you disconnect from the server.
tmux Quick Start
# Start a new named session
tmux new -s analysis

# Run your long command
# ... your command here ...

# Detach: Press Ctrl+B, then D

# List sessions
tmux ls
analysis: 1 windows (created Mon Jan 20 10:00:00 2026)# Reattach later tmux attach -t analysis # Kill session when done tmux kill-session -t analysis
tmux Key Bindings (Ctrl+B, then)
| Key | Action |
|---|---|
d |
Detach from session |
c |
Create new window |
n |
Next window |
p |
Previous window |
% |
Split vertically |
" |
Split horizontally |
Git Basics - Version Control
Track changes to your code and collaborate with others.
Step 1: Configure Git
# Set your identity (one-time setup)
git config --global user.name "Your Name"
git config --global user.email "your.email@example.com"

# Verify
git config --list | grep user
user.name=Your Name user.email=your.email@example.com
Step 2: Create a Repository
# Create and initialize a project
mkdir my_analysis
cd my_analysis
git init
Initialized empty Git repository in /home/user/my_analysis/.git/# Create some files echo "# My Analysis" > README.md echo "data/" > .gitignore # Check status git statusOn branch main Untracked files: README.md .gitignore
Step 3: Make Your First Commit
# Add files to staging
git add README.md .gitignore

# Commit with a message
git commit -m "Initial commit: add README and gitignore"
[main (root-commit) abc1234] Initial commit: add README and gitignore 2 files changed, 2 insertions(+)# View history git log --onelineabc1234 Initial commit: add README and gitignore
Git Commands Reference
| Command | Description |
|---|---|
git init |
Initialize repository |
git status |
Check file status |
git add FILE |
Stage changes |
git commit -m "msg" |
Commit changes |
git log |
View history |
git diff |
See changes |
git clone URL |
Clone repository |