🗺️ HPC series — you are here
1. 🔵 HPC Cluster basics (this page) — SSH, file transfer, Micromamba, Slurm, dependencies 2. Resequencing pipeline on HPC — BWA-MEM2 + GATK, variant calling 3. ChIP-Seq pipeline on HPC — minimap2 + MACS3, peak calling 4. RNA-Seq pipeline on HPC — STAR + featureCounts, DE analysis
Start here to get comfortable with the cluster, then move through the three real-pipeline tutorials in any order.
Overview
Why do we need an HPC cluster?
Modern bioinformatics datasets are huge. A single human genome sequencing run can be hundreds of gigabytes; an RNA-Seq experiment with a dozen samples can take days to align on a laptop — assuming your laptop even has enough RAM, which it usually doesn’t. High-Performance Computing (HPC) solves this by giving you access to many large servers at once.
What is a cluster, really?
Imagine a normal computer scaled up and multiplied:
- A cluster is a roomful of powerful servers connected by a fast network.
- Each server is called a node, and each node has many CPU cores (think: workers) and a lot of RAM (think: desk space).
- All nodes share the same storage (think: a giant filing cabinet everyone can see).
When you log in, you don’t get a node to yourself — you share the cluster with hundreds of other users. A scheduler (Slurm) decides who runs where and when, so everyone gets a fair turn.
What’s different from your laptop?
You already know Linux from previous classes — cd, ls, nano, grep, all of those work the same on the cluster. Only three new ideas:
- Remote access — you connect over the network with SSH instead of opening a terminal locally.
- File transfer — your data lives on your laptop, but compute happens on the cluster, so you’ll move files back and forth.
- Job scheduling — instead of running a program directly, you ask Slurm to run it for you on a free node.
Learning Objectives
By the end of this lesson you will be able to:
- Connect to the UNR Pronghorn HPC cluster over SSH
- Move files between your laptop and the cluster with
scpandrsync- Install bioinformatics tools with Micromamba
- Set up scratch storage for working data
- Write, submit, monitor, and cancel jobs with Slurm (
sbatch,squeue,scancel)- Download and preprocess public RNA-Seq data on HPC
Lesson roadmap
We’ll do everything in this order — each step builds on the last:
- Log in to Pronghorn with SSH
- Make your shell nicer with a colored prompt (one-time setup)
- Move files between your laptop and the cluster
- Set up scratch storage for big data files (one-time setup)
- Install Micromamba and create an RNA-Seq software environment (one-time setup)
- Submit a Slurm job to actually do work on a compute node
- Run a real workflow: download SRA data and quality-trim it
Terminal Survival Kit (Read This First!)
Before we touch the cluster, here are the absolutely essential terminal skills you’ll use every minute. Skim this even if you think you know it — these are the things that trip up beginners most.
Keyboard shortcuts that save your life
| Shortcut | What it does | When to use it |
|---|---|---|
Ctrl-C |
Stop the running command | Something is hung, looping, or you typed the wrong thing |
Ctrl-D |
Send “end of input” / log out | Cleanly exit a shell or close cat-style input |
Ctrl-L |
Clear the screen | Screen is messy; same as clear |
Tab |
Auto-complete filename or command | Always use it — saves typing AND prevents typos |
↑ / ↓ |
Cycle through your previous commands | Re-run the last thing without retyping |
Ctrl-R |
Search command history | Type a few letters, find old commands fast |
Ctrl-A / Ctrl-E |
Jump cursor to start / end of line | Editing long commands |
The single most important habit: press Tab
Half of all “command not found” and “no such file” errors come from typos. Press Tab after typing a few letters of any path or command — the shell finishes it for you, or beeps if it doesn’t recognize what you typed (which means you have the name wrong). Tab twice shows all matching options.
Copy-paste in the terminal
Regular Ctrl-C / Ctrl-V don’t work in most terminals (Ctrl-C means “cancel” here!). Use:
- Mac Terminal:
Cmd+C/Cmd+V(normal) - Linux / WSL:
Ctrl+Shift+C/Ctrl+Shift+V - Windows Terminal / PuTTY: right-click to paste, or
Ctrl+Shift+V
Where am I right now?
When you have multiple terminals open, it’s easy to lose track of whether you’re on your laptop, on the Pronghorn login node, or inside a Slurm job. When in doubt, run these two commands:
hostname        # Which machine am I on?
pwd             # Which directory am I in?
whoami          # Who am I logged in as?
hostname shows… |
You’re on… |
|---|---|
your laptop’s name (e.g., Macbook-Pro.local, DESKTOP-XYZ) |
Your laptop |
pronghorn (or similar) |
The Pronghorn login node (don’t run heavy jobs here!) |
cpu-1, cpu-23, etc. |
A compute node (you’re inside a Slurm job — heavy work OK) |
Editing files with nano
nano is the simplest text editor on the cluster. Open or create a file:
nano myfile.sh
Inside nano, the commands are listed at the bottom (the ^ symbol means Ctrl):
| Shortcut | Action |
|---|---|
Ctrl-O, then Enter |
Save (Output) the file |
Ctrl-X |
Exit nano |
Ctrl-K |
Cut current line |
Ctrl-U |
Paste cut line |
Ctrl-W |
Search inside the file |
Ctrl-G |
Help |
A typical save-and-exit sequence: Ctrl-O → Enter → Ctrl-X.
Reading and decoding error messages
The terminal isn’t trying to be cryptic — it’s literally telling you what’s wrong. Learn these three:
| Message | Translation | Fix |
|---|---|---|
command not found |
I don’t know that program | Typo in command, or you forgot to micromamba activate an environment |
No such file or directory |
The path you gave doesn’t exist | Check spelling with Tab; check pwd to make sure you’re where you think you are |
Permission denied |
You don’t have rights to do that | Script needs chmod +x; you’re trying to write where you can’t (someone else’s folder) |
Read the WHOLE error
Long error messages usually have the actual problem on the first or last line. Everything in the middle is a stack trace — you can ignore it for now. Quote the first/last line when asking for help.
Mini glossary
You’ll hear these words a lot — here’s the one-line version of each:
| Term | What it means |
|---|---|
| Shell / terminal | The text-based program where you type commands (Bash on the cluster). |
| Command line | Same as “shell” — the place after the $ prompt. |
| Path | The address of a file: /data/gpfs/assoc/bch709-6/jdoe/file.txt. |
PATH (uppercase) |
An environment variable listing where the shell looks for commands. Activating an environment adds its tools to PATH. |
Home directory (~) |
Your personal folder; ~ is shorthand for /home/<netid>. |
| Node | One physical computer in the cluster. |
| Login node | The small node you SSH into. For editing/submitting only. |
| Compute node | A big node where Slurm runs your real work. |
| Core / CPU | A processing unit; --cpus-per-task=8 means “give me 8 cores.” |
| Job | A unit of work submitted to Slurm. Has an ID like 12345. |
| Queue / partition | A pool of compute nodes you’re allowed to use (e.g. cpu-core-0). |
| Account | Who pays for the compute time (e.g., cpu-s5-bch709-6). |
| Environment | A self-contained set of installed software (Micromamba). |
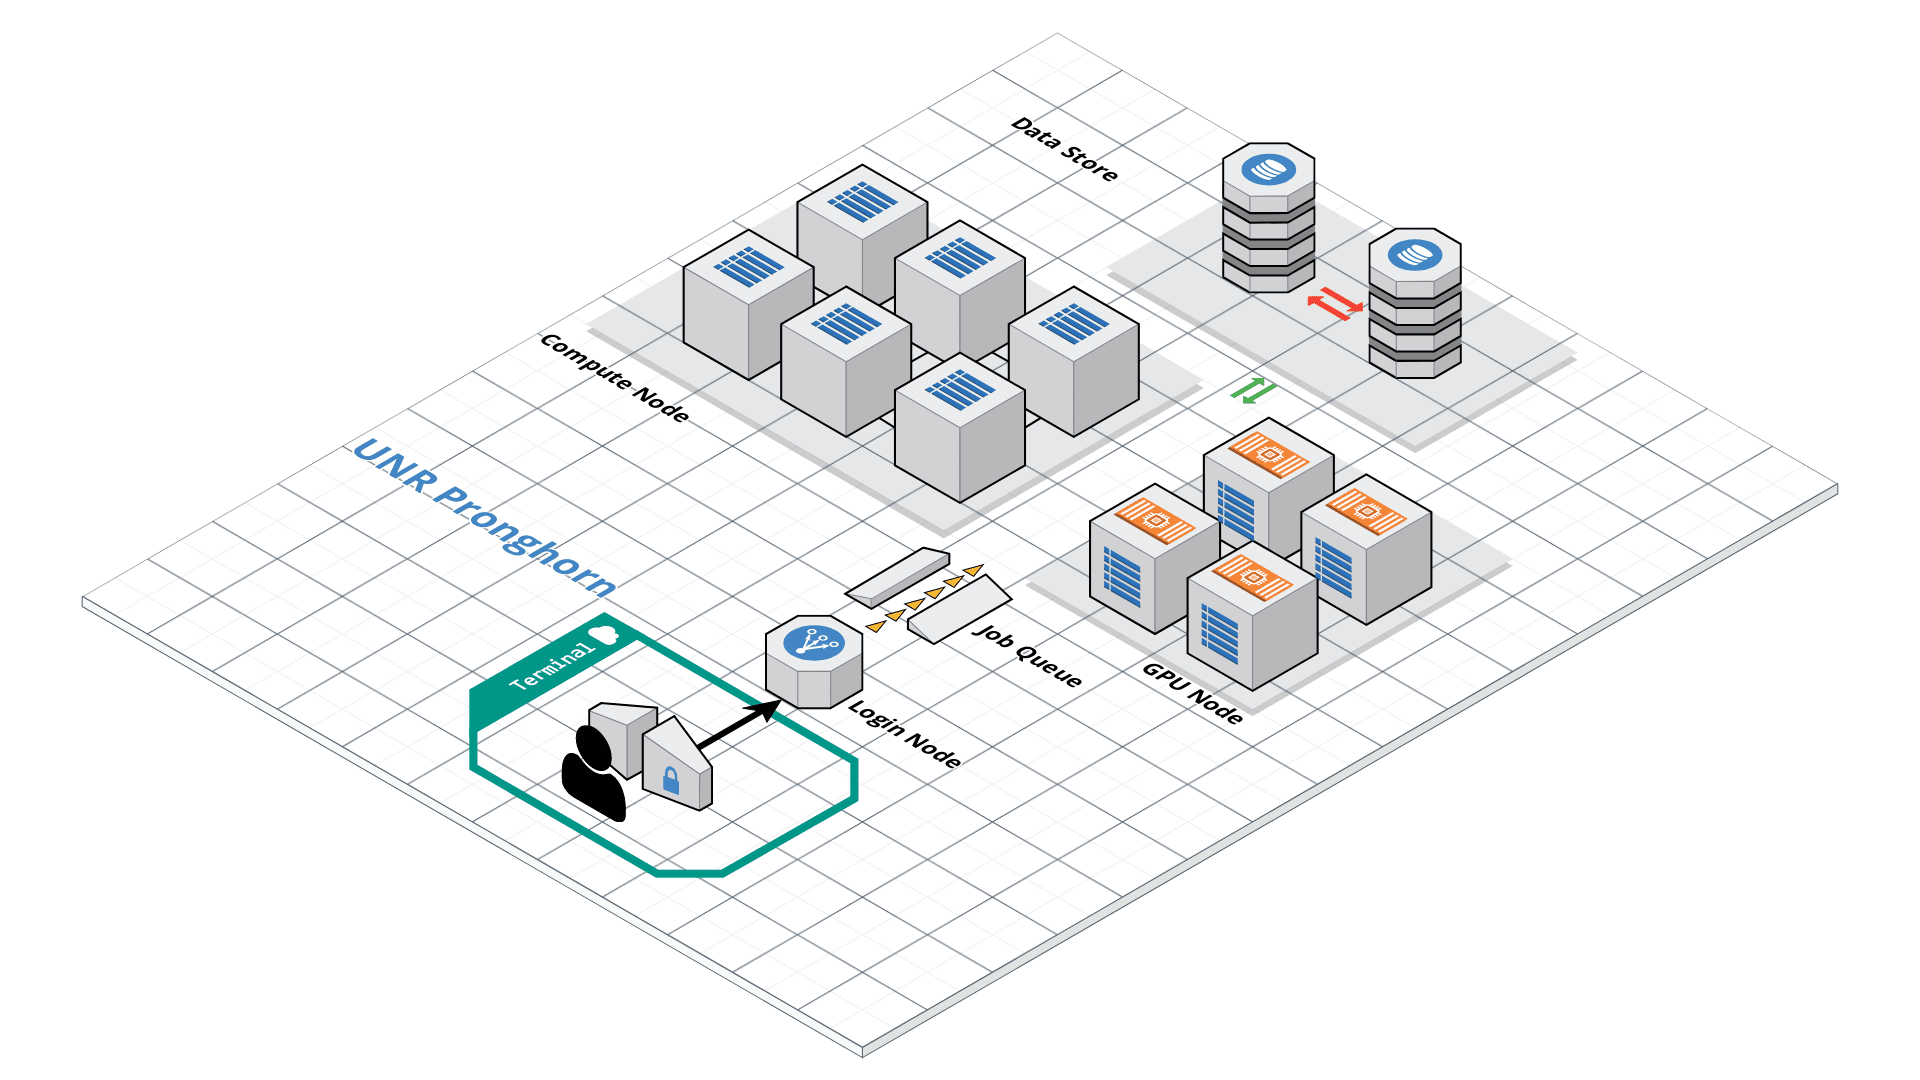
Pronghorn HPC Cluster
Pronghorn is the name of UNR’s HPC cluster — it’s the specific machine we’ll use for the rest of this course. It’s a shared resource for researchers and students across the Nevada System of Higher Education.
Roughly, what’s inside:
- CPU section — 93 nodes, ~3,000 CPU cores total, 21 TiB of memory (for normal compute jobs like ours)
- GPU section — 44 NVIDIA Tesla P100 GPUs (for deep learning / GPU-accelerated tools)
- Storage — 1 PB (= 1,000 TB) of fast parallel storage shared by all nodes
The hardware lives at the Switch Citadel Campus, about 25 miles east of campus — but you’ll never see it in person, you only ever talk to it through SSH. Up-to-date specs are on the UNR Research Computing page.
Your account
All students in this course already have a Pronghorn account using your UNR NetID and password — the same ones you use for WebCampus. If you didn’t receive a confirmation email, message the instructor before continuing. (Researchers outside the course request access through their department or advisor.)
Connecting to Pronghorn
We connect to the cluster using SSH (Secure Shell) — a program that opens a remote terminal session over the network. Once connected, your keystrokes travel to Pronghorn and its responses come back to your screen, but everything is actually running on the cluster, not your laptop.
Before you start, know which terminal to use:
- Mac / Linux — open iTerm2 (recommended on Mac) or any terminal emulator you prefer. SSH is already installed system-wide.
- Windows — open WSL (Ubuntu) that you set up earlier in the course. Alternatively, MobaXterm or PuTTY also work.
Now log in (replace <YOUR_NET_ID> with your actual NetID, e.g., jdoe):
ssh <YOUR_NET_ID>@pronghorn.rc.unr.edu
What happens next:
- First time only: SSH shows a long fingerprint and asks
Are you sure you want to continue connecting (yes/no)?— typeyesand press Enter. (This memorizes Pronghorn’s identity so it can warn you if you ever connect to a fake server.) - It prompts for your password. Type your NetID password — nothing will appear on the screen as you type, not even dots. This is normal. Press Enter when done.
- You’ll see a welcome message and a new prompt like
[jdoe@pronghorn ~]$. You’re now on the cluster.
To leave the cluster and return to your laptop, type exit or press Ctrl-D.
Tip — losing your connection
If your laptop sleeps or you lose Wi-Fi, your SSH session will freeze or die. That’s fine — just
sshback in. (For long jobs, this doesn’t matter because Slurm runs them on a compute node independently of your session — see the Slurm section below.)
Customizing Your Shell Prompt (Optional but Helpful)
The default prompt on Pronghorn is just $ — easy to confuse with your laptop’s terminal when you have several windows open. A colored prompt showing your username, host, time, and current directory makes it obvious where you are.
~/.bashrc runs every time you open a new shell, so anything you append there becomes permanent.
⚠️ RUN THIS ONCE — ONLY ONCE!
These commands use
>>which appends to~/.bashrc. If you run them a second time, you’ll get a duplicate prompt setup (and a third time → triplicate, and so on) — your~/.bashrcwill grow every time and the prompt may break.Do this one time only, right after your first login. After that, just open a new SSH session — the prompt is already there permanently.
If you accidentally ran it multiple times, open
~/.bashrcwithnano ~/.bashrcand delete the extra copies (each block starts with###BCH709).
Run this once, inside your SSH session:
echo '###BCH709' >> ~/.bashrc
echo 'tty -s && export PS1="\[\033[38;5;164m\]\u\[$(tput sgr0)\]\[\033[38;5;15m\] \[$(tput sgr0)\]\[\033[38;5;231m\]@\[$(tput sgr0)\]\[\033[38;5;15m\] \[$(tput sgr0)\]\[\033[38;5;2m\]\h\[$(tput sgr0)\]\[\033[38;5;15m\] \[$(tput sgr0)\]\[\033[38;5;172m\]\t\[$(tput sgr0)\]\[\033[38;5;15m\] \[$(tput sgr0)\]\[\033[38;5;2m\]\w\[$(tput sgr0)\]\[\033[38;5;15m\]\n \[$(tput sgr0)\]"' >> ~/.bashrc
echo "alias ls='ls --color=auto'" >> ~/.bashrc
source ~/.bashrc
The last line, source ~/.bashrc, re-loads the file so the changes take effect immediately — you don’t have to log out and back in. From now on, every new SSH session will already look this way — you do NOT need to re-run these commands.
How to check whether you already ran it
grep '###BCH709' ~/.bashrc | wc -l
0→ you haven’t run it yet, go ahead1→ perfect, already set up, don’t run it again2or more → you ran it too many times; open~/.bashrcand delete the duplicate blocks
Transferring Files
Your laptop and the cluster have completely separate file systems — files on one are not visible from the other. So whenever you want the cluster to work on data from your laptop (or pull results back), you have to copy them explicitly.
Two main tools for this, both run from your laptop’s terminal (not from inside the SSH session):
| Tool | Best for | Why |
|---|---|---|
scp |
A few small files | Simple syntax, like cp but across machines |
rsync |
Folders, big datasets, anything that might fail mid-transfer | Resumes interrupted transfers, shows progress, only re-copies what changed |
Direction matters
Both
scpandrsyncuse the same template:command <source> <destination>The
<username>@pronghorn.rc.unr.edu:prefix marks a path on the cluster. Whichever side has that prefix is the cluster side. Run these from your laptop’s terminal, not from inside SSH.
scp — Secure Copy
scp stands for secure copy — it copies files between two computers over the same encrypted SSH connection you used to log in. If you already know cp, you already mostly know scp:
cp   <source>  <destination>          # local copy
scp  <source>  <destination>          # copy over SSH
The only new piece is how you write a path on the remote machine. A remote path looks like:
<username>@<server>:<path>
For us that’s:
jdoe@pronghorn.rc.unr.edu:/home/jdoe/data.txt
└─┬─┘ └────────┬────────┘ └──────┬──────────┘
NetID    Pronghorn host       Path on cluster
The : between the host and the path is mandatory — without it, scp thinks the whole thing is a local filename and creates a weird file like jdoe@pronghorn.rc.unr.edu. (Common beginner mistake.)
Tilde shortcuts
~means “my home directory” — works on both your laptop and the cluster.~/data.txtmeans “filedata.txtin my home directory”.- On the cluster,
~/and/home/<your_netid>/point to the same place.
1. Send a file from your laptop → cluster (upload)
scp <source_file> <username>@pronghorn.rc.unr.edu:<target_location>
📝 Example — upload sanity check (run from your laptop terminal, not from inside SSH)
# 1. Make a small test file on your laptop
mkdir -p ~/bch709              # -p = no error if the folder already exists
cd ~/bch709
echo "hello world" > test_uploading_file.txt

# 2. Copy it to your home directory on Pronghorn
scp test_uploading_file.txt <username>@pronghorn.rc.unr.edu:~/
scp will ask for your NetID password (no characters appear as you type — that’s normal). When it finishes you’ll see a progress line like:
test_uploading_file.txt 100% 12 0.5KB/s 00:00
Now log into Pronghorn and confirm the file arrived:
ssh <username>@pronghorn.rc.unr.edu
ls ~/                       # you should see test_uploading_file.txt
cat test_uploading_file.txt # prints "hello world"
exit                        # back to your laptop
You can also rename the file as you upload — just put the new name at the end of the remote path:
scp test_uploading_file.txt <username>@pronghorn.rc.unr.edu:~/hello.txt
2. Pull a file from cluster → laptop (download)
Just flip the order — put the remote path first (as the source) and a local path second (as the destination):
scp <username>@pronghorn.rc.unr.edu:<source_file> <destination>
📝 Example
# Pull a file from your Pronghorn home into your laptop's current directory
scp <username>@pronghorn.rc.unr.edu:~/test_downloading_file.txt  ./
./ means “right here, in the directory I’m currently in.” You can also give a specific destination folder:
scp <username>@pronghorn.rc.unr.edu:~/results.csv ~/Downloads/
3. Copy an entire folder — add -r (recursive)
A folder can contain many files and subfolders, so scp refuses to copy it unless you tell it to descend recursively:
scp -r <source_directory> <username>@pronghorn.rc.unr.edu:<target_directory>
📝 Example — upload a whole project folder
scp -r ~/bch709 <username>@pronghorn.rc.unr.edu:~/
This creates ~/bch709/ on Pronghorn containing everything inside your local ~/bch709/.
The same -r works in the other direction:
scp -r <username>@pronghorn.rc.unr.edu:~/scratch/results ~/Downloads/
4. Copy multiple specific files at once
You can list several source files before the destination:
scp file1.txt file2.txt file3.txt <username>@pronghorn.rc.unr.edu:~/bch709/
Or use a shell wildcard (*) to match a pattern:
# Upload every .txt file in the current folder to your bch709 home folder
scp *.txt  <username>@pronghorn.rc.unr.edu:~/bch709/
5. Useful scp flags
| Flag | What it does |
|---|---|
-r |
Recursive — required for folders |
-P 22 |
Use a non-default SSH port (Pronghorn uses 22 by default, so you usually don’t need this) |
-p |
Preserve original timestamps and permissions |
-C |
Compress data during transfer (faster on slow networks) |
-v |
Verbose — show what’s happening (useful for debugging) |
-i ~/.ssh/mykey |
Use a specific SSH key file |
Common scp gotchas
- Forgot the
:—scp file user@host~/treats the whole right side as a local filename. The:is what makes it remote.- Forgot
-ron a folder — error:not a regular file. Add-r.- Wrong direction — overwriting a file because you swapped source and destination.
scpdoes not warn you, it just overwrites. Read your command twice before pressing Enter.- Run it inside SSH by mistake —
scpfrom inside a Pronghorn shell will try to copy between two cluster paths, not to your laptop. Always runscpfrom your laptop terminal.- Big folders —
scpcan’t resume if the connection drops mid-transfer; you have to start over. For anything bigger than a few GB, usersync(next section) instead.
Open the local folder in your file browser
Sometimes it’s easier to drag-and-drop or check what’s actually in the folder. Open the local copy in your OS file manager:
- Windows (WSL)
cd ~/bch709
explorer.exe .
- Mac
cd ~/bch709
open .
rsync — the smarter choice for big transfers
For folders, datasets, or anything that takes more than a few seconds, rsync is almost always the better choice:
- Resumes if your Wi-Fi drops mid-transfer (just re-run the same command).
- Only copies what’s changed — re-running it after editing one file copies just that file, not the whole folder again.
- Shows a progress bar so you know it’s actually working.
Send a folder laptop → cluster:
rsync -avhP <source_directory> <username>@pronghorn.rc.unr.edu:<target_directory>
Pull a folder cluster → laptop:
rsync -avhP <username>@pronghorn.rc.unr.edu:<source_directory> <target_directory>
The flags -avhP mean: archive (preserve permissions/timestamps), verbose, human-readable sizes, show Progress.
Prefer drag-and-drop?
Graphical SFTP clients work too — try Cyberduck (Mac/Win), FileZilla (cross-platform), or WinSCP (Windows). Use server
pronghorn.rc.unr.edu, port22, and your NetID/password.
Installing Micromamba (Package Manager)
📚 Already covered earlier
The concepts of package managers, Conda/Micromamba, and environments were introduced in the Conda, Compile & Software Installations lesson (Week 3). If you need a refresher on what a package manager is and why we use Micromamba, go read that lesson first.
This section just shows you how to install Micromamba specifically on Pronghorn and build the RNA-Seq environment we’ll use for the rest of the course.
Install Micromamba with one command (run inside your Pronghorn SSH session):
"${SHELL}" <(curl -L https://micro.mamba.pm/install.sh)
When prompted, accept the defaults:
- Install location:
~/.local/bin - Initialize your shell? yes
- Root prefix:
~/micromamba
Then reload your shell so the micromamba command is on your PATH:
source ~/.bashrc
Verify the installation:
micromamba --version
Creating the RNA-Seq Environment
Now create one environment for this course and install every tool we’ll use later. (One-time setup — the environment persists across logins.)
micromamba create -n RNASEQ_bch709 -c conda-forge -c bioconda python=3.11
micromamba activate RNASEQ_bch709

micromamba install -c conda-forge -c bioconda \
    minimap2 star 'samtools>=1.20' subread \
    openjdk=17 'trinity>=2.15' gffread seqkit kraken2 'fastp>=0.24' \
    perl-dbi perl-dbd-sqlite perl-html-parser -y
# NOTE 1: omit `perl-bioperl` — its libzlib<1.3 pin conflicts with modern
# samtools/Trinity. Install in a separate env if you ever need it.
# NOTE 2: we deliberately do NOT install `sra-tools`. Bioconda's sra-tools 3.x
# is built against GLIBC 2.27+, newer than Pronghorn's system libc — so
# `prefetch` / `fastq-dump` crash on the compute nodes with
# "GLIBC_2.27 not found". Step 1 below downloads FASTQ from ENA over HTTPS
# with `curl`, which works regardless of the system GLIBC.

# Upgrade pip first — older pip can't find the prebuilt `tiktoken`
# manylinux wheel (a transitive multiqc dep), tries to build it from
# Rust source, fails on Pronghorn (no Rust compiler).
pip install --upgrade pip

# MultiQC + pinned deps. `tiktoken<0.8` is the safety pin — older
# tiktoken has stable cp311 linux wheels.
pip install --prefer-binary \
    'numpy<2.0' 'pyarrow<17' 'tiktoken<0.8' 'multiqc<1.34'
Why pin
numpyandpyarrow?
numpy<2.0— NumPy 2.0 broke ABI compatibility with many bioinformatics packages; staying on 1.x is safest.pyarrow<17— newer PyArrow (used by MultiQC via Polars) pulls in a NumPy 2.x dependency that conflicts with the pin above.Without these pins,
multiqccan install and then crash at runtime withnumpy.dtype size changederrors.Important: pass all three packages in the same
pip installcommand. Splitting them across two commands lets the first resolver pick a newernumpy, then the pin in the second command is either ignored or causes a reinstall.
Once activated, your shell prompt will show (RNASEQ_bch709) and the installed tools will be on your PATH. Use micromamba deactivate to leave the environment.
Fix:
libcrypto.so.1.0.0error in samtoolsIf
samtoolscomplains that it cannot findlibcrypto.so.1.0.0, symlink the newer library shipped with the environment. Activate the environment first — Micromamba sets$CONDA_PREFIXto the active env’s path (for conda-ecosystem compatibility), so you can use it as a shortcut:micromamba activate RNASEQ_bch709 echo $CONDA_PREFIX # should print something like /home/<netid>/micromamba/envs/RNASEQ_bch709 ln -s $CONDA_PREFIX/lib/libcrypto.so.1.1 $CONDA_PREFIX/lib/libcrypto.so.1.0.0Run this only once per environment — re-running will fail with
File exists. If that happens, the symlink is already there andsamtoolsshould work.If
$CONDA_PREFIXis empty for some reason (e.g. the activation didn’t take), look it up withmicromamba env listand use the explicit path from itsPathcolumn:ln -s /home/<netid>/micromamba/envs/RNASEQ_bch709/lib/libcrypto.so.1.1 \ /home/<netid>/micromamba/envs/RNASEQ_bch709/lib/libcrypto.so.1.0.0
How to copy an environment from your laptop to HPC
You often want to develop and test on your laptop first, then reproduce the exact same environment on Pronghorn. You don’t copy the environment folder directly — that won’t work across different operating systems / architectures. Instead, you export a recipe file, copy the small recipe, and let Micromamba rebuild the environment on the cluster.
Step 1 — Export the environment from your laptop (Mac → Linux safe)
A plain micromamba env export records the exact build strings of every package (e.g. samtools=1.19=h50ea8bc_0). Those build strings are tied to the OS/CPU you exported from — on a Mac they look like *_h... / *_osx64_* / *_arm64_*, and Linux simply doesn’t have those builds. That’s where the dreaded PackagesNotFoundError / ResolvePackageNotFound comes from.
The fix: export only what you explicitly installed, and strip build strings. Then on the Linux side Micromamba will pick the matching Linux build automatically.
On your laptop, with the environment activated:
# 1. Activate the env you want to copy
micromamba activate RNASEQ_bch709

# 2. Export ONLY the packages you asked for (no build strings, no OS-specific deps)
micromamba env export --from-history --no-builds > RNASEQ_bch709.yml
Take a look — it should be small and clean:
head -20 RNASEQ_bch709.yml
name: RNASEQ_bch709
channels:
  - bioconda
  - conda-forge
dependencies:
  - python=3.11
  - samtools=1.19
  - fastp=0.23.4
  - star=2.7.11b
  - ...
Why
--from-history --no-buildsavoids Mac→Linux errors
Command What it records Mac → Linux? micromamba env exportEvery package + exact Mac build string ❌ fails — Linux has no *osx*buildsmicromamba env export --no-buildsEvery package, versions only ⚠️ usually works, but transitive deps may still be Mac-only micromamba env export --from-history --no-buildsOnly packages you installed, versions only ✅ recommended for Mac → Linux
--from-historykeeps only the packages you asked for; Micromamba re-solves all the dependencies fresh on Linux, so you never carry Mac-specific transitive packages across.
Before you scp it, sanity-check the YAML — make sure no line contains osx-64, osx-arm64, or a build hash like =h1234abc_0:
grep -E 'osx|=h[a-f0-9]+_' RNASEQ_bch709.yml # should print nothing
If that command prints anything, re-export with --from-history --no-builds (you likely forgot one of the flags).
Step 2 — Copy the recipe file to Pronghorn
From your laptop terminal:
scp RNASEQ_bch709.yml <username>@pronghorn.rc.unr.edu:~/
The file is tiny, so this takes a second.
Step 3 — Rebuild the environment on Pronghorn (force linux-64)
SSH into Pronghorn and create the environment from the recipe. Use -n <name> to give the env a clean name — Micromamba will put it under $MAMBA_ROOT_PREFIX/envs/<name>/ (usually ~/micromamba/envs/<name>/) automatically, so you don’t need -p with an explicit path. The --platform linux-64 flag tells Micromamba to only consider Linux x86_64 builds, so even if a stray Mac hint sneaked into the YAML it will be ignored:
ssh <username>@pronghorn.rc.unr.edu
cd ~

# -n sets the env name; Micromamba picks the path itself
# --platform forces Linux x86_64 builds
micromamba env create -n RNASEQ_bch709 -f RNASEQ_bch709.yml --platform linux-64
Why
-ninstead of-p?
-n <name>— Micromamba auto-places the env at~/micromamba/envs/<name>/. The name is what you use later inmicromamba activate <name>.-p <path>— manual path. Useful when you want the env in a non-default location (e.g. on scratch), but then you have to activate withmicromamba activate <path>.For most uses,
-nis simpler and matches the naming convention used on your laptop. Thename:field inside the YAML is ignored when you pass-non the command line.
Micromamba will download and install every package listed. When it finishes, activate it:
micromamba activate RNASEQ_bch709
which fastp        # should print a path inside ~/micromamba/envs/RNASEQ_bch709/
fastp --version    # confirm the tool works
You now have an identical environment on Pronghorn.
📝 Example — full laptop → HPC workflow (Mac → Linux, error-free)
# --- On your Mac laptop ---
micromamba activate RNASEQ_bch709
micromamba env export --from-history --no-builds > RNASEQ_bch709.yml
grep -E 'osx|=h[a-f0-9]+_' RNASEQ_bch709.yml   # must print nothing
scp RNASEQ_bch709.yml <netid>@pronghorn.rc.unr.edu:~/

# --- Then on Pronghorn (after ssh) ---
micromamba env create -n RNASEQ_bch709 -f ~/RNASEQ_bch709.yml --platform linux-64
micromamba activate RNASEQ_bch709
which fastp      # verify
Common Mac → Linux pitfalls (and fixes)
PackagesNotFoundError/ResolvePackageNotFoundon a build likesamtools=1.19=h50ea8bc_0→ You exported with build strings. Re-export on the Mac with--from-history --no-buildsand try again.A specific package name doesn’t exist on Linux (rare — usually a Mac-only GUI tool) → Open
RNASEQ_bch709.ymlon Pronghorn withnano, delete that line, re-runmicromamba env create -n RNASEQ_bch709 -f RNASEQ_bch709.yml --platform linux-64.Apple Silicon (M1/M2/M3) Mac → Linux HPC → Your laptop env may be
osx-arm64.--from-history --no-builds+--platform linux-64handles this; do not try to copy theenvs/folder.“Channel not found” → Make sure the YAML lists both
- biocondaand- conda-forgeunderchannels:. If missing, add them and re-run.Solver hangs / takes forever → Normal for big bio environments. Micromamba is still much faster than plain Conda. If it truly stalls, pin fewer versions (
samtoolsinstead ofsamtools=1.19) and retry.“prefix already exists” → The env was partially created before. Remove it first:
micromamba env remove -n RNASEQ_bch709, then re-create.Don’t
scptheenvs/folder itself — environments contain compiled binaries that are specific to the OS/CPU. Copying them across Mac ↔ Linux almost never works.
Setting Up Scratch Storage
Why two different storage areas?
On Pronghorn (and almost every HPC cluster) you have two main places to keep files, and they serve very different purposes:
| Location | Path | Size | Speed | Backed up? | Use it for |
|---|---|---|---|---|---|
| Home | ~ (/home/<netid>) |
Small (~50 GB) | Slower | Yes | Scripts, configs, software, small important results |
| Scratch | /data/gpfs/assoc/bch709-6/<netid> |
Huge (TBs) | Very fast (parallel) | No | Raw sequencing data, intermediate files, large outputs |
Think of it like a desk + warehouse:
- Home is your desk drawer — small but safe. The IT team backs it up, so don’t worry about losing important files. But it fills up quickly, and putting big sequencing data there will get you in trouble.
- Scratch is the warehouse loading dock — enormous and built for speed. Bioinformatics jobs read and write huge files (FASTQ, BAM, etc.), and scratch can handle it. But there are no backups, and old files may be cleaned up periodically. Anything you actually want to keep long-term, copy back to your laptop or to home.
Rule of thumb
- Code, scripts, notes → home (
~)- Data and analysis outputs → scratch (
~/scratch)- Final figures / tables you want to keep → download to your laptop with
rsync
Why “parallel” storage matters
Scratch lives on a parallel file system (IBM SpectrumScale / GPFS), meaning many compute nodes can read and write to it simultaneously at full speed. Your home directory isn’t built for that — if 8 cores all hammer it at once, throughput crawls. Always run heavy I/O jobs from scratch.
Create your scratch directory
⚠️ RUN THIS ONCE — ONLY ONCE!
These three commands are a one-time setup. After you’ve done them, the folder and the
~/scratchshortcut stay put forever — you justcd ~/scratchfrom any future session.Specifically, the
ln -scommand (step 3) will fail if you run it again because the shortcut already exists:ln: failed to create symbolic link '/home/<netid>/scratch': File existsOr, worse, if
~/scratchhappens to be a directory when you re-run it,ln -swill create a nested link inside that directory (~/scratch/<netid>→ loop). So do this once, then never again.
Run these only the first time you log into Pronghorn:
# 1. Create your personal folder inside the class scratch space
mkdir -p /data/gpfs/assoc/bch709-6/${USER}

# 2. Move into it to confirm it exists
cd /data/gpfs/assoc/bch709-6/${USER}

# 3. Make a shortcut so you can type "~/scratch" instead of the full path
ln -s /data/gpfs/assoc/bch709-6/${USER} ~/scratch
What each line does:
mkdir -pcreates your folder under the shared course directorybch709-6. The${USER}variable expands to your NetID, so each student gets their own space and can’t see each other’s files. The-pflag means “no error if the parent already exists” — safe to re-run.cdmoves you into the new folder so you can verify it.ln -screates a symbolic link (a shortcut) called~/scratchthat points to the long path. Nowcd ~/scratchalways takes you to your scratch space — much easier to remember and type. ⚠️ This step is ONE-TIME ONLY (see the warning above).
How to check if you already ran it
Before running the three commands, you can check your current state:
ls -la ~/scratch
- “No such file or directory” → you haven’t run it yet, go ahead with the 3 commands above.
~/scratch -> /data/gpfs/assoc/bch709-6/<your_netid>→ perfect, already set up. Skip all 3 commands.- Something else (a real directory, not a link) → ask the instructor before deleting anything.
Verify it worked
ls -la ~/scratch
# the first line should show:  ~/scratch -> /data/gpfs/assoc/bch709-6/<your_netid>

cd ~/scratch && pwd
# should print:  /data/gpfs/assoc/bch709-6/<your_netid>
From now on, every time you start a new analysis, do it inside ~/scratch:
cd ~/scratch
mkdir my_project
cd my_project
# ... download data, run jobs, etc.
Don’t lose your work
Scratch is not backed up and may be purged on a schedule. Before the semester ends, copy anything you want to keep (final results, figures) back to your laptop with
rsync(see the File Transfer section).
How much space am I using?
Sequencing data is huge — it’s easy to fill scratch without realizing it. Two commands to know:
# How big is each file/folder in the current directory? (-h = human-readable)
du -sh *

# How big is one specific folder, total?
du -sh ~/scratch

# How much space is left on the file system?
df -h ~/scratch

# Find your biggest folders (top 10 in scratch)
du -h ~/scratch | sort -hr | head
If your home directory fills up (df -h ~ shows nearly 100% used), micromamba and even ssh start failing in weird ways. Move large files to scratch.
Submitting Jobs with Slurm
Why a job scheduler?
When you log into Pronghorn with SSH, you land on a login node — a small server shared by everyone. The login node is for editing files, copying data, and submitting work. You should never run real analyses on it. A heavy job there slows down every other user and will be killed by the system.
The actual computing happens on dozens of much larger compute nodes. Because hundreds of users want them at once, a piece of software called Slurm acts as the traffic controller:
- You write a small text file (a batch script) saying “I need this many CPUs, this much memory, for this long, and here are the commands to run.”
- You hand the script to Slurm with
sbatch. - Slurm puts your job in a queue, finds a free compute node that matches your request, runs your commands there, and writes the output back to your home directory.
Mental model
Think of Slurm like a hotel reservation system. The login node is the lobby — fine for waiting around, not for sleeping. To actually use a room (compute node), you fill in a request form (batch script) saying how many beds (CPUs), how big a room (memory), and for how many nights (time). Slurm is the front desk that hands you a key when a matching room is free.
Step 1 — Find your account and partition
Slurm needs to know who is paying (--account) and which pool of machines to use (--partition). If you guess wrong, your job is rejected immediately. Check what is assigned to you:
# The most useful single command — shows your account, partition, and QOS
# (the %N suffix sets each column's width so long names don't get cut off)
sacctmgr show user $USER withassoc format=User%15,Account%30,Partition%30,QOS%20

# Summary of all partitions and how busy they are
sinfo -s

# Your default account (used if you omit --account in sbatch)
sacctmgr show user $USER format=User%15,DefaultAccount%30

# Detailed view including limits like MaxJobs, MaxSubmit
sacctmgr show assoc user=$USER format=Cluster%15,Account%30,User%15,Partition%30,Share,QOS%20,MaxJobs,MaxSubmit
Tip — column widths in
sacctmgrBy default,
sacctmgrcolumns are narrow and truncate long names with a+at the end (e.g.,cpu-s5-bch7+). Add%<width>after each column to widen it:Account%30= 30 characters. If you ever see a+in the output, widen that column.
The output from the first command should look something like this (your NetID will appear in the User column):
           User                        Account                      Partition                  QOS
--------------- ------------------------------ ------------------------------ --------------------
           wyim                cpu-s5-bch709-6                     cpu-core-0              student
Read across one row: User = your NetID, Account = cpu-s5-bch709-6, Partition = cpu-core-0, QOS = student. These are the exact strings to paste into your #SBATCH --account= and #SBATCH --partition= lines below. (Some students may see multiple rows if they belong to several accounts — pick the one that ends in bch709-6 for this course.)
Write down the Account and Partition values — you’ll paste them into every batch script.
Common error
sbatch: error: Batch job submission failed: Invalid account or account/partition combination specified→ re-run the first command above and copy the values exactly.
Step 2 — Quick sanity test (no script needed)
Before you spend time writing a full batch script, you want to know: does Slurm even accept my submission? Are my --account and --partition correct? The fastest way to find out is a 30-second test.
Why not just run the test directly on the login node?
You might be tempted to do this:
# ❌ BAD — runs on the login node
echo "Hello from $(hostname)"
sleep 300
echo "Done"
This works, but it runs on the login node — the small server everyone shares. Even a 5-minute sleep is fine, but the moment you replace it with a real bioinformatics command, you’ll slow everyone down and Pronghorn’s “watchdog” will kill your process. We need it to run on a compute node instead. That means going through Slurm.
Why not write a full batch script for a quick test?
You could create a file:
# Create a script
nano test.sh
#!/bin/bash
#SBATCH -A cpu-s5-bch709-6
#SBATCH -p cpu-core-0
#SBATCH --time=00:10:00
echo "Hello from $(hostname)"
sleep 300
echo "Done"
sbatch test.sh
This works too, but for just testing whether Slurm is happy with you, opening an editor, writing 6 lines of header, saving, then submitting is a lot of typing. There’s a faster way.
The fastest way: sbatch --wrap
The --wrap flag tells sbatch: “The command I want to run is right here in quotes — wrap it in a temporary script for me.” Slurm builds a tiny one-shot script behind the scenes and submits it. No file. No editor. One line.
sbatch -A cpu-s5-bch709-6 -p cpu-core-0 --time=00:10:00 \
       --wrap="echo Hello from \$(hostname) && sleep 300 && echo Done"
What each piece does:
| Piece | Meaning |
|---|---|
sbatch |
Submit a job to Slurm |
-A cpu-s5-bch709-6 |
Charge it to this account (short form of --account) |
-p cpu-core-0 |
Run on this partition (short form of --partition) |
--time=00:10:00 |
Kill it if it runs longer than 10 minutes |
--wrap="..." |
The command(s) to run on the compute node, in quotes |
\ at line end |
“Continue this command on the next line” — purely for readability |
Why use --wrap for tests:
- One line, no separate file to manage or delete later
- Lets you experiment quickly: change a flag, hit Up-arrow, edit, submit again
- Forces the command onto a compute node (so it’s a real Slurm test, not just a login-node command)
- Slurm still gives it a job ID, log file,
squeueentry — exactly like a “real” job
When to stop using --wrap and write a script:
- More than 1–2 commands → readability suffers fast inside one quoted string
- You want comments, loops, or variables → much cleaner in a script
- You’ll want to re-run this exact job later → a script is reusable
Submit it and watch it run
# 1. Submit — you'll see "Submitted batch job 12345" immediately
sbatch -A cpu-s5-bch709-6 -p cpu-core-0 --time=00:10:00 \
       --wrap="echo Hello from \$(hostname) && sleep 300 && echo Done"

# 2. Check that it's queued (PD) or running (R) — should appear within seconds
squeue -u $USER

# 3. After ~5 minutes, look for the log file Slurm wrote
ls slurm-*.out
cat slurm-12345.out          # use your actual job ID
What the tiny job does:
- Prints
Hello from cpu-XX— note this is a compute node name likecpu-3, notpronghorn. That’s how you know it really ran somewhere else! - Sleeps for 5 minutes (so you can see it sitting in
squeue) - Prints
Done
When you don’t specify -o, Slurm writes the log to slurm-<jobid>.out in the directory you submitted from. Open it and you should see your two echo lines.
What this test confirms
- Your
--accountand--partitionare spelled correctly (no “Invalid account” error)- Slurm is letting you submit jobs (you’re properly enrolled in the course allocation)
- The job actually ran on a compute node, not the login node (the
hostnamein the log proves it)- You know where to find the output (
slurm-<jobid>.out)If this works → you’re ready for full batch scripts below. If
sbatchcomplains about the account/partition → go back to Step 1 and re-runsacctmgr show user $USER ....
Step 3 — Write your first batch script
A batch script is just a normal shell script with extra #SBATCH lines at the top that Slurm reads as your “request form.” For anything more than a one-liner, scripts are easier to read, edit, and re-run. Create one:
nano submit.sh
#!/bin/bash
#SBATCH --job-name=test                  # name shown in the queue
#SBATCH --account=cpu-s5-bch709-6        # who pays (from Step 1)
#SBATCH --partition=cpu-core-0           # which pool of machines (from Step 1)
#SBATCH --cpus-per-task=1                # CPU cores to reserve
#SBATCH --mem=1g                         # RAM (1 gigabyte)
#SBATCH --time=00:10:00                  # max runtime (10 minutes)
#SBATCH --mail-type=ALL                  # email on start/end/fail
#SBATCH --mail-user=<YOUR_EMAIL>
#SBATCH -o test_%j.out                   # log file; %j becomes the job ID

# --- everything below runs on the compute node ---
echo "Job started on $(hostname) at $(date)"
for i in {1..1000}; do
  echo $i
  sleep 1
done
echo "Job finished at $(date)"
Anatomy of a #SBATCH line
Every directive is just
#SBATCH --option=value. The most common ones:
Directive What it asks for Example --job-nameA label so you can find your job in the queue --job-name=trim_ATH--accountWhich allocation to charge --account=cpu-s5-bch709-6--partitionWhich group of machines to run on --partition=cpu-core-0--cpus-per-taskCPU cores reserved for the job — match this to your tool’s --threadsflag--cpus-per-task=8--memRAM per node ( g= GB,m= MB)--mem=16g--timeWall-clock limit; job is killed if exceeded --time=2-15:00:00(= 2 days, 15 h)--mail-type/--mail-userEmail notifications --mail-type=ALL-o/-eWhere stdout / stderr are written -o trim_%j.out
--ntasksvs--cpus-per-task—--ntasksis the number of independent processes (almost always1for bioinformatics), and--cpus-per-taskis the number of CPU cores each process can use. For typical multi-threaded tools likesamtools,STAR, orfastp, leave--ntasksat its default (1) and set--cpus-per-taskto however many cores you want.Rule of thumb: ask for just enough. The more you request, the longer you wait in the queue, and an over-asked job blocks resources from your classmates.
Step 4 — Submit your job
chmod +x submit.sh             # make it executable (only needed once)
sbatch submit.sh
# → "Submitted batch job 12345"   ← write down this number, it's your job ID
That’s it — the job is now in Slurm’s hands. You can close your laptop, log out, lose Wi-Fi… the job will keep running on a compute node. It only depends on Slurm, not on your shell.
Step 5 — Check what’s running (squeue)
squeue shows the queue of jobs on the cluster. By itself it dumps everyone’s jobs, which is overwhelming, so almost always filter it:
squeue -u $USER                # only YOUR jobs (most common)
squeue -j 12345                # one specific job by ID
squeue -u $USER -t RUNNING     # only your jobs currently running
squeue -u $USER -t PENDING     # only your jobs still waiting in line
squeue -p cpu-core-0           # everything on a particular partition
The columns you’ll actually look at:
JOBID  PARTITION   NAME      USER  ST  TIME      NODES  NODELIST(REASON)
12345  cpu-core-0  trim_ATH  jdoe  R   00:03:21  1      cpu-1
12346  cpu-core-0  fastqdump jdoe  PD  0:00      1      (Resources)
| Column | Meaning |
|---|---|
JOBID |
Use this with scancel and sacct |
ST |
State — see table below |
TIME |
How long it has been running so far |
NODES / NODELIST |
Which compute node(s) it’s on (or why it’s pending, in parentheses) |
State codes (ST column):
| State | Meaning |
|---|---|
PD |
Pending — waiting in line for resources |
R |
Running — currently executing on a compute node |
CG |
Completing — finishing up, flushing files |
CD |
Completed successfully |
F |
Failed — exited with a non-zero status |
TO |
Timed out — hit the --time limit and was killed |
CA |
Cancelled — you (or an admin) ran scancel |
Why is my job still
PD(pending)?The reason is in the
NODELIST(REASON)column. Common ones:
Reason What it means (Resources)Cluster is busy, you’re in line — usually fine, just wait. (Priority)Higher-priority jobs are ahead of you. (QOSMaxJobsPerUserLimit)You’ve already hit your concurrent-job limit. (ReqNodeNotAvail, Reserved)The node you asked for is in a maintenance reservation. (AssocGrpCpuLimit)Your account’s total CPU allocation is exhausted. Estimate when it will start:
squeue -j 12345 --start
Useful squeue view tweaks
# Long format: full job names + accounts (default cuts them off)
squeue -u $USER -o "%.10i %.20j %.10P %.10a %.8T %.10M %.6D %R"

# Refresh every 5 seconds (Ctrl-C to quit) — like watching a live monitor
watch -n 5 'squeue -u $USER'

# Just count how many jobs you have running
squeue -u $USER -t RUNNING -h | wc -l
Step 6 — Cancel jobs (scancel)
If you submitted by accident, see a typo, or realize the job is misconfigured, kill it:
scancel 12345                       # cancel one job by ID
scancel 12345 12346 12347           # cancel several at once
scancel -u $USER                    # cancel ALL of your jobs (nuclear option)
scancel -u $USER -t PENDING         # cancel only your queued (not-yet-running) jobs
scancel -u $USER -t RUNNING         # cancel only running jobs
scancel --name=trim_ATH -u $USER    # cancel by job name
scancel -p cpu-core-0 -u $USER      # cancel only your jobs on a specific partition
Cancel safely
scanceltakes effect almost instantly — there’s no undo, so double-check the ID first.- Cancelled jobs still produce a (partial) log file. Check it to see how far they got.
- If
scanceldoesn’t seem to work, the job may be inCG(completing) — give it a few seconds.
Step 7 — Understanding log files and error files
When you run a program directly in the terminal, you see its output scroll by on screen. Inside a Slurm job there is no screen — the job runs on a compute node with no terminal attached. So Slurm captures everything the program would have printed and writes it to files in the directory you submitted from. These are your log files, and they’re your single most important debugging tool.
stdout and stderr — two separate streams
Every Linux program produces two independent streams of text:
| Stream | Name | What goes there | Example |
|---|---|---|---|
| stdout (standard output) | “normal” output | Results, progress messages, anything the tool intentionally prints | echo "Hello", alignment stats, row counts |
| stderr (standard error) | “error / warning” output | Errors, warnings, diagnostic info | error: file not found, WARNING: low mapping quality, Python tracebacks |
On your laptop terminal, both streams appear mixed together on the same screen. In Slurm, you choose where each one goes using #SBATCH directives.
-o and -e: where the output goes
| Directive | Controls | Default (if omitted) |
|---|---|---|
-o <path> |
Where stdout is written | slurm-<jobid>.out in the submission directory |
-e <path> |
Where stderr is written | Same file as -o (mixed together) |
The %j placeholder — Slurm replaces %j with the actual job ID, so logs from many runs don’t overwrite each other:
#SBATCH -o trim_%j.out      # → trim_12345.out
#SBATCH -e trim_%j.err      # → trim_12345.err
Option 1: Everything in one file (simplest)
If you only specify -o and omit -e, both stdout and stderr go into the same file, interleaved in the order they were printed. This is the default and is fine for most jobs:
#SBATCH -o myjob_%j.out # all output + errors mixed together
Pros: One file to check. Nothing gets lost in a separate file you forgot about. Cons: If a tool prints 10,000 lines of normal output, a single error line can be hard to find.
Option 2: Separate stdout and stderr (recommended for real work)
Add -e to send errors to their own file:
#SBATCH -o myjob_%j.out     # normal messages only
#SBATCH -e myjob_%j.err     # errors and warnings only
Pros: The .err file is either empty (great — no errors!) or contains only problems, making debugging much faster. You can check errors with just cat myjob_12345.err.
Cons: Two files per job instead of one. Some tools print important info to stderr (common in bioinformatics), so always check .err too, not just .out.
Which option should I use?
For learning / test jobs: Option 1 (one file) is fine — less to think about. For real analysis scripts with many steps: Option 2 (separate) is better — when something breaks at 3 AM, you want
cat *.errto show you exactly what went wrong.
How to read the log files
# List all log files, newest first
ls -lt *.out *.err 2>/dev/null

# Print the whole log
cat myjob_12345.out

# Browse a long log interactively (q to quit, / to search)
less myjob_12345.out

# Follow the log LIVE while the job is still running (Ctrl-C to stop watching)
tail -f myjob_12345.out

# Show only the last 50 lines (quick "how did it end?")
tail -50 myjob_12345.out

# Jump straight to errors / warnings anywhere in the file
grep -in "error\|warn\|fail\|killed\|oom" myjob_12345.out

# If you used separate stderr, check for errors first — empty = no problems
cat myjob_12345.err
What to look for in the log
- End of file — did it print “Done” or just stop mid-sentence? A truncated log usually means OOM or timeout.
- Exit code — some tools print
exit status: 0(success) or a non-zero number (failure) at the end.- Timestamps — if your script prints
dateat the start and end (like our test script does), you’ll know exactly how long each step took.- Error keywords — search for
error,Error,ERROR,WARN,fail,killed,Segmentation fault,oom-kill. These words mean something went wrong.
A real-world example
Suppose your trim.sh job finishes and you see this in squeue:
(nothing — the job is gone from the queue)
Was it successful? Here’s how to find out:
# 1. Check how it ended
sacct -j 12345 --format=JobID,State,ExitCode
#   → COMPLETED 0:0   means success
#   → FAILED 1:0      means the script exited with an error
#   → OUT_OF_ME+       means it ran out of RAM

# 2. Look at the log
tail -20 trim.out
#   → last lines should be fastp finishing the 6th sample

# 3. Check for errors (if you used -e)
cat trim_12345.err
#   → empty? Great, no errors.
#   → has text? Read it — that's what went wrong.

# 4. Verify the output files actually exist
ls -lh ~/scratch/rnaseq/trim/
#   → you should see 12 trimmed .fq.gz files + 6 .html reports
Step 8 — Inspect a finished job (sacct)
squeue only shows active jobs. Once a job finishes (success or failure) it disappears from squeue — to look at past jobs, use sacct (Slurm accounting):
# Full record of one job
sacct -j 12345

# Just the columns you usually care about
sacct -j 12345 --format=JobID,JobName,State,Elapsed,MaxRSS,ReqMem,AllocCPUS,ExitCode

# All of your jobs from today
sacct -u $USER --starttime=$(date +%Y-%m-%d)

# All of your jobs from the last 7 days
sacct -u $USER --starttime=$(date -d '7 days ago' +%Y-%m-%d)
What the columns mean:
| Column | Meaning | Why you care |
|---|---|---|
State |
COMPLETED, FAILED, TIMEOUT, OUT_OF_MEMORY, CANCELLED |
First thing to check |
Elapsed |
How long it actually ran (HH:MM:SS) |
Helps right-size --time |
MaxRSS |
Peak memory used | Helps right-size --mem |
ReqMem |
Memory you requested | Compare to MaxRSS |
AllocCPUS |
CPUs you actually got | Sanity check |
ExitCode |
Program’s exit status (0:0 = success) |
0:0 good, anything else = bug |
Right-size your next job
If
MaxRSSsays 2.1 GB and you reserved 16 GB, drop--memto 4 GB. IfElapsedwas 8 minutes and you reserved 2 days, drop--timeto 30 minutes. Smaller requests start sooner and are kinder to your classmates.
Step 9 — Email notifications (very useful!)
The --mail-type and --mail-user directives tell Slurm to email you when something happens to your job. This is a huge quality-of-life upgrade — instead of running squeue every five minutes, you go do something else and let Pronghorn ping you.
#SBATCH --mail-user=you@example.com
#SBATCH --mail-type=ALL
Available --mail-type values:
| Value | Email when |
|---|---|
BEGIN |
The job starts running on a compute node |
END |
The job finishes normally |
FAIL |
The job fails (non-zero exit code, OOM, etc.) |
TIME_LIMIT_50 |
The job has used 50% of its requested time (good warning) |
TIME_LIMIT_90 |
90% of requested time used — about to time out |
TIME_LIMIT |
Hit the time limit (was killed) |
ALL |
All of the above |
NONE |
No emails (default) |
Why this matters:
- A long alignment job might run for hours. With
BEGIN+ENDyou know exactly when to come back and check results. FAILlets you debug quickly instead of finding out the next morning.TIME_LIMIT_50/TIME_LIMIT_90give you early warning so you canscontrol updatemore time before it gets killed (saves work!).
A typical professional setup:
#SBATCH --mail-user=jdoe@nevada.unr.edu
#SBATCH --mail-type=BEGIN,END,FAIL,TIME_LIMIT_90
Tip — use a real address
Use an inbox you actually check (your @nevada.unr.edu address works well). The email subject is something like
Slurm Job_id=12345 Name=trim_ATH Began, Queued time 00:01:23— easy to filter into a folder.
Step 10 — Job dependencies (chaining jobs automatically)
In a real pipeline, jobs are not independent — you can’t align reads until the FASTQ files finish downloading, can’t call variants until the BAMs are marked-duplicate, and so on. You could babysit each step (wait for step 1 to finish, then submit step 2, then wait again…), but Slurm gives you a much better option: --dependency.
A dependency tells Slurm “don’t run this job until job XYZ has finished.” You submit all your jobs at once, Slurm queues them, and each one starts only when its predecessors succeed.
The three dependency types you’ll use most
| Dependency | Meaning |
|---|---|
afterok:<JID> |
Start this job only if <JID> finished successfully (exit code 0). This is what you want 99% of the time. |
afterany:<JID> |
Start this job after <JID> finishes, regardless of success or failure. Use for cleanup / reporting steps that should always run. |
afternotok:<JID> |
Start only if <JID> failed. Useful for error-handling scripts. |
You can also depend on multiple jobs — separate IDs with a colon:
--dependency=afterok:12345:12346:12347 # only starts if ALL three succeeded
Getting the job ID — --parsable
To tell job B to depend on job A, you need job A’s ID. sbatch normally prints Submitted batch job 12345, which you’d have to parse. Instead, use --parsable: it prints just the number, perfect for capturing into a shell variable:
JOB_A=$(sbatch --parsable scripts/step_a.sh)
echo "Job A is: $JOB_A"     # → Job A is: 12345
Example — chain two jobs
Say you want trim.sh to run only after fastq-dump.sh finishes successfully:
# Submit the first job and capture its ID
DUMP_JID=$(sbatch --parsable fastq-dump.sh)

# Submit the second with a dependency on the first
TRIM_JID=$(sbatch --parsable --dependency=afterok:${DUMP_JID} trim.sh)

echo "fastq-dump: $DUMP_JID  →  trim: $TRIM_JID"
Both submissions complete immediately. Run squeue -u $USER:
JOBID  ST  TIME  NODELIST(REASON)
12345  R   0:42  cpu-3
12346  PD  0:00  (Dependency)        ← waiting for 12345
The second job shows state PD with reason (Dependency) — it’s alive but blocked until the first one succeeds.
Example — chain a whole pipeline
#!/bin/bash
# run_pipeline.sh — submit everything in one shot, correct order enforced by Slurm

DL=$(sbatch   --parsable                               01_download.sh)
REF=$(sbatch  --parsable                               02_reference.sh)
ALN=$(sbatch  --parsable --dependency=afterok:${DL}:${REF}  03_align.sh)
DUP=$(sbatch  --parsable --dependency=afterok:${ALN}        04_markdup.sh)
CALL=$(sbatch --parsable --dependency=afterok:${DUP}        05_variants.sh)

echo "Pipeline submitted:"
echo "  download     $DL"
echo "  reference    $REF"
echo "  align        $ALN"
echo "  markdup      $DUP"
echo "  variants     $CALL"
Submit with bash run_pipeline.sh — you hand Slurm the whole DAG at once, then walk away. Each step begins the moment its predecessors complete.
What happens if a job in the chain fails?
With
afterok, Slurm automatically cancels every downstream job that depended on the failed one — they never start. You’ll see them insacctasState=CANCELLEDwithReason=DependencyNeverSatisfied.This is exactly what you want: if alignment failed, don’t waste compute on variant calling against a broken BAM.
After you fix the failing step, resubmit only the broken step and its downstream jobs — update their
--dependencyto the new job ID.
Re-running a single failed step (drop
--dependency=)
--dependency=afterok:JIDis only needed when you submit a downstream job before the upstream job has finished. If the upstream step is already inCOMPLETEDstate and only one downstream step failed, just resubmit that one script with no--dependency=flag — there is nothing left to wait on.# When chaining (upstream not yet finished): JID2=$(sbatch --parsable --dependency=afterok:${JID1} step2.sh) # When step2 alone failed and step1 is already COMPLETED: sbatch step2.shFor an array job, override
--array=on the command line to redo only the failed task(s):sbatch --array=3 step.sh # re-run only task 3The four pipeline lessons (
resequencing_hpc.md,chipseq_hpc.md,HPC_RNA_SEQ.md) each list the exact per-script re-run commands for their own pipeline.
Cancel a whole pipeline at once
Since dependent jobs haven’t started yet, you can kill the entire pending chain with a single command:
scancel $DL $REF $ALN $DUP $CALL        # cancel by listed IDs
scancel -u $USER                        # nuclear: all your jobs
Common dependency pitfalls
Pitfalls
- Forgot
--parsable—$JOB_Aends up as the string"Submitted batch job 12345"andafterok:Submitted...is a syntax error. Always use--parsable.- Used
after:instead ofafterok:— plainafter:starts the job as soon as the predecessor starts (not finishes). Almost never what you want.- Chain broken by a trivial warning — if a tool exits with code 1 even though the result is usable, downstream jobs get cancelled. Use
afterany:for steps that should tolerate warnings, or fix the script’s exit code.- Dependency on a very old job ID — job IDs are reused after a while. Capture the ID in a variable the moment you submit; don’t hardcode a number you saw yesterday.
Status-at-a-glance commands
When you come back to the cluster after a few hours, these are the commands to run, in order:
# 1. What's still going?
squeue -u $USER

# 2. What just finished today?
sacct -u $USER --starttime=$(date +%Y-%m-%d) \
      --format=JobID,JobName,State,Elapsed,MaxRSS,ExitCode

# 3. How busy is the cluster overall (do I have a chance of starting soon)?
sinfo -s

# 4. Read the latest log to see what happened
ls -lt *.out | head    # newest log files first
tail -50 trim_12345.out
Debugging failed jobs — a step-by-step guide
Your job will fail at some point. That’s normal — even experienced users fail jobs regularly. The important thing is knowing how to figure out what went wrong. Here’s a systematic approach.
The 5-step debugging workflow
Every time a job fails (or produces wrong/empty output), follow these steps in order:
Step 1: What state is the job in?     → sacct
Step 2: What does the error file say? → cat *.err
Step 3: What does the log file say?   → tail *.out
Step 4: Can I reproduce the error?    → run the command interactively
Step 5: Fix and resubmit              → edit script, sbatch again
Step 1 — Check the job state with sacct
sacct -j <JOBID> --format=JobID,JobName,State,ExitCode,MaxRSS,Elapsed
The State and ExitCode columns tell you the category of failure:
| State | ExitCode | What happened | What to do |
|---|---|---|---|
COMPLETED |
0:0 |
Ran to the end successfully | If output is wrong, the bug is in your commands, not Slurm |
FAILED |
1:0 or 2:0 etc. |
Your script/command hit an error and exited | Go to Step 2 — read the error file |
FAILED |
0:1 |
Slurm killed the job (signal received) | Likely OOM — check Step 2 for oom-kill |
OUT_OF_MEMORY |
0:125 |
Ran out of RAM | Increase --mem (see “OOM” section below) |
TIMEOUT |
0:1 |
Hit the --time limit |
Increase --time, or your script is stuck in a loop |
CANCELLED |
0:0 |
You (or an admin) cancelled it | Intentional? If not, check if a hook or limit triggered it |
NODE_FAIL |
varies | The compute node crashed | Not your fault — just resubmit with sbatch |
Step 2 — Read the error file
# If you used separate -e:
cat <jobname>_<jobid>.err

# If you didn't use -e (everything in one file):
grep -in "error\|warn\|fail\|killed\|traceback\|exception\|abort\|segfault" <jobname>_<jobid>.out
Read the FIRST error. When one thing fails, it often causes a cascade of secondary errors. The first error is the root cause; everything after it is noise.
Step 3 — Read the end of the log file
tail -30 <jobname>_<jobid>.out
The last lines show you how far the script got before it died. Did it finish downloading sample 3 and die on sample 4? Did the very first command print command not found (meaning the env wasn’t active when you submitted)? This narrows the problem to one specific command.
Step 4 — Reproduce the error interactively
This is the most powerful debugging technique and the one beginners skip most often. Instead of resubmitting and waiting, start an interactive session on a compute node and run the failing command by hand:
# Request an interactive shell on a compute node (small, just for testing)
srun -A cpu-s5-bch709-6 -p cpu-core-0 --cpus-per-task=2 --mem=4g \
     --time=00:30:00 --pty bash
Now you’re on a compute node with a live terminal. Activate your environment and run the failing command manually:
micromamba activate RNASEQ_bch709

# Run the exact command that failed — copy it from your script
fastp --in1 raw_data/SRR1761506_1.fastq.gz --in2 raw_data/SRR1761506_2.fastq.gz ...
You’ll see the error happen in real time, with the full context. This is much faster than the submit-wait-check-log cycle.
Type exit to leave the interactive session when you’re done.
srunvssbatch
sbatch— batch mode: submit a script and walk away. Output goes to a log file.srun— interactive mode: opens a live terminal on a compute node. You type commands and see output immediately, like on the login node — but with compute-node resources.Use
srunfor testing and debugging. Usesbatchfor real work you want to run unattended.
Step 5 — Fix and resubmit
Once you know what went wrong, edit the script and submit again:
nano trim.sh            # fix the problem
sbatch trim.sh          # new job, new job ID
squeue -u $USER         # confirm it's queued
Don’t edit and re-submit blindly
Before resubmitting, clean up any partial output from the failed run. For example, if the download script fetched 3 of 6 runs before failing, those files are still in
~/scratch/rnaseq/raw_data/. Depending on the tool, leftover partial files can cause the next run to silently produce wrong results or skip steps.ls -lh ~/scratch/rnaseq/raw_data/ # check what's there # if partially downloaded: rm the incomplete file and resubmit
Common problems and how to fix them
Here are the most frequent failures, what they look like, and exactly how to fix each one.
Problem: command not found
trim.sh: line 14: fastp: command not found
Cause: You forgot to activate the Micromamba environment in your login shell before calling sbatch. Slurm submits with --export=ALL by default, so each batch job inherits your current shell’s PATH — but only if the env was active when you ran sbatch.
Fix: Activate the env in the login shell, then resubmit. Do NOT add micromamba activate inside the .sh file — that’s fragile and breaks the activation pattern used in this course:
# in your login shell:
micromamba activate RNASEQ_bch709
which fastp     # confirm: should print a path inside ~/micromamba/envs/RNASEQ_bch709/

sbatch trim.sh  # now this job inherits the right PATH
Why activation in the login shell carries over
By default
sbatch --export=ALLcopies the submitting shell’s environment (includingPATH) into the batch job. So activating the env in the login shell beforesbatchis enough — the compute node sees the samefastp,samtools, etc.If you open a new SSH session, the activation is lost. Just run
micromamba activate <env>again before submitting.
Problem: No such file or directory
fastp: error: cannot open raw_data/SRR1761506_1.fastq.gz: No such file or directory
Cause: Slurm runs your script in the directory where you ran sbatch. If you submitted from ~ but your data is in ~/scratch/, the paths don’t match.
Fix: Add an explicit cd at the top of your script:
#!/bin/bash
#SBATCH ...
cd ~/scratch/rnaseq                  # ← add this line
fastp --in1 raw_data/SRR1761506_1.fastq.gz ...
Or use absolute paths everywhere: --in1 ~/scratch/rnaseq/raw_data/SRR1761506_1.fastq.gz.
How to confirm: Run pwd right before the failing command (add echo "Running in: $(pwd)" to your script).
Problem: OUT_OF_MEMORY (OOM kill)
slurmstepd: error: Detected 1 oom_kill event in StepId=12345.batch. Some of the step tasks have been OOM Killed.
Cause: Your program tried to use more RAM than you reserved with --mem.
Debug:
# Check how much it actually used before dying
sacct -j 12345 --format=JobID,MaxRSS,ReqMem
Fix: Increase --mem. A safe rule: set it to 2x the MaxRSS from your last attempt (to leave headroom):
# Was:  #SBATCH --mem=4g    ← too small
# Now:  #SBATCH --mem=16g   ← doubled + headroom
Problem: TIMEOUT
CANCELLED AT 2026-04-16T10:00:00 DUE TO TIME LIMIT
Cause: The job ran longer than your --time setting.
Debug:
sacct -j 12345 --format=JobID,Elapsed,TimelimitRaw
Fix: Increase --time. Or check if your script is stuck in an infinite loop — look at the end of the log to see if it was making progress or repeating the same step.
Problem: Job stuck in PD (pending) forever
Debug:
squeue -j 12345 -o "%i %T %r"
# The last column shows the REASON
| Reason | Fix |
|---|---|
(Resources) |
Cluster is busy — just wait. Or reduce --mem/--cpus-per-task to fit on more nodes. |
(Priority) |
Higher-priority jobs are ahead of you — wait. |
(QOSMaxJobsPerUserLimit) |
You have too many jobs running — wait for some to finish, or scancel ones you don’t need. |
(InvalidAccount) |
Wrong --account — re-check with sacctmgr show user $USER withassoc ... |
Problem: Tool runs but uses only 1 core (slow)
Cause: Slurm reserved 8 cores for you, but the tool doesn’t automatically use them — most bioinformatics tools need an explicit flag.
Fix: Match the tool’s thread flag to --cpus-per-task:
#SBATCH --cpus-per-task=8

# Each tool has its own flag name:
fastp    --thread 8
samtools -@ 8
STAR     --runThreadN 8
minimap2 -t 8
If --cpus-per-task=8 but the tool doesn’t have a threads flag, you’re wasting 7 cores. Drop --cpus-per-task to 1.
Problem: Job finishes but output files are empty or missing
Possible causes:
- Wrong output path — the files were written somewhere else. Check
pwdin the script and the--outdir/--outflags. - Input file was empty — the previous step failed silently. Check input file sizes:
ls -lh raw_data/*.fastq.gz(0 bytes = empty). - Tool failed but exit code was 0 — some tools don’t return proper error codes. Always check the log for warning messages even when
sacctsaysCOMPLETED.
Debug approach:
# 1. Where did the script run?
grep "pwd\|Running in" myjob_12345.out

# 2. Are the input files real?
ls -lh ~/scratch/rnaseq/raw_data/*.fastq.gz    # 0 bytes = problem

# 3. Any hidden warnings?
grep -i "warn\|skip\|empty\|0 reads" myjob_12345.out
The golden rule of debugging
Change ONE thing at a time, then resubmit. If you change
--mem,--time, and the command all at once, you won’t know which fix actually solved the problem — and you’ll be lost again next time.
Workflow: Download and Clean RNA-Seq Data
Now that you can submit jobs, let’s put everything together in a real workflow: download published RNA-Seq data, then quality-trim it so it’s ready for alignment in the next lesson.
What is the SRA?
The Sequence Read Archive (SRA) is NCBI’s giant public archive of raw sequencing data — every published genomics paper that includes sequencing usually deposits its reads here so others can re-analyze them. As of today it stores tens of petabytes from every kind of organism and experiment.
SRA organizes data in a tree:
- BioProject (
PRJNA…) — the umbrella for one study (e.g., “ROS1 demethylation in Arabidopsis”).- BioSample (
SAMN…) — one biological sample within the study.- Run (
SRR…) — one actual sequencing run; this is the file you download.When a paper says “sequencing data are available at SRA accession PRJNA272719”, you go to that page, list its runs, and download the
SRR…IDs you want.
The dataset we’ll use (Arabidopsis ABA response)
The authors compared Arabidopsis thaliana seedlings with and without ABA (abscisic acid) treatment, with three biological replicates per condition. We’ll use 6 of their RNA-Seq runs (3 wild-type + 3 ABA-treated).
BioProject page
The full project page on NCBI:
https://www.ncbi.nlm.nih.gov/bioproject/PRJNA272719
Full run table (from NCBI’s “Run Selector”)
This is the metadata table you would download from NCBI to see every run in the project. Don’t worry about reading it cell-by-cell — the columns we actually care about for this exercise are Run (the SRR ID), LibraryStrategy (RNA-Seq), LibraryLayout (PAIRED = two FASTQ files per run), and ScientificName.
| Run | ReleaseDate | LoadDate | spots | bases | spots_with_mates | avgLength | size_MB | AssemblyName | download_path | Experiment | LibraryName | LibraryStrategy | LibrarySelection | LibrarySource | LibraryLayout | InsertSize | InsertDev | Platform | Model | SRAStudy | BioProject | Study_Pubmed_id | ProjectID | Sample | BioSample | SampleType | TaxID | ScientificName | SampleName | g1k_pop_code | source | g1k_analysis_group | Subject_ID | Sex | Disease | Tumor | Affection_Status | Analyte_Type | Histological_Type | Body_Site | CenterName | Submission | dbgap_study_accession | Consent | RunHash | ReadHash |
|---|---|---|---|---|---|---|---|---|---|---|---|---|---|---|---|---|---|---|---|---|---|---|---|---|---|---|---|---|---|---|---|---|---|---|---|---|---|---|---|---|---|---|---|---|---|---|
| SRR1761506 | 1/15/2016 15:51 | 1/15/2015 12:43 | 7379945 | 1490748890 | 7379945 | 202 | 899 | https://sra-downloadb.be-md.ncbi.nlm.nih.gov/sos1/sra-pub-run-5/SRR1761506/SRR1761506.1 | SRX844600 | RNA-Seq | cDNA | TRANSCRIPTOMIC | PAIRED | 0 | 0 | ILLUMINA | Illumina HiSeq 2500 | SRP052302 | PRJNA272719 | 3 | 272719 | SRS820503 | SAMN03285048 | simple | 3702 | Arabidopsis thaliana | GSM1585887 | no | GEO | SRA232612 | public | F335FB96DDD730AC6D3AE4F6683BF234 | 12818EB5275BCB7BCB815E147BFD0619 | |||||||||||||
| SRR1761507 | 1/15/2016 15:51 | 1/15/2015 12:43 | 9182965 | 1854958930 | 9182965 | 202 | 1123 | https://sra-downloadb.be-md.ncbi.nlm.nih.gov/sos1/sra-pub-run-5/SRR1761507/SRR1761507.1 | SRX844601 | RNA-Seq | cDNA | TRANSCRIPTOMIC | PAIRED | 0 | 0 | ILLUMINA | Illumina HiSeq 2500 | SRP052302 | PRJNA272719 | 3 | 272719 | SRS820504 | SAMN03285045 | simple | 3702 | Arabidopsis thaliana | GSM1585888 | no | GEO | SRA232612 | public | 00FD62759BF7BBAEF123BF5960B2A616 | A61DCD3B96AB0796AB5E969F24F81B76 | |||||||||||||
| SRR1761508 | 1/15/2016 15:51 | 1/15/2015 12:47 | 19060611 | 3850243422 | 19060611 | 202 | 2324 | https://sra-downloadb.be-md.ncbi.nlm.nih.gov/sos1/sra-pub-run-5/SRR1761508/SRR1761508.1 | SRX844602 | RNA-Seq | cDNA | TRANSCRIPTOMIC | PAIRED | 0 | 0 | ILLUMINA | Illumina HiSeq 2500 | SRP052302 | PRJNA272719 | 3 | 272719 | SRS820505 | SAMN03285046 | simple | 3702 | Arabidopsis thaliana | GSM1585889 | no | GEO | SRA232612 | public | B75A3E64E88B1900102264522D2281CB | 657987ABC8043768E99BD82947608CAC | |||||||||||||
| SRR1761509 | 1/15/2016 15:51 | 1/15/2015 12:51 | 16555739 | 3344259278 | 16555739 | 202 | 2016 | https://sra-downloadb.be-md.ncbi.nlm.nih.gov/sos1/sra-pub-run-5/SRR1761509/SRR1761509.1 | SRX844603 | RNA-Seq | cDNA | TRANSCRIPTOMIC | PAIRED | 0 | 0 | ILLUMINA | Illumina HiSeq 2500 | SRP052302 | PRJNA272719 | 3 | 272719 | SRS820506 | SAMN03285049 | simple | 3702 | Arabidopsis thaliana | GSM1585890 | no | GEO | SRA232612 | public | 27CA2B82B69EEF56EAF53D3F464EEB7B | 2B56CA09F3655F4BBB412FD2EE8D956C | |||||||||||||
| SRR1761510 | 1/15/2016 15:51 | 1/15/2015 12:46 | 12700942 | 2565590284 | 12700942 | 202 | 1552 | https://sra-downloadb.be-md.ncbi.nlm.nih.gov/sos1/sra-pub-run-5/SRR1761510/SRR1761510.1 | SRX844604 | RNA-Seq | cDNA | TRANSCRIPTOMIC | PAIRED | 0 | 0 | ILLUMINA | Illumina HiSeq 2500 | SRP052302 | PRJNA272719 | 3 | 272719 | SRS820508 | SAMN03285050 | simple | 3702 | Arabidopsis thaliana | GSM1585891 | no | GEO | SRA232612 | public | D3901795C7ED74B8850480132F4688DA | 476A9484DCFCF9FFFDAADAAF4CE5D0EA | |||||||||||||
| SRR1761511 | 1/15/2016 15:51 | 1/15/2015 12:44 | 13353992 | 2697506384 | 13353992 | 202 | 1639 | https://sra-downloadb.be-md.ncbi.nlm.nih.gov/sos1/sra-pub-run-5/SRR1761511/SRR1761511.1 | SRX844605 | RNA-Seq | cDNA | TRANSCRIPTOMIC | PAIRED | 0 | 0 | ILLUMINA | Illumina HiSeq 2500 | SRP052302 | PRJNA272719 | 3 | 272719 | SRS820507 | SAMN03285047 | simple | 3702 | Arabidopsis thaliana | GSM1585892 | no | GEO | SRA232612 | public | 5078379601081319FCBF67C7465C404A | E3B4195AFEA115ACDA6DEF6E4AA7D8DF | |||||||||||||
| SRR1761512 | 1/15/2016 15:51 | 1/15/2015 12:44 | 8134575 | 1643184150 | 8134575 | 202 | 1067 | https://sra-downloadb.be-md.ncbi.nlm.nih.gov/sos1/sra-pub-run-5/SRR1761512/SRR1761512.1 | SRX844606 | RNA-Seq | cDNA | TRANSCRIPTOMIC | PAIRED | 0 | 0 | ILLUMINA | Illumina HiSeq 2500 | SRP052302 | PRJNA272719 | 3 | 272719 | SRS820509 | SAMN03285051 | simple | 3702 | Arabidopsis thaliana | GSM1585893 | no | GEO | SRA232612 | public | DDB8F763B71B1E29CC9C1F4C53D88D07 | 8F31604D3A4120A50B2E49329A786FA6 | |||||||||||||
| SRR1761513 | 1/15/2016 15:51 | 1/15/2015 12:43 | 7333641 | 1481395482 | 7333641 | 202 | 960 | https://sra-downloadb.be-md.ncbi.nlm.nih.gov/sos1/sra-pub-run-5/SRR1761513/SRR1761513.1 | SRX844607 | RNA-Seq | cDNA | TRANSCRIPTOMIC | PAIRED | 0 | 0 | ILLUMINA | Illumina HiSeq 2500 | SRP052302 | PRJNA272719 | 3 | 272719 | SRS820510 | SAMN03285053 | simple | 3702 | Arabidopsis thaliana | GSM1585894 | no | GEO | SRA232612 | public | 4068AE245EB0A81DFF02889D35864AF2 | 8E05C4BC316FBDFEBAA3099C54E7517B | |||||||||||||
| SRR1761514 | 1/15/2016 15:51 | 1/15/2015 12:44 | 6160111 | 1244342422 | 6160111 | 202 | 807 | https://sra-downloadb.be-md.ncbi.nlm.nih.gov/sos1/sra-pub-run-5/SRR1761514/SRR1761514.1 | SRX844608 | RNA-Seq | cDNA | TRANSCRIPTOMIC | PAIRED | 0 | 0 | ILLUMINA | Illumina HiSeq 2500 | SRP052302 | PRJNA272719 | 3 | 272719 | SRS820511 | SAMN03285059 | simple | 3702 | Arabidopsis thaliana | GSM1585895 | no | GEO | SRA232612 | public | 0A1F3E9192E7F9F4B3758B1CE514D264 | 81BFDB94C797624B34AFFEB554CE4D98 | |||||||||||||
| SRR1761515 | 1/15/2016 15:51 | 1/15/2015 12:44 | 7988876 | 1613752952 | 7988876 | 202 | 1048 | https://sra-downloadb.be-md.ncbi.nlm.nih.gov/sos1/sra-pub-run-5/SRR1761515/SRR1761515.1 | SRX844609 | RNA-Seq | cDNA | TRANSCRIPTOMIC | PAIRED | 0 | 0 | ILLUMINA | Illumina HiSeq 2500 | SRP052302 | PRJNA272719 | 3 | 272719 | SRS820512 | SAMN03285054 | simple | 3702 | Arabidopsis thaliana | GSM1585896 | no | GEO | SRA232612 | public | 39B37A0BD484C736616C5B0A45194525 | 85B031D74DF90AD1815AA1BBBF1F12BD | |||||||||||||
| SRR1761516 | 1/15/2016 15:51 | 1/15/2015 12:44 | 8770090 | 1771558180 | 8770090 | 202 | 1152 | https://sra-downloadb.be-md.ncbi.nlm.nih.gov/sos1/sra-pub-run-5/SRR1761516/SRR1761516.1 | SRX844610 | RNA-Seq | cDNA | TRANSCRIPTOMIC | PAIRED | 0 | 0 | ILLUMINA | Illumina HiSeq 2500 | SRP052302 | PRJNA272719 | 3 | 272719 | SRS820514 | SAMN03285055 | simple | 3702 | Arabidopsis thaliana | GSM1585897 | no | GEO | SRA232612 | public | E4728DFBF0F9F04B89A5B041FA570EB3 | B96545CB9C4C3EE1C9F1E8B3D4CE9D24 | |||||||||||||
| SRR1761517 | 1/15/2016 15:51 | 1/15/2015 12:44 | 8229157 | 1662289714 | 8229157 | 202 | 1075 | https://sra-downloadb.be-md.ncbi.nlm.nih.gov/sos1/sra-pub-run-5/SRR1761517/SRR1761517.1 | SRX844611 | RNA-Seq | cDNA | TRANSCRIPTOMIC | PAIRED | 0 | 0 | ILLUMINA | Illumina HiSeq 2500 | SRP052302 | PRJNA272719 | 3 | 272719 | SRS820513 | SAMN03285058 | simple | 3702 | Arabidopsis thaliana | GSM1585898 | no | GEO | SRA232612 | public | C05BC519960B075038834458514473EB | 4EF7877FC59FF5214DBF2E2FE36D67C5 | |||||||||||||
| SRR1761518 | 1/15/2016 15:51 | 1/15/2015 12:44 | 8760931 | 1769708062 | 8760931 | 202 | 1072 | https://sra-downloadb.be-md.ncbi.nlm.nih.gov/sos1/sra-pub-run-5/SRR1761518/SRR1761518.1 | SRX844612 | RNA-Seq | cDNA | TRANSCRIPTOMIC | PAIRED | 0 | 0 | ILLUMINA | Illumina HiSeq 2500 | SRP052302 | PRJNA272719 | 3 | 272719 | SRS820515 | SAMN03285052 | simple | 3702 | Arabidopsis thaliana | GSM1585899 | no | GEO | SRA232612 | public | 7D8333182062545CECD5308A222FF506 | 382F586C4BF74E474D8F9282E36BE4EC | |||||||||||||
| SRR1761519 | 1/15/2016 15:51 | 1/15/2015 12:44 | 6643107 | 1341907614 | 6643107 | 202 | 811 | https://sra-downloadb.be-md.ncbi.nlm.nih.gov/sos1/sra-pub-run-5/SRR1761519/SRR1761519.1 | SRX844613 | RNA-Seq | cDNA | TRANSCRIPTOMIC | PAIRED | 0 | 0 | ILLUMINA | Illumina HiSeq 2500 | SRP052302 | PRJNA272719 | 3 | 272719 | SRS820516 | SAMN03285056 | simple | 3702 | Arabidopsis thaliana | GSM1585900 | no | GEO | SRA232612 | public | 163BD8073D7E128D8AD1B253A722DD08 | DFBCC891EB5FA97490E32935E54C9E14 | |||||||||||||
| SRR1761520 | 1/15/2016 15:51 | 1/15/2015 12:44 | 8506472 | 1718307344 | 8506472 | 202 | 1040 | https://sra-downloadb.be-md.ncbi.nlm.nih.gov/sos1/sra-pub-run-5/SRR1761520/SRR1761520.1 | SRX844614 | RNA-Seq | cDNA | TRANSCRIPTOMIC | PAIRED | 0 | 0 | ILLUMINA | Illumina HiSeq 2500 | SRP052302 | PRJNA272719 | 3 | 272719 | SRS820517 | SAMN03285062 | simple | 3702 | Arabidopsis thaliana | GSM1585901 | no | GEO | SRA232612 | public | 791BD0D8840AA5F1D74E396668638DA1 | AF4694425D34F84095F6CFD6F4A09936 | |||||||||||||
| SRR1761521 | 1/15/2016 15:51 | 1/15/2015 12:46 | 13166085 | 2659549170 | 13166085 | 202 | 1609 | https://sra-downloadb.be-md.ncbi.nlm.nih.gov/sos1/sra-pub-run-5/SRR1761521/SRR1761521.1 | SRX844615 | RNA-Seq | cDNA | TRANSCRIPTOMIC | PAIRED | 0 | 0 | ILLUMINA | Illumina HiSeq 2500 | SRP052302 | PRJNA272719 | 3 | 272719 | SRS820518 | SAMN03285057 | simple | 3702 | Arabidopsis thaliana | GSM1585902 | no | GEO | SRA232612 | public | 47C40480E9B7DB62B4BEE0F2193D16B3 | 1443C58A943C07D3275AB12DC31644A9 | |||||||||||||
| SRR1761522 | 1/15/2016 15:51 | 1/15/2015 12:49 | 9496483 | 1918289566 | 9496483 | 202 | 1162 | https://sra-downloadb.be-md.ncbi.nlm.nih.gov/sos1/sra-pub-run-5/SRR1761522/SRR1761522.1 | SRX844616 | RNA-Seq | cDNA | TRANSCRIPTOMIC | PAIRED | 0 | 0 | ILLUMINA | Illumina HiSeq 2500 | SRP052302 | PRJNA272719 | 3 | 272719 | SRS820519 | SAMN03285061 | simple | 3702 | Arabidopsis thaliana | GSM1585903 | no | GEO | SRA232612 | public | BB05DF11E1F95427530D69DB5E0FA667 | 7706862FB2DF957E4041D2064A691CF6 | |||||||||||||
| SRR1761523 | 1/15/2016 15:51 | 1/15/2015 12:46 | 14999315 | 3029861630 | 14999315 | 202 | 1832 | https://sra-downloadb.be-md.ncbi.nlm.nih.gov/sos1/sra-pub-run-5/SRR1761523/SRR1761523.1 | SRX844617 | RNA-Seq | cDNA | TRANSCRIPTOMIC | PAIRED | 0 | 0 | ILLUMINA | Illumina HiSeq 2500 | SRP052302 | PRJNA272719 | 3 | 272719 | SRS820520 | SAMN03285060 | simple | 3702 | Arabidopsis thaliana | GSM1585904 | no | GEO | SRA232612 | public | 101D3A151E632224C09A702BD2F59CF5 | 0AC99FAA6B8941F89FFCBB8B1910696E |
The 6 runs we’ll actually use
To keep things manageable, we’ll only download 6 of the 18 runs — three replicates per condition:
| Sample | Run | Condition |
|---|---|---|
| WT_rep1 | SRR1761506 | Wild type |
| WT_rep2 | SRR1761507 | Wild type |
| WT_rep3 | SRR1761508 | Wild type |
| ABA_rep1 | SRR1761509 | ABA-treated |
| ABA_rep2 | SRR1761510 | ABA-treated |
| ABA_rep3 | SRR1761511 | ABA-treated |
Workflow Step 1 — Download reads from ENA
The data on NCBI’s SRA is stored in a compressed .sra format. NCBI’s own tool (fastq-dump/prefetch, from the sra-tools package) is built against a newer GLIBC than Pronghorn’s system libc, so its binary crashes on our compute nodes (GLIBC_2.27 not found). The simplest fix: pull the same data from ENA (the European Nucleotide Archive at EBI), which mirrors every SRA run and serves the FASTQ files already gzipped over plain HTTPS — no special tool needed, just curl.
Each of these 6 runs is several hundred MB to a few GB, and downloading takes minutes per file — way too long for the login node. So we package the work as a Slurm batch script and let a compute node do it.
Activate the environment in your login shell first (once per session — sbatch will then inherit the PATH automatically, see the 🔑 activation callout earlier):
micromamba activate RNASEQ_bch709
which curl     # `curl` is always available; this just confirms PATH is sane
Then make a place for the downloads (inside scratch — these are large data files):
mkdir -p ~/scratch/rnaseq/raw_data
cd ~/scratch/rnaseq
nano fastq-dump.sh
Paste in this batch script (remember to edit --mail-user to your real address):
#!/bin/bash
#SBATCH --job-name=fastqdump_ATH
#SBATCH --account=cpu-s5-bch709-6
#SBATCH --partition=cpu-core-0
#SBATCH --cpus-per-task=2
#SBATCH --time=2-15:00:00            # generous: up to 2 days 15 hours
#SBATCH --mem=16g
#SBATCH --mail-type=ALL
#SBATCH --mail-user=<YOUR_EMAIL>
#SBATCH -o fastq-dump.out            # log goes here

# NOTE: activate the env ONCE in your login shell before `sbatch` —
# sbatch --export=ALL is the default, so this job inherits the PATH.
# Don't put `micromamba activate` inside the script.

set -euo pipefail
mkdir -p ~/scratch/rnaseq/raw_data

# For each run, ask ENA for the exact fastq URLs (handles SE/PE/multi-file
# automatically) and download every file with curl.
for SRR in SRR1761506 SRR1761507 SRR1761508 SRR1761509 SRR1761510 SRR1761511; do
  echo "[fastq] ${SRR} — querying ENA"
  URLS=$(curl -fsSL --retry 3 --max-time 60 \
          "https://www.ebi.ac.uk/ena/portal/api/filereport?accession=${SRR}&result=read_run&fields=fastq_ftp&format=tsv" \
          | tail -n +2 | awk -F'\t' '{print $NF}' | tr ';' '\n' | sed '/^$/d')
  [ -n "${URLS}" ] || { echo "ERROR: ENA returned no fastq URLs for ${SRR}"; exit 1; }
  for U in ${URLS}; do
    OUT=~/scratch/rnaseq/raw_data/$(basename "${U}")
    # Skip-by-existence removed intentionally — a partial download (e.g. a
    # 960 MB chunk of a 1.2 GB file from a previous job that was cancelled
    # mid-stream) would silently pass `[ -s "${OUT}" ]` and corrupt the
    # rest of the pipeline. `curl -C -` below either resumes such partials
    # or exits cleanly when the file is already complete.
    echo "[fastq] ${SRR} -> https://${U}"
    # --retry-all-errors: retry on SSL eof / connection drops (EBI HTTPS
    #   regularly drops mid-stream on >1 GB transfers; without this flag,
    #   curl --retry only retries on HTTP 5xx and exits 56 on SSL eof).
    # -C -: resume partial downloads. If ${OUT} is already complete, curl
    #   detects it and exits cleanly without re-downloading.
    # --retry bumped to 5 for headroom on consecutive drops.
    curl -fsSL --retry 5 --retry-all-errors --retry-delay 30 \
         --max-time 3600 -C - -o "${OUT}" "https://${U}"
  done
done
Submit and watch it — capture the job ID with --parsable so the next step (trim) can depend on it:
DUMP_JID=$(sbatch --parsable fastq-dump.sh)
echo "fastq-dump job: $DUMP_JID"
squeue -u $USER         # check it landed in the queue
tail -f fastq-dump.out  # follow progress live (Ctrl-C to stop watching)
What the script does, line by line:
| Step | Why it’s there |
|---|---|
curl … filereport?accession=${SRR}… |
Asks ENA’s metadata API for this run’s fastq URLs. Returns a TSV; awk -F'\t' '{print $NF}' grabs the last column (fastq_ftp). |
tr ';' '\n' |
Paired-end runs return both R1 and R2 separated by ; — split them onto separate lines. |
https://${U} |
The API returns ftp.sra.ebi.ac.uk paths without a protocol; we just prepend https://. |
curl --retry 5 --retry-all-errors -C - |
EBI HTTPS regularly drops mid-stream on >1 GB transfers; --retry-all-errors retries on SSL eof (curl 7.71+), and -C - resumes partial files instead of restarting at byte 0. |
When the job finishes you should see 12 files (SRR1761506_1.fastq.gz, SRR1761506_2.fastq.gz, …) in ~/scratch/rnaseq/raw_data/. Confirm with:
ls -lh ~/scratch/rnaseq/raw_data/
Workflow Step 2 — Quality trim with fastp
Raw sequencing reads aren’t perfect: they often have leftover adapter sequences from library prep and low-quality bases, especially near the ends. We clean these up before alignment.
fastp does three things in one fast pass:
- Detects and trims adapter sequences,
- Trims/discards low-quality bases and reads,
- Writes an HTML quality-control report you can open in a browser.
Create the trimming script:
cd ~/scratch/rnaseq
nano trim.sh
#!/bin/bash
#SBATCH --job-name=trim_ATH
#SBATCH --account=cpu-s5-bch709-6
#SBATCH --partition=cpu-core-0
#SBATCH --cpus-per-task=2
#SBATCH --time=2-15:00:00
#SBATCH --mem=16g
#SBATCH --mail-type=ALL
#SBATCH --mail-user=<YOUR_EMAIL>
#SBATCH -o trim.out

# Activate the env ONCE in your login shell before `sbatch`; don't put it here.
mkdir -p trim

# Loop over each sample so we don't have to repeat the command 6 times
for SRR in SRR1761506 SRR1761507 SRR1761508 SRR1761509 SRR1761510 SRR1761511; do
  fastp \
    --in1  raw_data/${SRR}_1.fastq.gz \
    --in2  raw_data/${SRR}_2.fastq.gz \
    --out1 trim/${SRR}_1.trimmed.fq.gz \
    --out2 trim/${SRR}_2.trimmed.fq.gz \
    --detect_adapter_for_pe \
    --qualified_quality_phred 20 \
    --length_required 50 \
    --thread 2 \
    --html trim/${SRR}_fastp.html \
    --json trim/${SRR}_fastp.json
done
Submit it with a dependency on the fastq-dump job — Slurm will hold this job until the previous one finishes successfully, so you can submit it immediately (no waiting):
TRIM_JID=$(sbatch --parsable --dependency=afterok:${DUMP_JID} trim.sh)
echo "trim job: $TRIM_JID  (waiting on $DUMP_JID)"
squeue -u $USER
# the trim job shows state PD with reason (Dependency) until fastq-dump finishes
Lost the
$DUMP_JIDvariable? (e.g. closed the terminal)Look up the job ID with
squeue -u $USERorsacct -u $USER --starttime=todayand plug it in directly:TRIM_JID=$(sbatch --parsable --dependency=afterok:12345 trim.sh)See the Step 10 — Job dependencies section for a full explanation of
--dependencyand--parsable.
What the key fastp flags mean:
| Flag | What it does |
|---|---|
--in1 / --in2 |
The two paired FASTQ files (R1 and R2) |
--out1 / --out2 |
Where to write the trimmed reads |
--detect_adapter_for_pe |
Automatically figure out which adapter sequences were used (don’t have to specify) |
--qualified_quality_phred 20 |
Treat any base with quality below Phred 20 (= 1% error rate) as “bad” |
--length_required 50 |
After trimming, throw away reads shorter than 50 bp (too short to align reliably) |
--thread 2 |
Use 2 CPU cores — must match --cpus-per-task above, otherwise you waste cores or oversubscribe |
--html / --json |
Write a per-sample QC report you can open in a browser (HTML) or parse with a script (JSON) |
When the job finishes, copy one of the HTML reports to your laptop with rsync and open it in a browser to see before/after quality plots:
# from your laptop's terminal:
rsync -avhP <username>@pronghorn.rc.unr.edu:~/scratch/rnaseq/trim/SRR1761506_fastp.html ~/Downloads/
open ~/Downloads/SRR1761506_fastp.html      # Mac
explorer.exe SRR1761506_fastp.html          # Windows (WSL)
You now have clean, trimmed reads in ~/scratch/rnaseq/trim/ — ready for alignment.
➡️ Continue: STAR alignment + counting in the RNA-Seq lesson
The next stages (reference download → STAR index → alignment → featureCounts → MultiQC → DE analysis) live in the HPC RNA-Seq lesson. It’s set up to reuse the
~/scratch/rnaseq/raw_data/and~/scratch/rnaseq/trim/outputs you just produced — see the “🔁 Already ran fastq-dump + trim in HPC_cluster?” callout near the top of that lesson for the one-line symlink trick.
Stuck? Getting Help
Everyone gets stuck on HPC. Here’s how to unstick yourself — and how to ask for help when you can’t.
Self-help checklist (try these first, in order)
Before asking anyone, run through this list. 80% of issues are solved by step 1 or 2:
- Read the error message. The first or last line usually tells you exactly what’s wrong (see the Reading and decoding error messages section).
- Check where you are. Run
hostnameandpwd— are you on the right machine and in the right folder? - Check the log file. For Slurm jobs,
cat <jobname>_<jobid>.outandcat <jobname>_<jobid>.err. - Check the job state.
sacct -j <jobid>will show if it failed, ran out of memory, or timed out. - Did you activate the environment in the login shell BEFORE
sbatch? Runwhich fastp— it should print a path inside~/micromamba/envs/RNASEQ_bch709/. If it says “not found,” runmicromamba activate RNASEQ_bch709and resubmit. (Don’t putmicromamba activateinside the.shfile.) - Is the file actually there?
ls -la <path>— Tab-complete to avoid typos. - Do you have disk space?
df -h ~anddf -h ~/scratch. - Re-read the command — typos in
--account,--partition, or paths are by far the most common bugs.
How to ask for help (so you actually get help)
Vague questions get vague answers. When asking the instructor or a classmate, include all four of these:
- What you tried — paste the exact command you ran.
- What you expected to happen.
- What actually happened — paste the full error message (use a code block, not a screenshot).
- What you’ve already checked — “I confirmed the file exists with
ls, andwhich fastpshows the right path.”
Bad vs. good question
❌ “My job doesn’t work, can you help?”
✅ “I submitted
trim.sh(job 12345) and it failed withOUT_OF_MEMORYaccording tosacct. The script asks for--mem=4g, fastp processes a 2 GB FASTQ. Should I bump it to 8 G or is something else going on?”
Where to get help
| Problem | Who to ask |
|---|---|
| Course material, this lesson, your specific assignment | The instructor / TA |
| Account/login problems, can’t SSH, password reset | UNR Research Computing (HPC team) — see the Pronghorn page |
| A bioinformatics tool’s flags or output | The tool’s own documentation (fastp --help, samtools --help, GitHub README) |
| General Linux / Slurm command syntax | man <command> (e.g., man sbatch), or search “slurm sbatch examples” |
The man page (built-in manual)
Almost every command has a manual. Press q to quit:
man ls           # documentation for ls
man sbatch       # documentation for sbatch
sbatch --help    # quick summary of options (for most tools)
Quick Reference Cheat Sheet
A one-page summary of everything in this lesson — bookmark it.
Connect
ssh <netid>@pronghorn.rc.unr.edu       # log in
exit                                   # log out
Move files (run from your laptop)
scp file.txt   <netid>@pronghorn.rc.unr.edu:~/      # upload one file
scp -r mydir   <netid>@pronghorn.rc.unr.edu:~/      # upload a folder
scp <netid>@pronghorn.rc.unr.edu:~/result.csv ./    # download
rsync -avhP mydir/ <netid>@pronghorn.rc.unr.edu:~/dir/   # smart copy
Storage
~/                  # home — small, backed up, for code
~/scratch           # scratch — huge, fast, NOT backed up, for data
Software (Micromamba)
micromamba activate RNASEQ_bch709     # turn on the environment
micromamba deactivate                  # turn it off
micromamba env list                    # list environments
Slurm — check what you can use
sacctmgr show user $USER withassoc \
        format=User%15,Account%30,Partition%30,QOS%20    # your account/partition/QOS
sinfo -s                                                  # cluster status
Slurm — submit & monitor
# Quick one-line test (no script file)
sbatch -A cpu-s5-bch709-6 -p cpu-core-0 --time=00:10:00 \
       --wrap="echo Hello from \$(hostname)"

sbatch submit.sh                       # submit a real script
squeue -u $USER                        # see your jobs
squeue -j 12345 --start                # estimated start time for a pending job
watch -n 5 'squeue -u $USER'           # live monitor (Ctrl-C to quit)
scancel 12345                          # cancel one job
scancel -u $USER                       # cancel ALL your jobs
sacct -j 12345 --format=JobID,State,Elapsed,MaxRSS,ExitCode   # post-mortem
tail -f trim_12345.out                 # follow log live
Slurm — chain jobs with dependencies
JID1=$(sbatch --parsable step1.sh)                                    # capture job ID
JID2=$(sbatch --parsable --dependency=afterok:${JID1} step2.sh)       # chain
JID3=$(sbatch --parsable --dependency=afterok:${JID2} step3.sh)
# afterok = start only if predecessor succeeded (most common)
# afterany = start regardless of success/failure
# afternotok = start only if predecessor FAILED
Minimal #SBATCH header
#!/bin/bash
#SBATCH --job-name=myjob
#SBATCH --account=cpu-s5-bch709-6
#SBATCH --partition=cpu-core-0
#SBATCH --cpus-per-task=2
#SBATCH --mem=8g
#SBATCH --time=02:00:00
#SBATCH --mail-type=BEGIN,END,FAIL
#SBATCH --mail-user=you@nevada.unr.edu
#SBATCH -o myjob_%j.out
References
- UNR Research Computing (Pronghorn): https://www.unr.edu/research-computing/hpc
- Slurm workload manager: https://slurm.schedmd.com/
- Micromamba: https://mamba.readthedocs.io/en/latest/user_guide/micromamba.html
- Bioconda: https://bioconda.github.io/
- SRA Toolkit: https://github.com/ncbi/sra-tools
- fastp: https://github.com/OpenGene/fastp